How to set up the notification
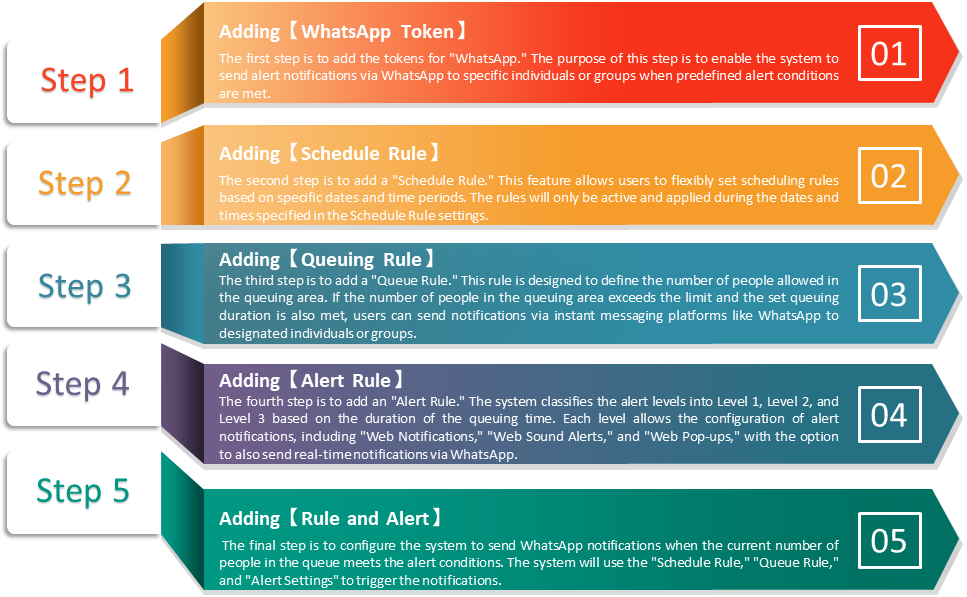
If users want to send notifications to the supervisor when the queue size meets the alert condition, we strongly recommend that users follow the five steps below to configure the alert notifications. Each of these five configuration steps is mandatory and must be completed in sequence, without exception.
For sending notifications, we have set up a scenario to explain how the notifications work and how to configure the function step by step. See below.
Scenario
Scene Background
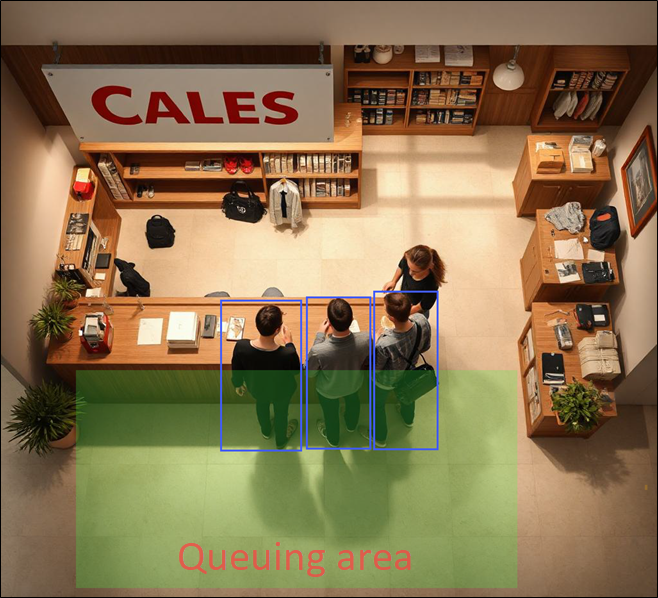
Jasmine is a store manager. She wants to provide a good shopping experience for customers without long waiting times, so she wants to receive WhatsApp notifications when the queue size exceeds 3 people and the waiting time is over 2 minutes. To achieve this, please follow the steps below to set up the notification system.
Step 1. Adding「WhatsApp Token」
Add WhatsApp notification sender and receiver.
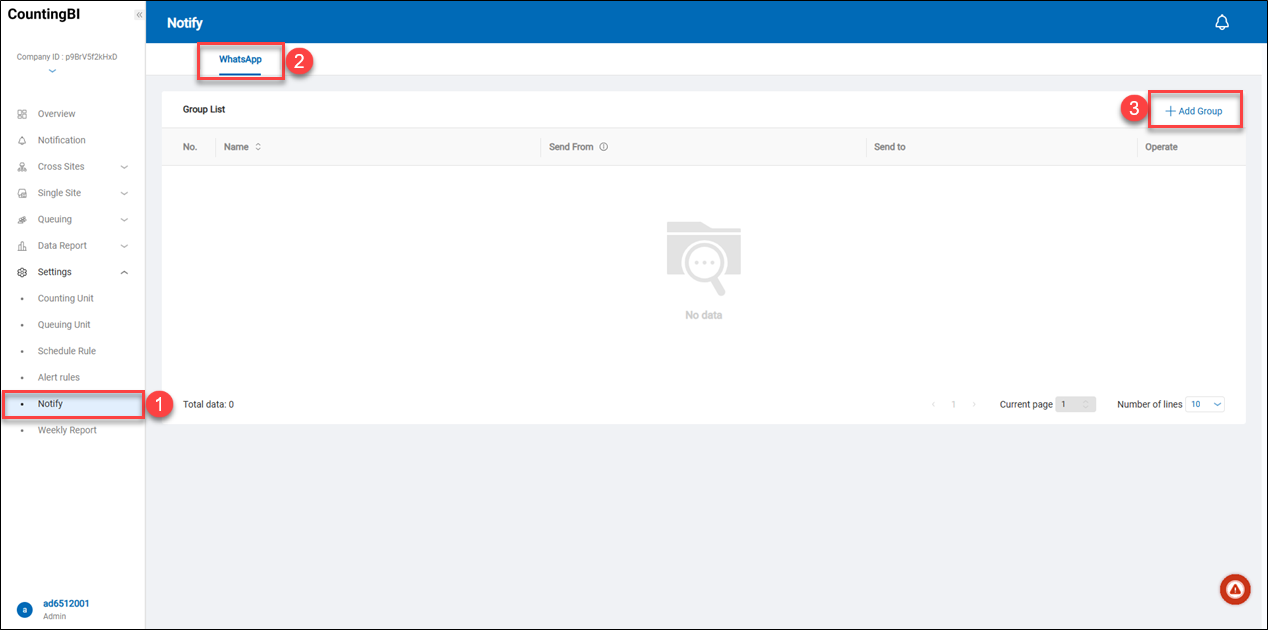 1: Navigate to 'Settings' -> 'Notify'
2: Click on the 'WhatsApp'
3: Click on the '+ Add Group'
1: Navigate to 'Settings' -> 'Notify'
2: Click on the 'WhatsApp'
3: Click on the '+ Add Group'
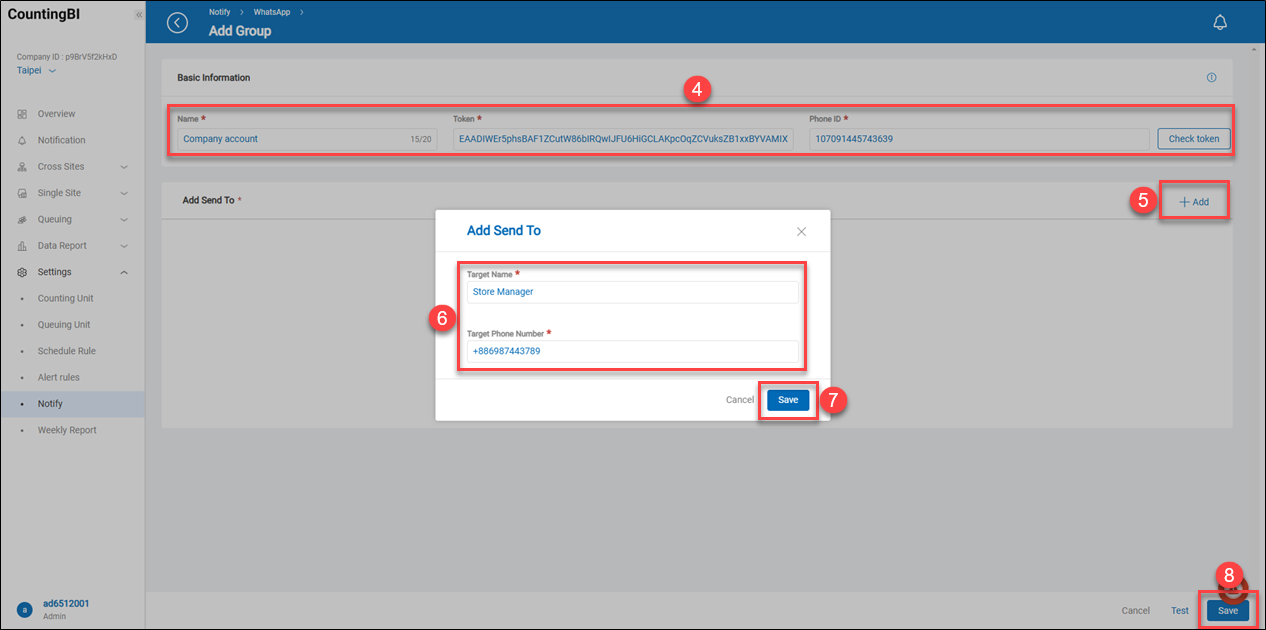 4: Define the name of the WhatsApp sender, a valid WhatsApp token, and the phone number associated with the token. Then click on 'Check Token' to verify whether the token is valid.
5: Click on the '+ Add'
6: Enter the target name and target phone number. This is the phone number of the notification receiver.
7: Click on the 'Save' button.
8: Click on the 'Save' button.
4: Define the name of the WhatsApp sender, a valid WhatsApp token, and the phone number associated with the token. Then click on 'Check Token' to verify whether the token is valid.
5: Click on the '+ Add'
6: Enter the target name and target phone number. This is the phone number of the notification receiver.
7: Click on the 'Save' button.
8: Click on the 'Save' button.
Step 2. Adding「Schedule Rule」
 1: Navigate to 'Settings' -> 'Schedule Rule'
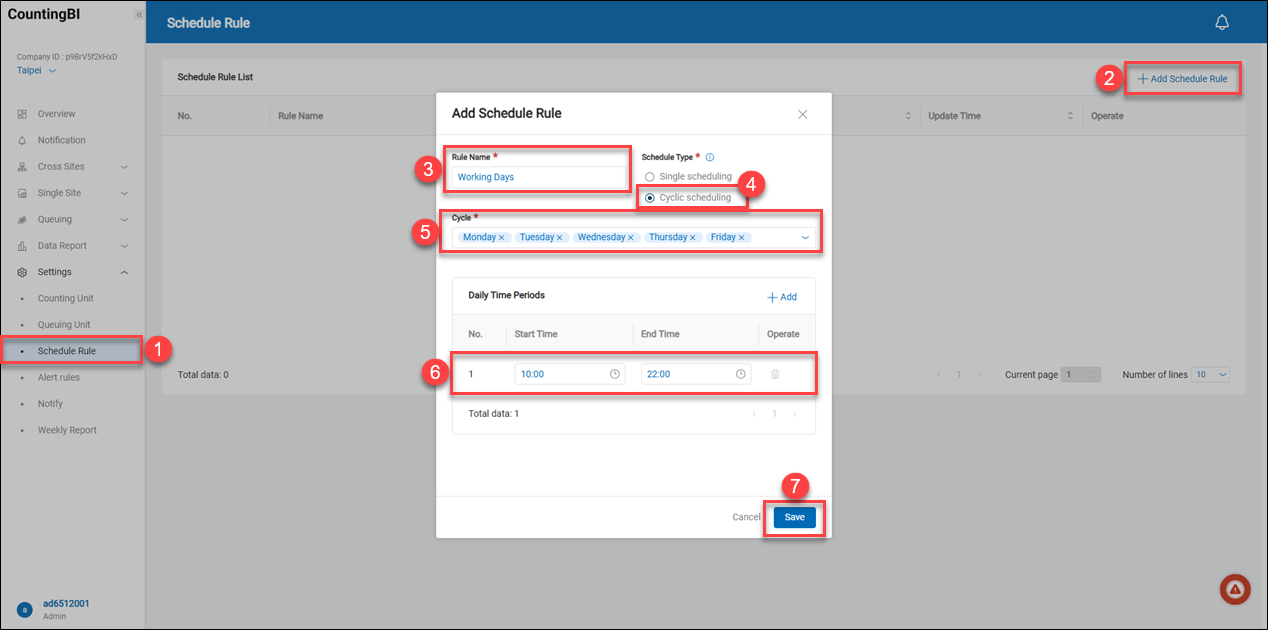
2: Click on the '+ Add Schedule Rule'
3: Enter the rule name.
4: Select 'Cyclic scheduling.'
5. Choose any day throughout the week. It will repeat the cyclic schedule every week.
6: Set a daily time period with a start time and an end time. For example, from 10:00 AM to 10:00 PM.
7: Click on the 'Save' button.
1: Navigate to 'Settings' -> 'Schedule Rule'
2: Click on the '+ Add Schedule Rule'
3: Enter the rule name.
4: Select 'Cyclic scheduling.'
5. Choose any day throughout the week. It will repeat the cyclic schedule every week.
6: Set a daily time period with a start time and an end time. For example, from 10:00 AM to 10:00 PM.
7: Click on the 'Save' button.
Step 3. Adding「Queuing Rule」
 1: Navigate to 'Settings' -> 'Queuing Unit'
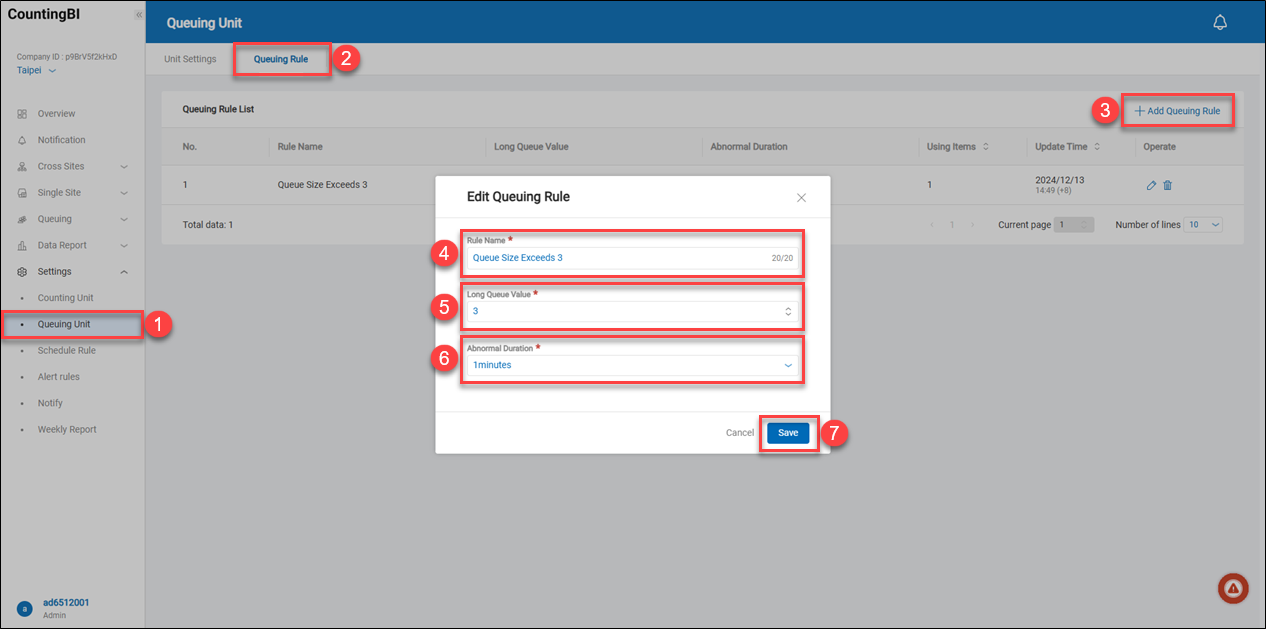
2: Click on the 'Queuing Rule'
3: Click on the '+ Add Queuing Rule'
4: Enter the rule name.
5: Set the maximum number of people in the queue. Here is an example: 3 people.
6. Select '1 minute.' This item is designed to calculate the duration during which the number of queuing people reaches the ‘Long Queue Value.’
7: Click on the 'Save' button.
1: Navigate to 'Settings' -> 'Queuing Unit'
2: Click on the 'Queuing Rule'
3: Click on the '+ Add Queuing Rule'
4: Enter the rule name.
5: Set the maximum number of people in the queue. Here is an example: 3 people.
6. Select '1 minute.' This item is designed to calculate the duration during which the number of queuing people reaches the ‘Long Queue Value.’
7: Click on the 'Save' button.
Step 4. Adding「Alert Rule」
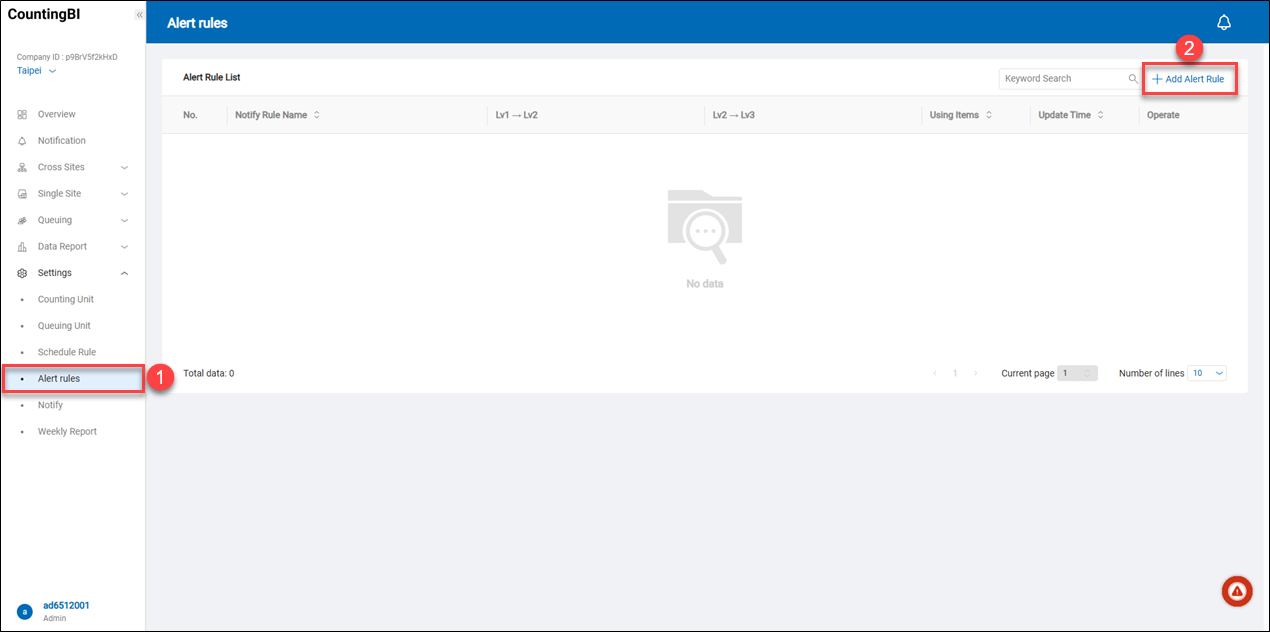 1: Navigate to 'Settings' -> 'Alert rules'
2: Click on the '+ Add Alert Rule'
1: Navigate to 'Settings' -> 'Alert rules'
2: Click on the '+ Add Alert Rule'
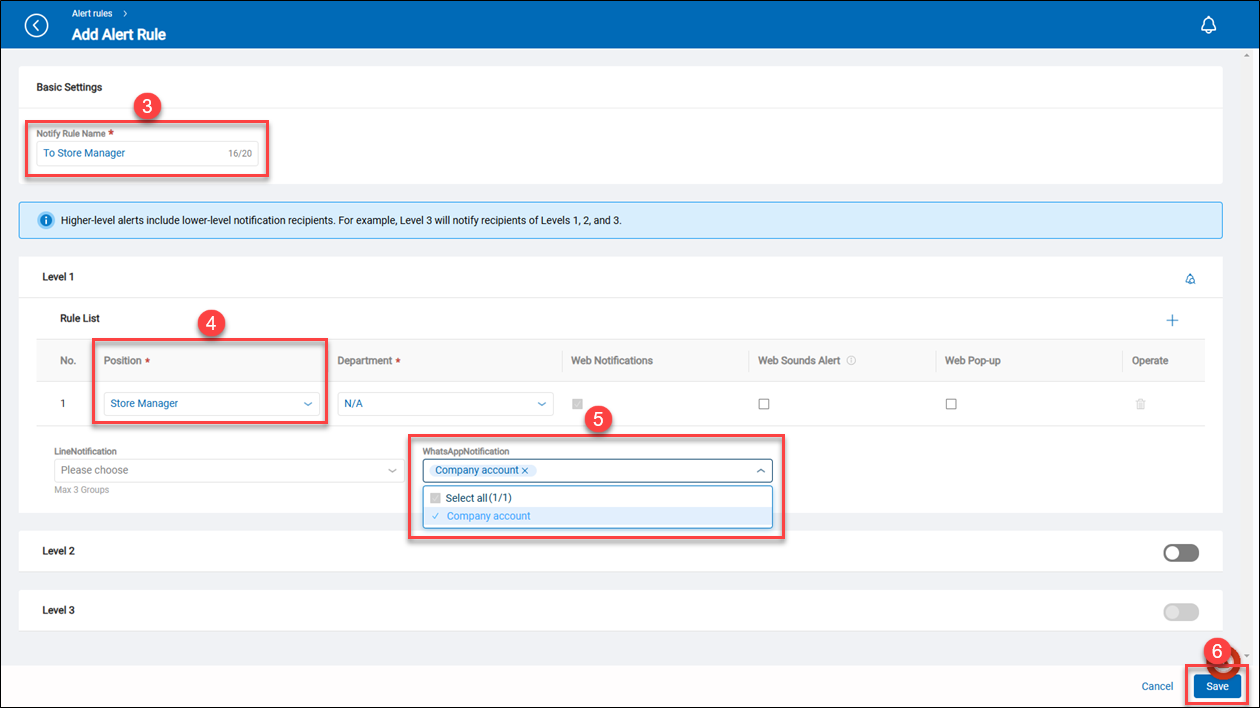 3: Enter the notify rule name.
4: On Level 1, select a job position. Here is an example: 'Store Manager.' The store manager is Jasmine.
5: Select an added WhatsApp notification sender.
6: Click on the 'Save' button.
3: Enter the notify rule name.
4: On Level 1, select a job position. Here is an example: 'Store Manager.' The store manager is Jasmine.
5: Select an added WhatsApp notification sender.
6: Click on the 'Save' button.
Step 5. Adding「Rule and Alert」
 1: Navigate to 'Settings' -> 'Queuing Unit'
2: Click on the 'Unit Settings'
3: Click on the 'Edit' icon for an existing queuing unit.
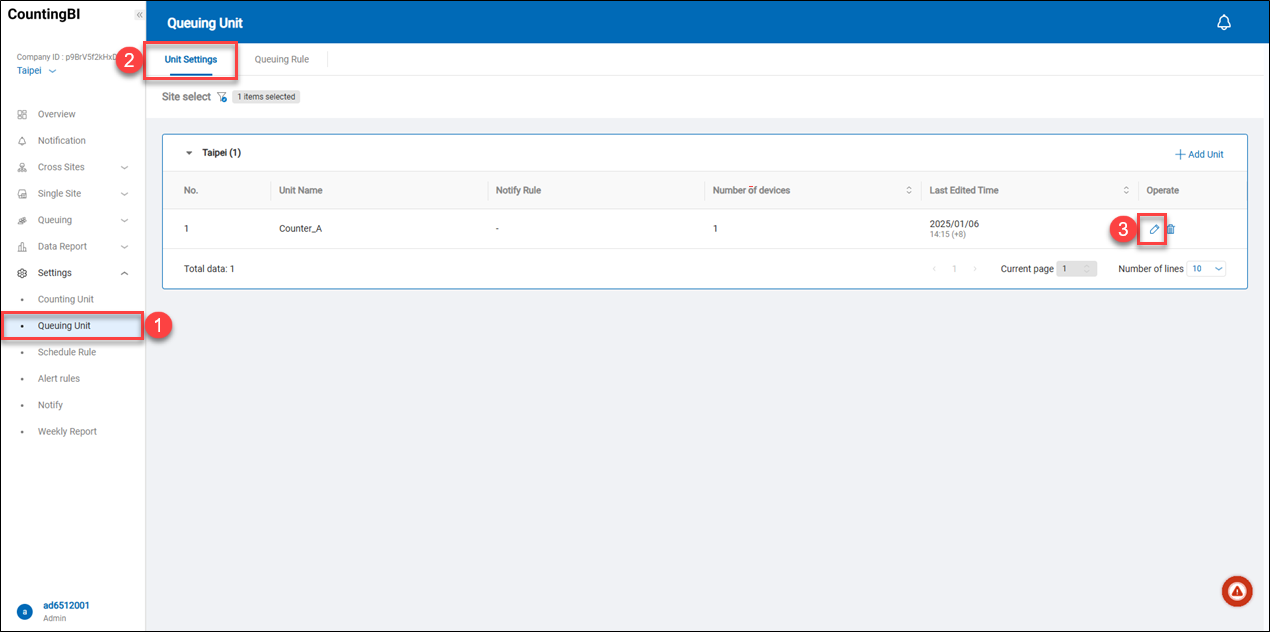
1: Navigate to 'Settings' -> 'Queuing Unit'
2: Click on the 'Unit Settings'
3: Click on the 'Edit' icon for an existing queuing unit.
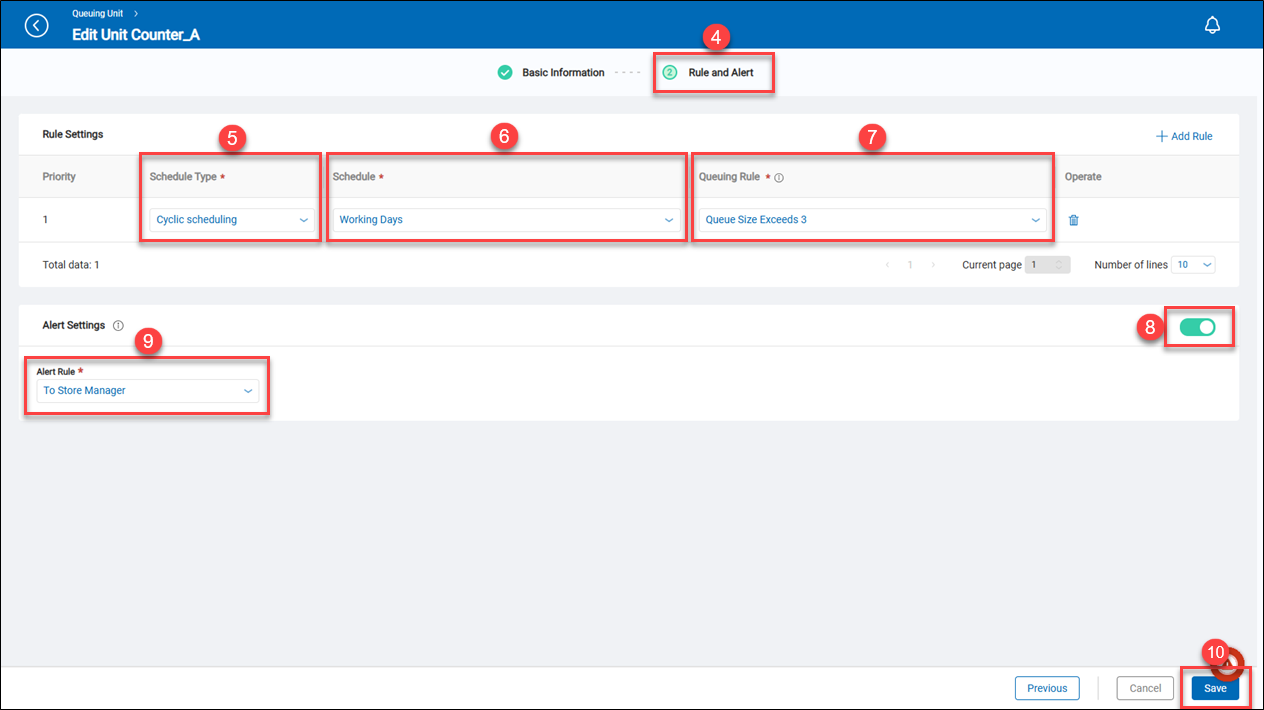 4: Click on the 'Rule and Alert'
5: Select 'Cyclic scheduling'
6: Select an added schedule rule. Here is an example: 'Working Days.'
7: Select an added queuing rule. Here is an example: 'Queue Size Exceeds 3.'
8: Click on the toggle switch to enable the alert rule.
9: Select an added alert rule.
10: Click on the 'Save' button.
4: Click on the 'Rule and Alert'
5: Select 'Cyclic scheduling'
6: Select an added schedule rule. Here is an example: 'Working Days.'
7: Select an added queuing rule. Here is an example: 'Queue Size Exceeds 3.'
8: Click on the toggle switch to enable the alert rule.
9: Select an added alert rule.
10: Click on the 'Save' button.
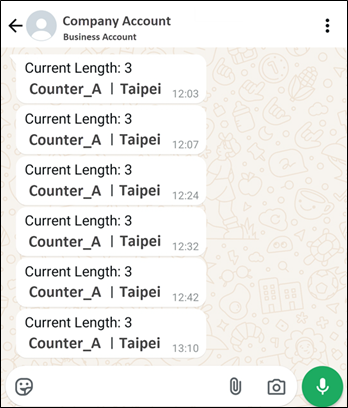
Once the queuing size exceeds 3 people in 1 minute on the queuing unit 'Counter_A,' the system will send a WhatsApp notification to the store manager. In this case, the receiver is the store manager, Jasmine.