iVision Suite Edge + IP Camera
Items You Will Need:
- iVision Suite Edge (UBX-110)
- IP camera supporting RTSP protocol (minimum requirement of 2-megapixel resolution)
- PoE network switch or PoE injector
- At least three RJ-45 Ethernet cables, with lengths depending on user site requirements
- Access to the《CountingBI》service on the WISE-iService cloud platform and a valid user account
Step 1: Add an IP Camera to iVision Suite Edge and Draw the Counting Unit (Count Line and Queue Area)
Log in to the iVision Suite Edge management interface using the Chrome browser.
 1. Go to the "Video Source" page to add an IP camera.
2. Click "+ Create".
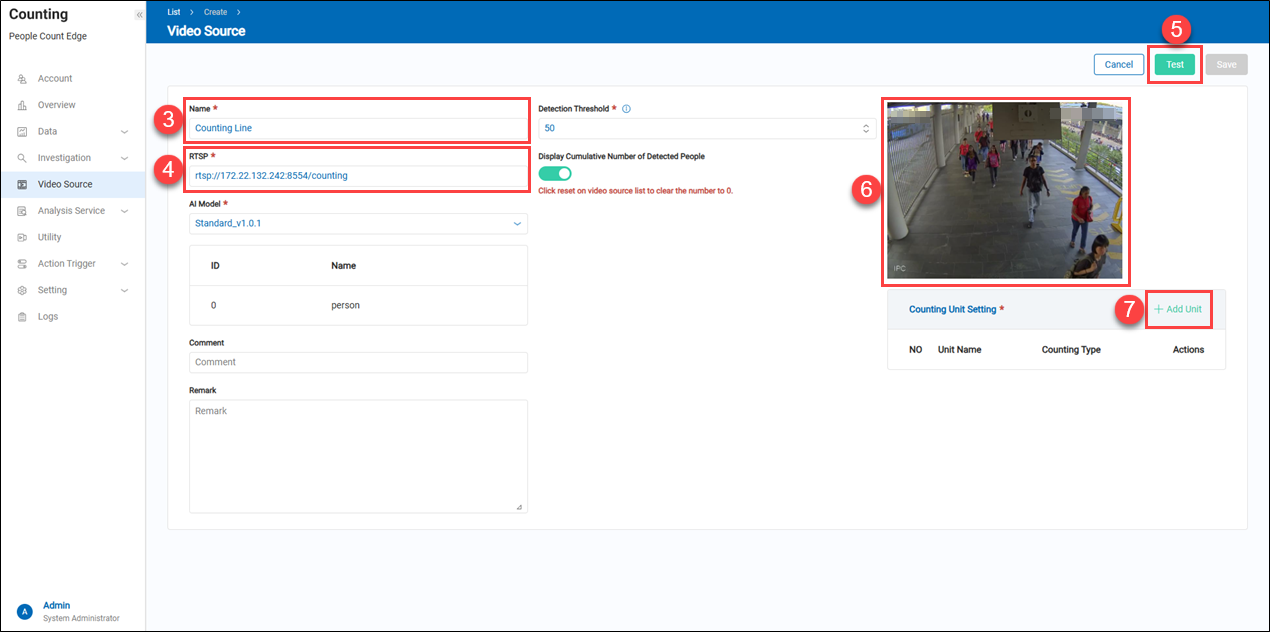 3. Enter a name that helps users easily identify this camera.
4. Enter the full RTSP URL path of the IP camera, including the username and password (e.g., rtsp://admin:aics12345@192.168.100.101/Streaming/Channels/1).
5. Click "Test" to verify that the RTSP URL is correct.
6. If the RTSP URL is correct, a snapshot from the IP camera will be obtained.
7. Click "+ Add Unit".
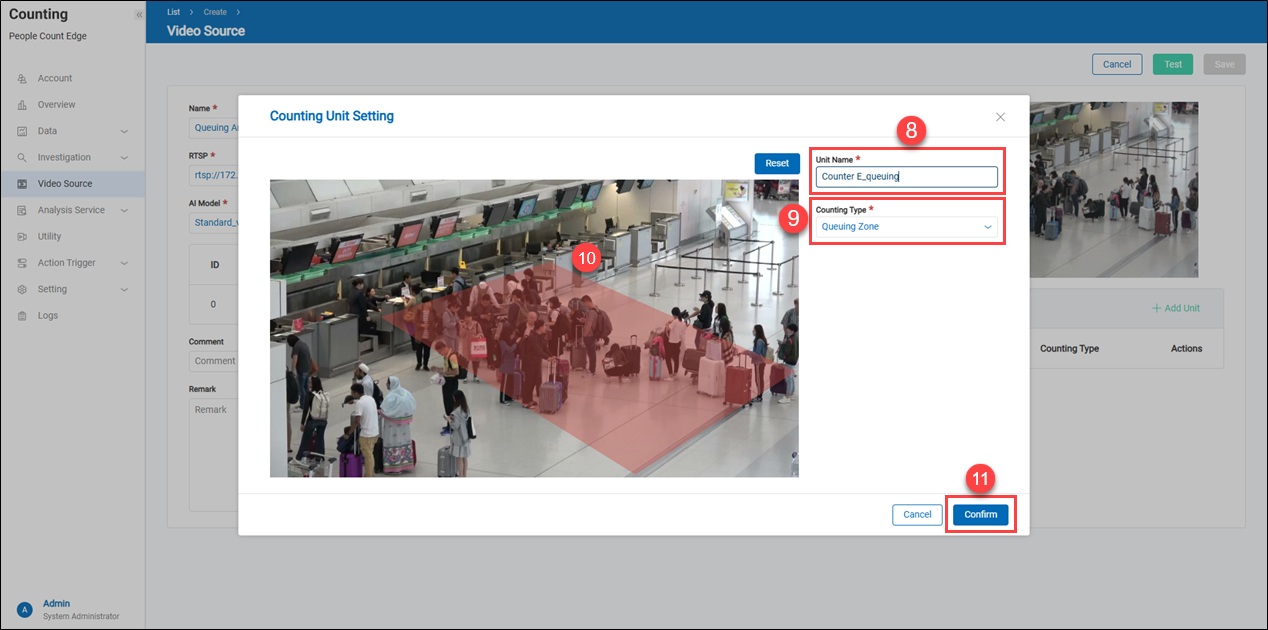
 8. Enter a name that helps users easily identify this counting unit.
9. Since we are counting people flow, select "Counting Line" as the counting type for this example.
10. Draw the counting line on the snapshot of the IP camera on the left. Move the cursor over the snapshot, and draw from left to right or right to left; the direction chosen defines entry and exit differently. In this example, drawing from left to right means that people moving from top to bottom across the line are counted as entering, while those moving from bottom to top are counted as exiting.
11. Click "Confirm" to apply the settings.
To draw a queuing zone, click "+ Add Unit" at step 7 above.
 8. Enter a name that helps users easily identify this queue unit.
9. Since this will be used for queue analysis, select Queuing Zone as the counting type for this example.
10. Draw the queue area on the snapshot of the IP camera on the left. Move the cursor over the snapshot, click the left mouse button once to start drawing the boundary line of the queue area, then click again at the end of the line to begin the next boundary. Repeat until a four-sided shape is completed.
11. Click "Confirm" to apply the settings.
8. Enter a name that helps users easily identify this queue unit.
9. Since this will be used for queue analysis, select Queuing Zone as the counting type for this example.
10. Draw the queue area on the snapshot of the IP camera on the left. Move the cursor over the snapshot, click the left mouse button once to start drawing the boundary line of the queue area, then click again at the end of the line to begin the next boundary. Repeat until a four-sided shape is completed.
11. Click "Confirm" to apply the settings.
> Note: Counting Line is used for people flow analysis and statistics, while Queuing Zone is used for queue analysis and counting.
Step 2: Bind the iVision Suite Edge to the《CountingBI》service and retrieve "Counting Units" and "Queue Units."
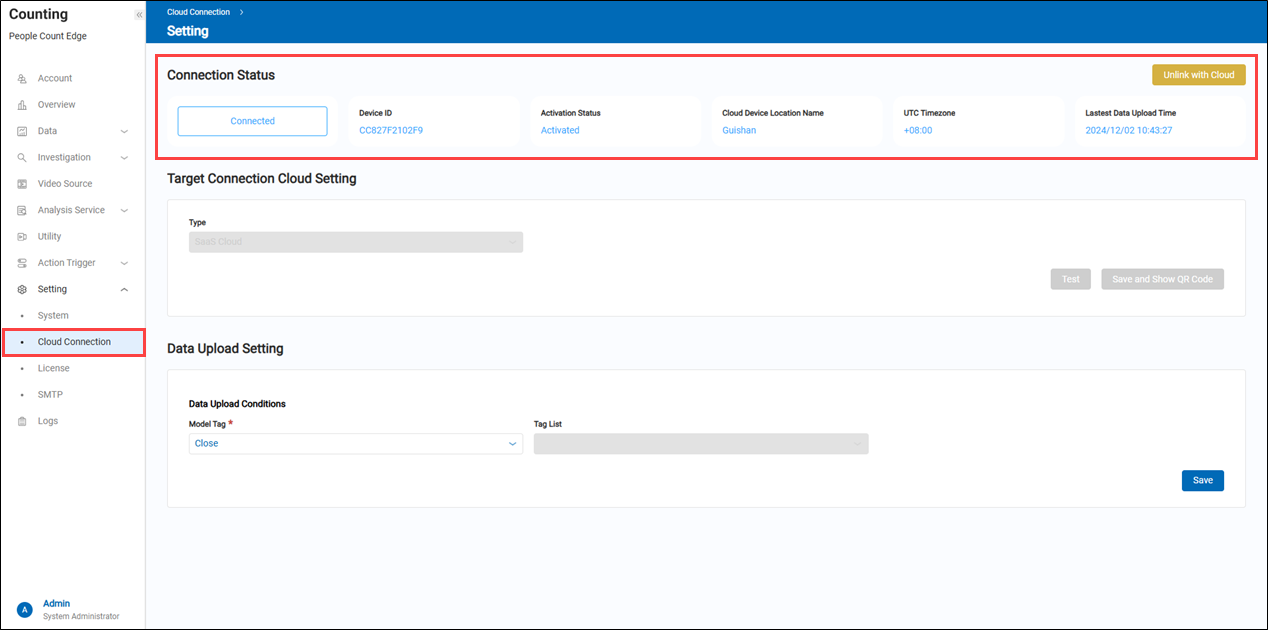
 12. In the iVision Suite Edge sidebar, click "Cloud Connection".
13. In the "Type" menu, select "SaaS Cloud".
14. Click "Test" to check if iVision Suite Edge can connect to the SaaS platform. iVision Suite Edge must have internet access to connect to the SaaS cloud.
15. If the test in step 14 is successful, click "Save and Show QR Code".
16. In the next steps, scan the displayed QR code using a mobile device.
17. Click "Save" to apply the settings.
12. In the iVision Suite Edge sidebar, click "Cloud Connection".
13. In the "Type" menu, select "SaaS Cloud".
14. Click "Test" to check if iVision Suite Edge can connect to the SaaS platform. iVision Suite Edge must have internet access to connect to the SaaS cloud.
15. If the test in step 14 is successful, click "Save and Show QR Code".
16. In the next steps, scan the displayed QR code using a mobile device.
17. Click "Save" to apply the settings.
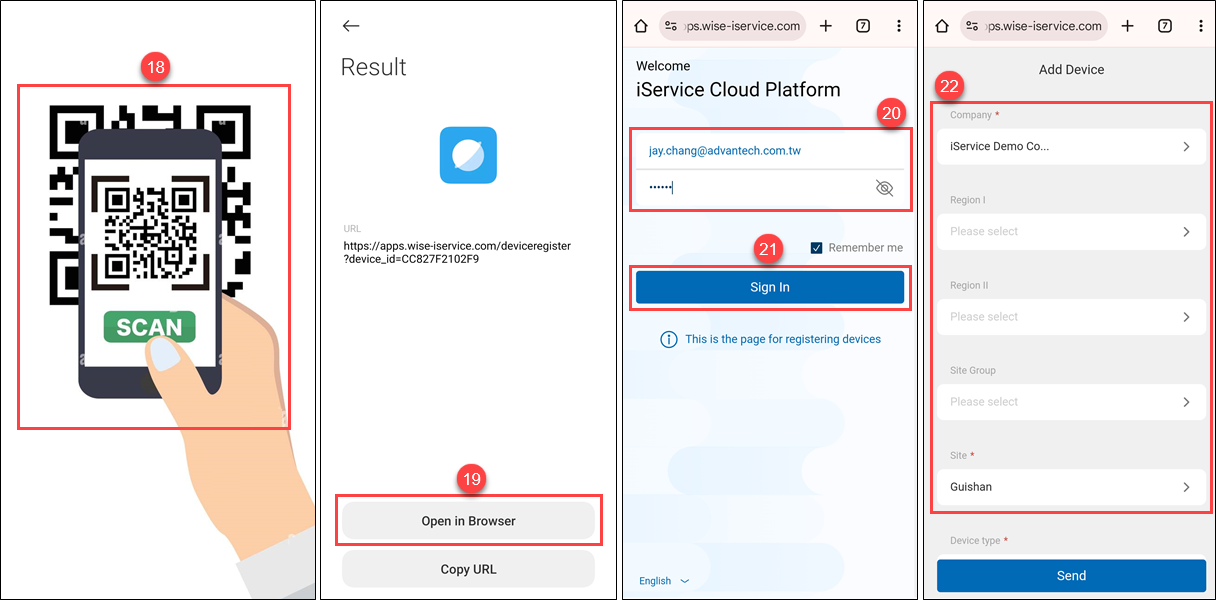 18. Use a mobile device to scan the QR code.
19. Select "Open in Browser".
20. Enter a valid user account and password.
> Note: Before logging into the iService Cloud Platform, you must have a valid user account for the "CountingBI" service.
18. Use a mobile device to scan the QR code.
19. Select "Open in Browser".
20. Enter a valid user account and password.
> Note: Before logging into the iService Cloud Platform, you must have a valid user account for the "CountingBI" service.
21. Click "Sign In". 22. In the "Company" menu, select the company or brand to which you want to bind iVision Suite Edge. Then, in the "Site" menu, choose the specific store to bind.
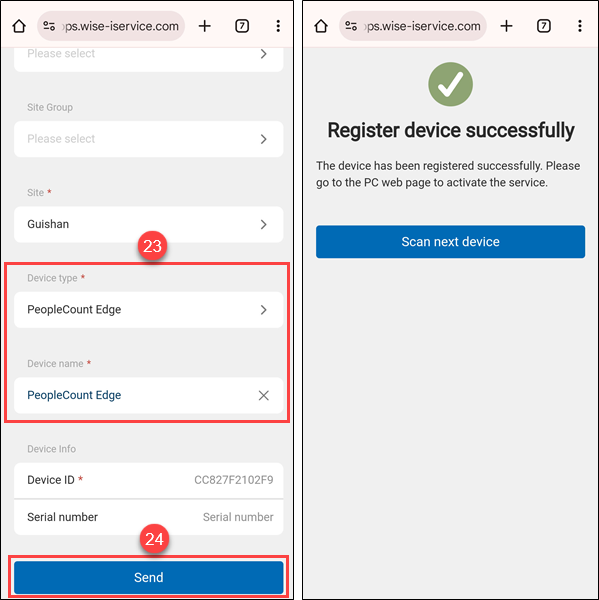 23. in the "Device Type" menu, select "PeopleCount Edge", in the "Device Name" menu, enter any name that makes it easy for users to identify the iVision Suite Edge.
24. Click "Send" to upload the settings to the "CountingBI" service for verification and binding. If the verification is successful, a screen will display "Register device successfully," and the connection status will show "Connected."
23. in the "Device Type" menu, select "PeopleCount Edge", in the "Device Name" menu, enter any name that makes it easy for users to identify the iVision Suite Edge.
24. Click "Send" to upload the settings to the "CountingBI" service for verification and binding. If the verification is successful, a screen will display "Register device successfully," and the connection status will show "Connected."
 > Note: After completing this step, the iVision Suite Edge has been successfully bound to the specified site in the "CountingBI" service. Next, please go to the "Subscription service website" to activate the iVision Suite Edge device. Only after activation can you proceed to the "CountingBI" service to perform functional settings.
Step 3: Add a Counting Unit for "People Flow Statistics" in the《CountingBI》service.
 25. Open the Chrome browser on any PC and connect to the WISE-iService cloud platform at the following URL: https://apps.wise-iservice.com.
26. After entering your user account and password, click "Log In".
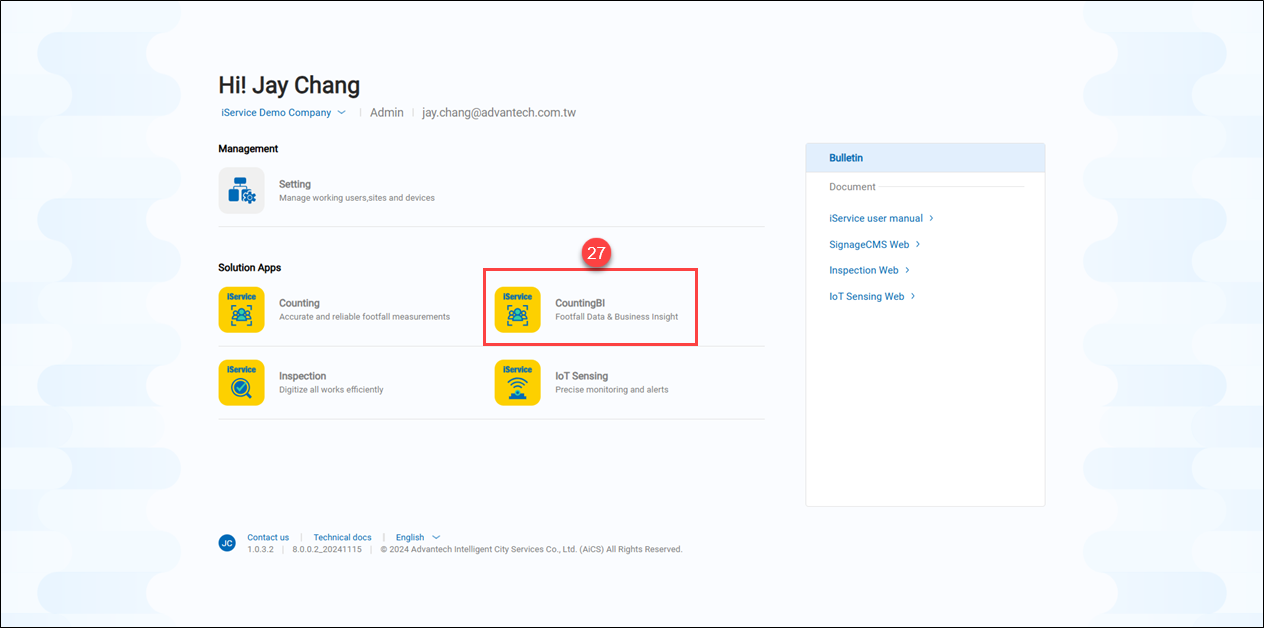 27. Click on the "CountingBI" service entry.
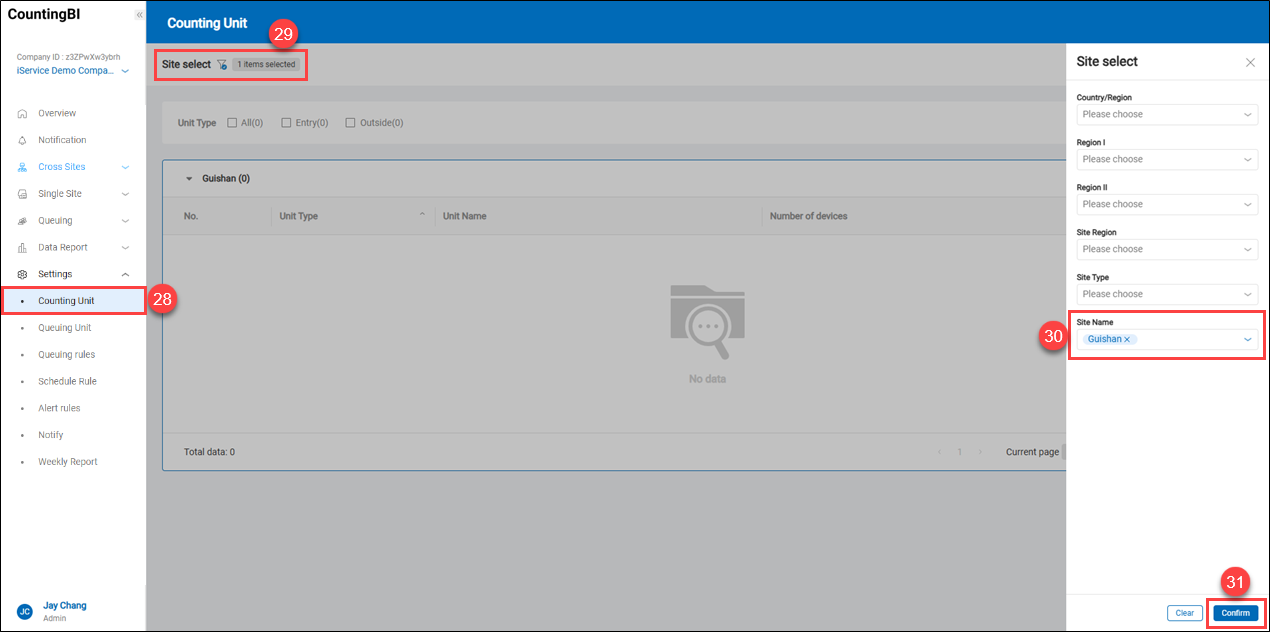 28. Click on "Counting Unit".
29. Click the filter icon
28. Click on "Counting Unit".
29. Click the filter icon ![]() to expand the site select menu.
30. Select the site where you want to add a counting unit.
31. Click "Confirm" to proceed to the next step.
to expand the site select menu.
30. Select the site where you want to add a counting unit.
31. Click "Confirm" to proceed to the next step.
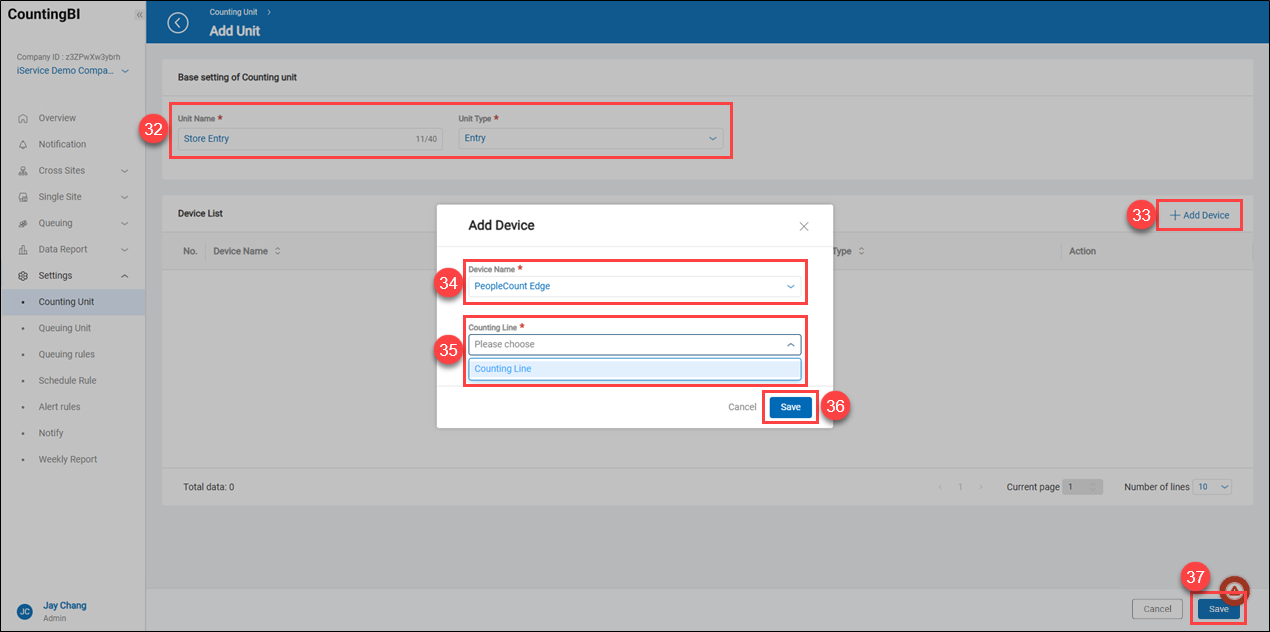 32. Enter a name for the counting unit that is easy for the user to identify. In this example, to calculate "store entry traffic," select "Entry" under "Unit Type."
33. Click "+ Add Device".
34. From the "Device Name" dropdown menu, select the iVision Suite Edge device that has been bound.
35. From the "Counting Line" dropdown menu, select the counting line that has been added to the iVision Suite Edge.
36. Click "Save" to apply the settings.
37. Click "Save" again to apply the settings.
32. Enter a name for the counting unit that is easy for the user to identify. In this example, to calculate "store entry traffic," select "Entry" under "Unit Type."
33. Click "+ Add Device".
34. From the "Device Name" dropdown menu, select the iVision Suite Edge device that has been bound.
35. From the "Counting Line" dropdown menu, select the counting line that has been added to the iVision Suite Edge.
36. Click "Save" to apply the settings.
37. Click "Save" again to apply the settings.
At this step, you have successfully added a counting unit for "traffic statistics" in the《CountingBI》service.
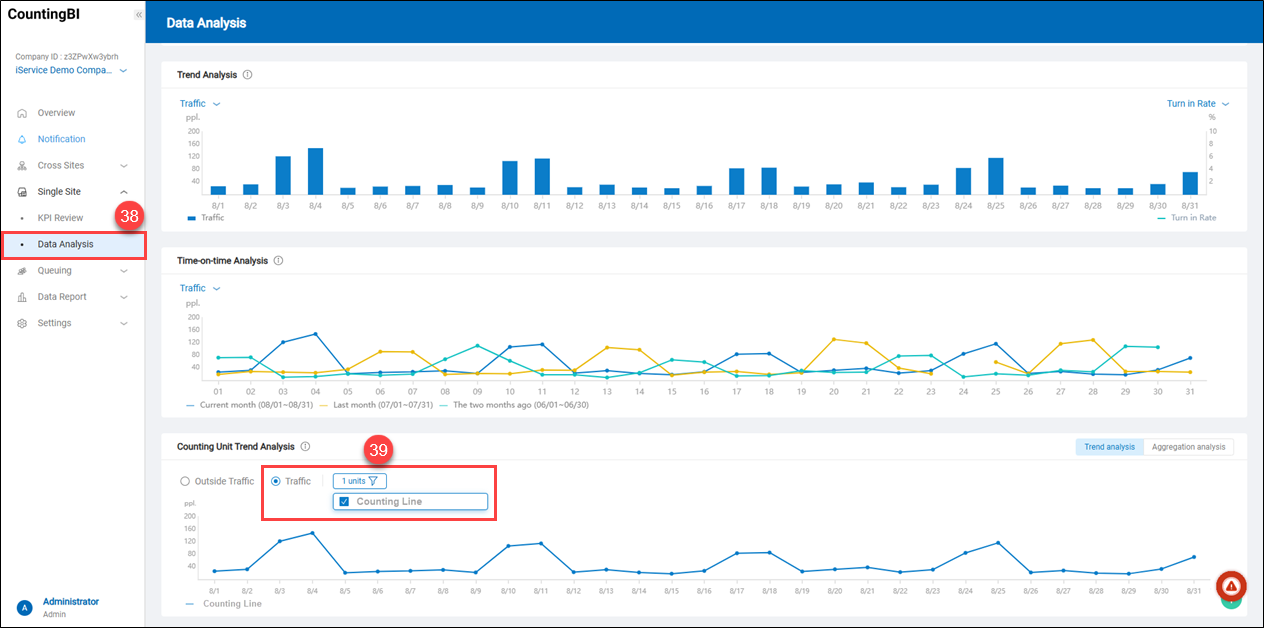 38. Click on "Single Site" -> "Data Analysis".
39. Users can quickly view statistical data by selecting "Store Traffic" along with the chosen counting unit in the "Counting Unit Trend Analysis" section under "Single Site -> Data Analysis."
38. Click on "Single Site" -> "Data Analysis".
39. Users can quickly view statistical data by selecting "Store Traffic" along with the chosen counting unit in the "Counting Unit Trend Analysis" section under "Single Site -> Data Analysis."
Step 4: Add a Queue Unit for "Queue Statistics" in the《CountingBI》Service.
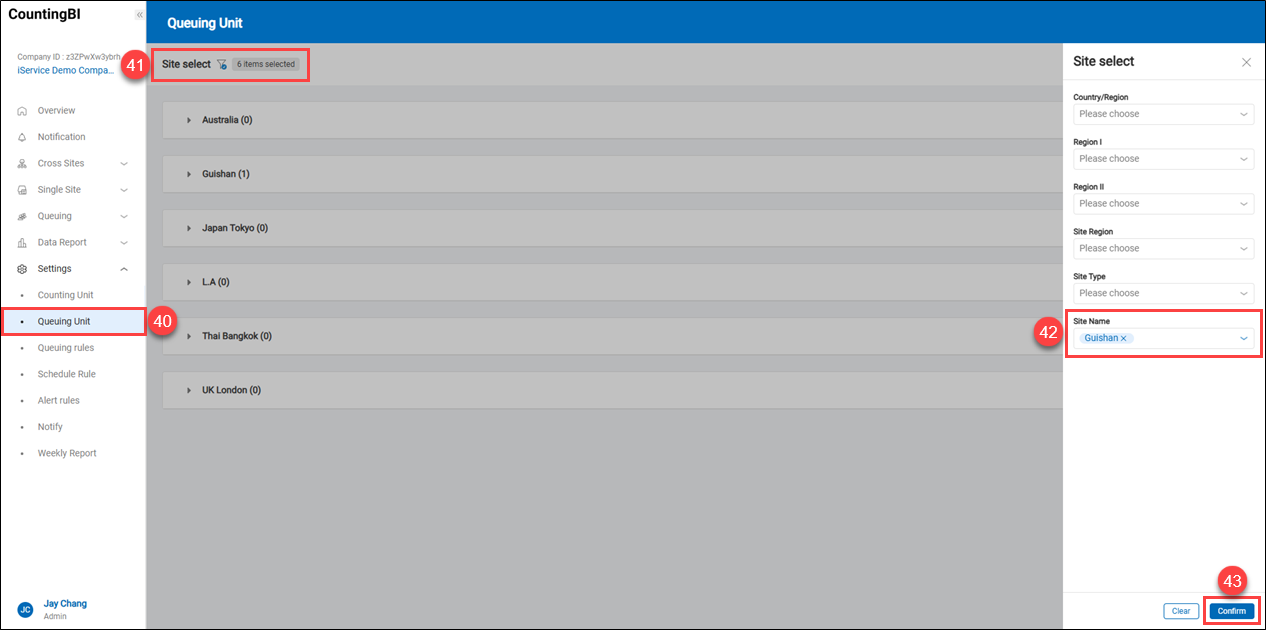 40. Click on "Queuing Unit".
41. Click the filter icon ![]() to expand the site select menu.
to expand the site select menu.
42. Select the site where you want to add the queue unit.
43. Click "Confirm" to proceed to the next step.
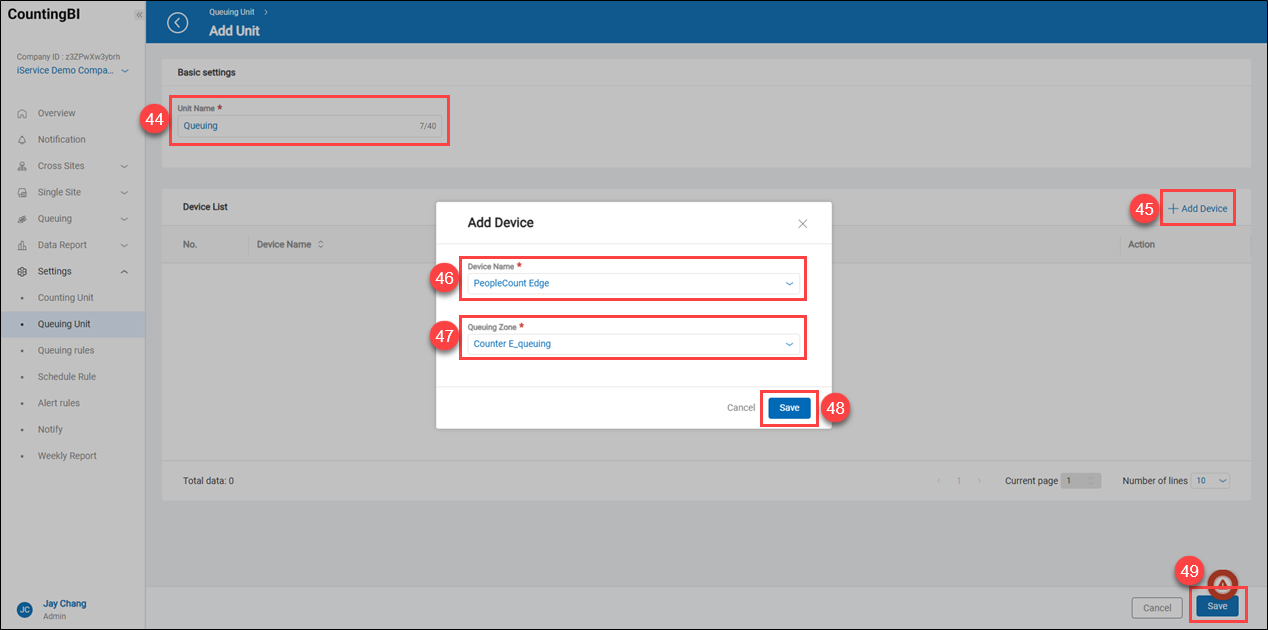 44. Enter a name for the queue unit that is easy for the user to recognize.
45. Click "+ Add Device".
46. In the "Device Name" dropdown menu, select the iVision Suite Edge device that has been bound.
47. In the "Queuing Zone" dropdown menu, select the "Queuing Zone" that has been added to iVision Suite Edge.
48. Click "Save" to apply the settings.
44. Enter a name for the queue unit that is easy for the user to recognize.
45. Click "+ Add Device".
46. In the "Device Name" dropdown menu, select the iVision Suite Edge device that has been bound.
47. In the "Queuing Zone" dropdown menu, select the "Queuing Zone" that has been added to iVision Suite Edge.
48. Click "Save" to apply the settings.
49. Click "Save" to apply the settings.
At this step, the queue area counting unit has been successfully added to the《CountingBI》service.
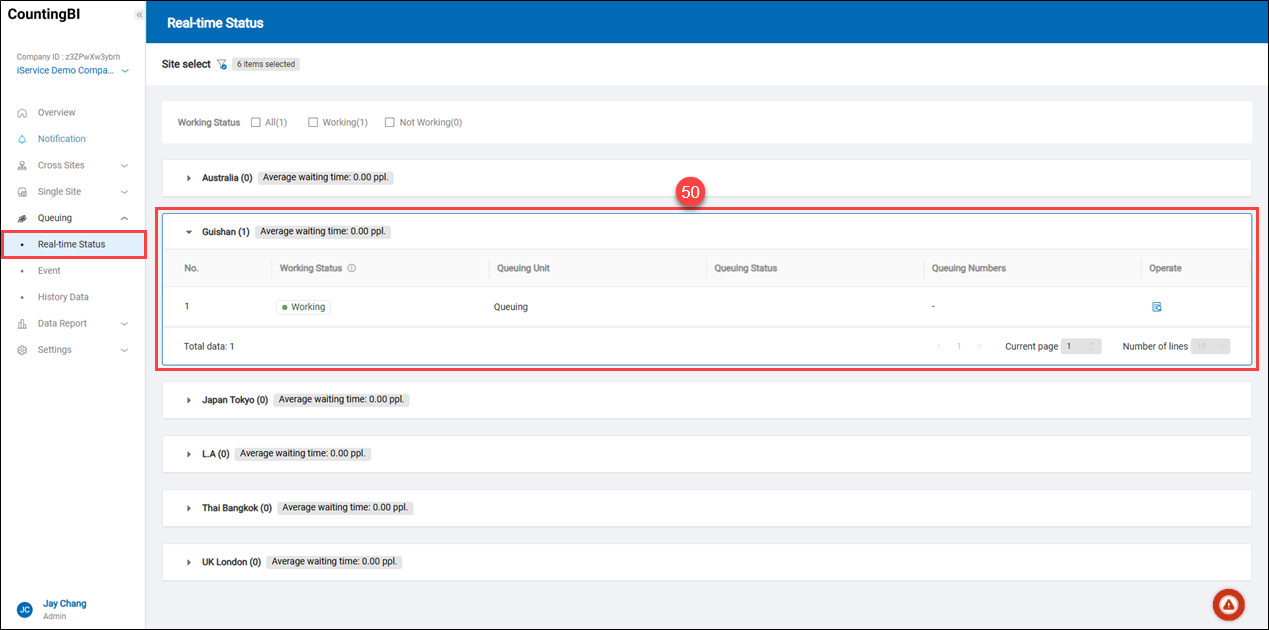 50. Users can quickly view relevant real-time queue information in the "Queuing -> Real-time Status" section.