What is the Counting Unit ?
In the "CountingBI" service, users view statistical data through charts with the "counting unit" as the smallest data view unit. This counting unit is designed to incorporate diverse foot traffic data sources and is divided into two main types: the first type provides precise data captured by the UCAM-130 foot traffic camera, while the second type involves data collected collaboratively by the VisionSense and network (IP) cameras, offering a more flexible monitoring solution. A single counting unit can contain data from one or multiple cameras.
Reminder: Before adding a "counting unit" or "queuing unit," users need to bind these devices to a designated site, whether using the UCAM-130 camera setup or the VisionSense with IP camera setup.
Counting Unit
This section explains how to define a counting unit. The counting unit setup allows users to designate a single foot traffic camera as an entrance or group multiple nearby foot traffic cameras into one entrance. In the foot traffic report, the counting unit is used to view entry and exit statistics for that entrance.
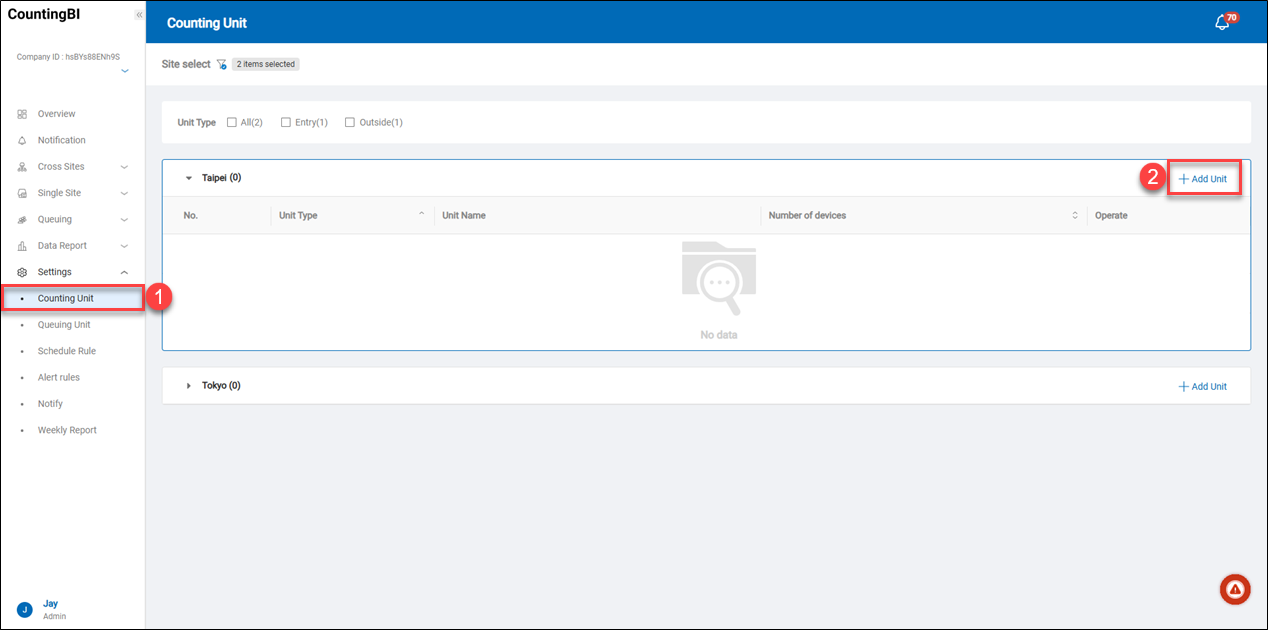
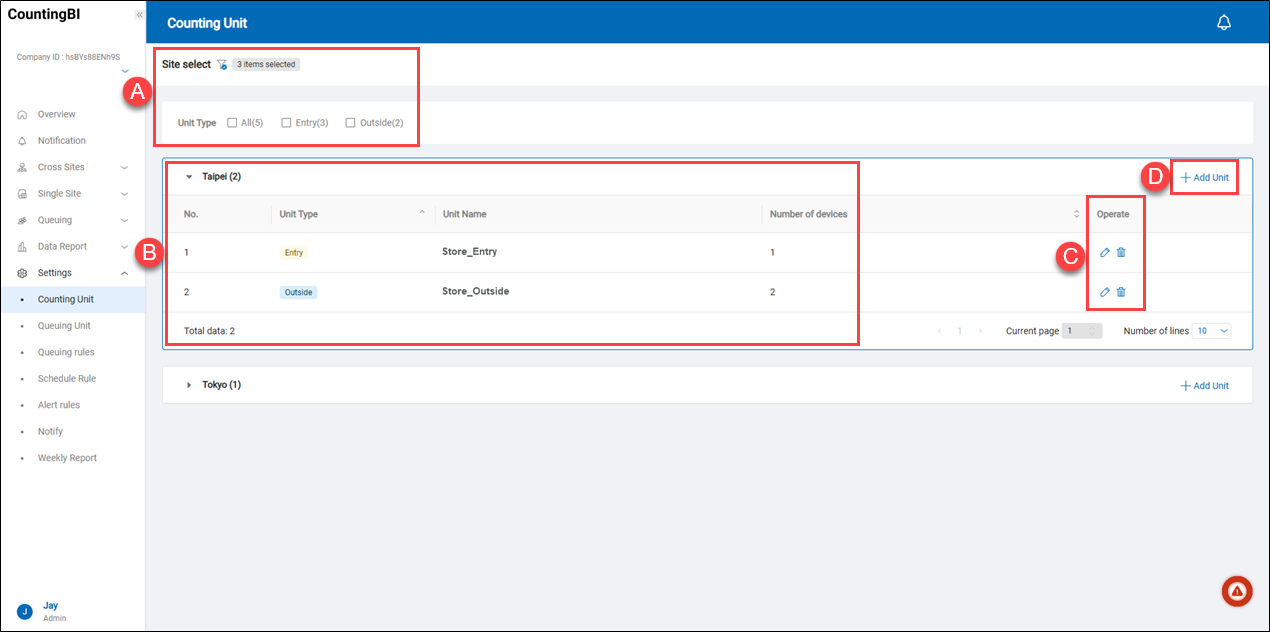 A.【Site Select】 ⇒ Click the filter
 ![]() icon to filter sites by country/region, region, site region, site type, or site name. By default, all sites are listed for display. After selecting a site, you can further use "unit type" as a filter to quickly locate the desired site for action.
B.【Site Counting Unit Information】 ⇒ Displays all counting units, unit types, and the number of devices contained within each counting unit for each site.
C.【Edit/Delete】 ⇒ Allows users to edit or delete a counting unit.
D.【+ Add Unit】 ⇒ Users can click "+ Add Unit" to add a new counting unit.
icon to filter sites by country/region, region, site region, site type, or site name. By default, all sites are listed for display. After selecting a site, you can further use "unit type" as a filter to quickly locate the desired site for action.
B.【Site Counting Unit Information】 ⇒ Displays all counting units, unit types, and the number of devices contained within each counting unit for each site.
C.【Edit/Delete】 ⇒ Allows users to edit or delete a counting unit.
D.【+ Add Unit】 ⇒ Users can click "+ Add Unit" to add a new counting unit.
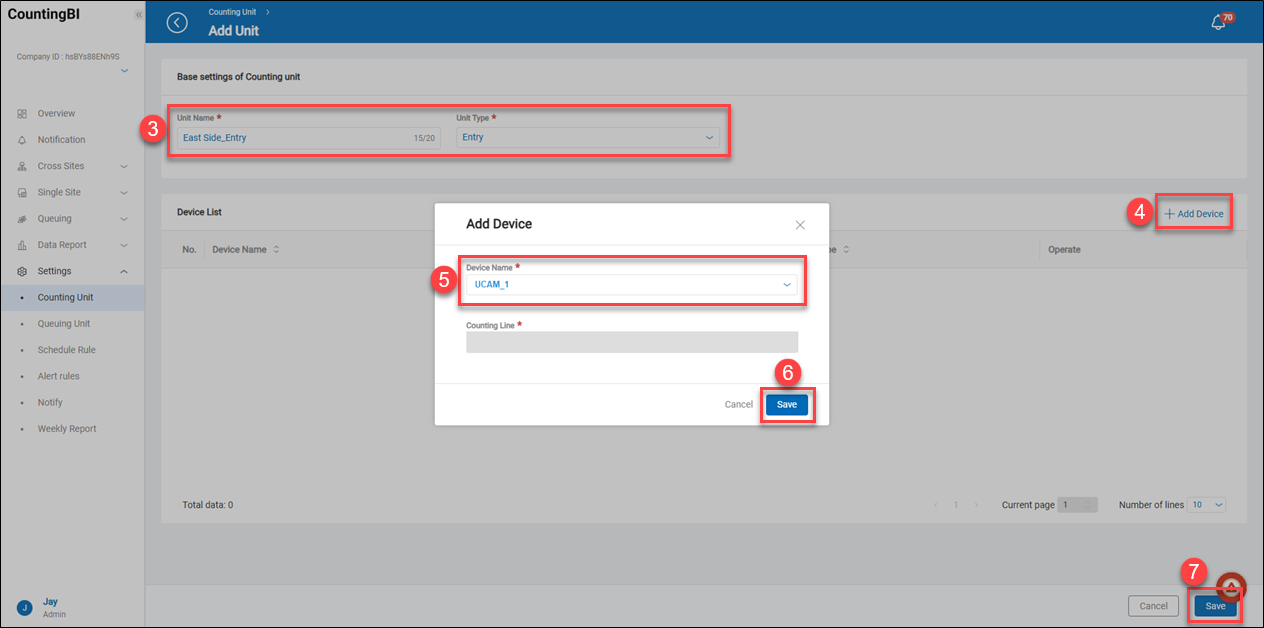
 E.【Unit Name and Type】 ⇒ Set the name of the counting unit and define its type. For example, specify if the unit is categorized as "Entrance/Exit" or "Outside."
F.【+ Add Device】 ⇒ Users can click on "+ Add Device" to add a UCAM People Flow camera or a VisionSense counting unit.
E.【Unit Name and Type】 ⇒ Set the name of the counting unit and define its type. For example, specify if the unit is categorized as "Entrance/Exit" or "Outside."
F.【+ Add Device】 ⇒ Users can click on "+ Add Device" to add a UCAM People Flow camera or a VisionSense counting unit.
Queuing Unit
This queuing unit is designed to add a source for queue data, with only one type of data source available: queue count data captured by an IP camera paired with the VisionSense.
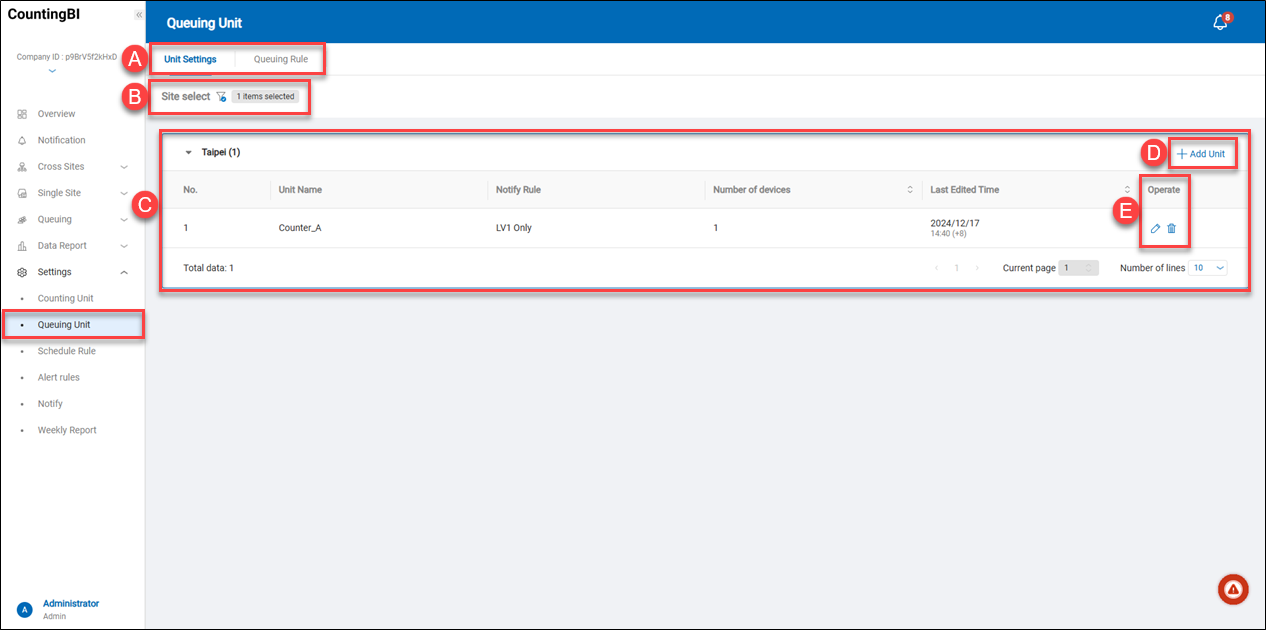 A.【Unit Settings/Queuing Rule】 ⇒ There are two function pages in the 'Queuing Unit.' Users can perform CRUD operations on the queuing unit in the 'Unit Settings' page and manage CRUD operations for queuing rules on the 'Queuing Rule' page.
B.【Site Select】 ⇒ Click on the filter icon
A.【Unit Settings/Queuing Rule】 ⇒ There are two function pages in the 'Queuing Unit.' Users can perform CRUD operations on the queuing unit in the 'Unit Settings' page and manage CRUD operations for queuing rules on the 'Queuing Rule' page.
B.【Site Select】 ⇒ Click on the filter icon ![]() to filter sites by country/region, region, site region, site type, or site name. By default, all sites will be listed.
C.【Queuing Unit Information for site】 ⇒ Displays all queuing units within each site, including unit names and the number of devices contained within each queuing unit.
D.【Edit/Delete】 ⇒ Allows modification of a queuing unit or deletion of this queuing unit entry.
E.【+ Add Unit】 ⇒ Users can click on "+ Add Unit" to add a new queuing unit.
to filter sites by country/region, region, site region, site type, or site name. By default, all sites will be listed.
C.【Queuing Unit Information for site】 ⇒ Displays all queuing units within each site, including unit names and the number of devices contained within each queuing unit.
D.【Edit/Delete】 ⇒ Allows modification of a queuing unit or deletion of this queuing unit entry.
E.【+ Add Unit】 ⇒ Users can click on "+ Add Unit" to add a new queuing unit.
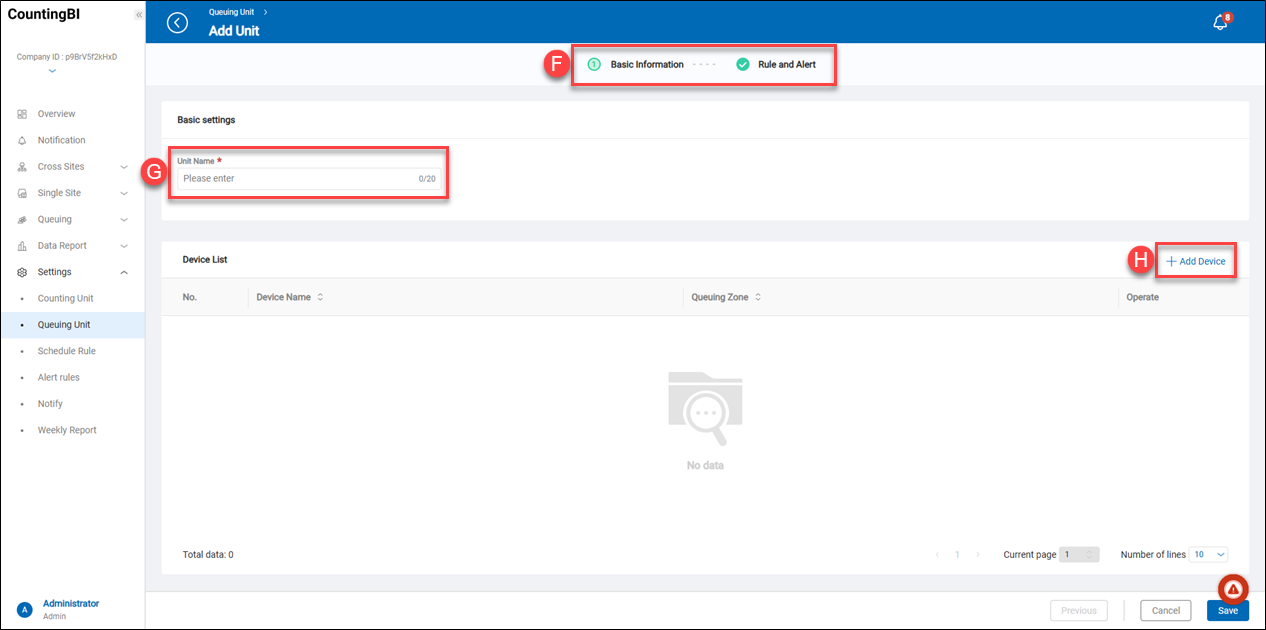 F.【Basic Information/Rule and Alert】 ⇒ There are two function pages in the 'Queuing Unit.' Users can perform CRUD operations on the queuing unit on the 'Basic Information' page and manage rules and alerts for when the queue size exceeds the maximum number of people.
![]() G.【Unit Name】 ⇒ Set the name of the queuing unit.
H.【+ Add Device】 ⇒ Users can click on "+ Add Device" to add a VisionSense counting unit for queue areas.
G.【Unit Name】 ⇒ Set the name of the queuing unit.
H.【+ Add Device】 ⇒ Users can click on "+ Add Device" to add a VisionSense counting unit for queue areas.
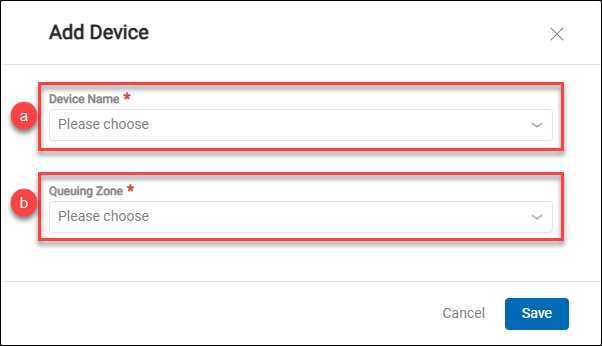 a.【Device Name】 ⇒ Select a VisionSense device to be added.
b.【Queuing Zone】 ⇒ Select a queuing zone (counting unit) to be added. This queue zone is associated with a VisionSense device.
a.【Device Name】 ⇒ Select a VisionSense device to be added.
b.【Queuing Zone】 ⇒ Select a queuing zone (counting unit) to be added. This queue zone is associated with a VisionSense device.
![]()
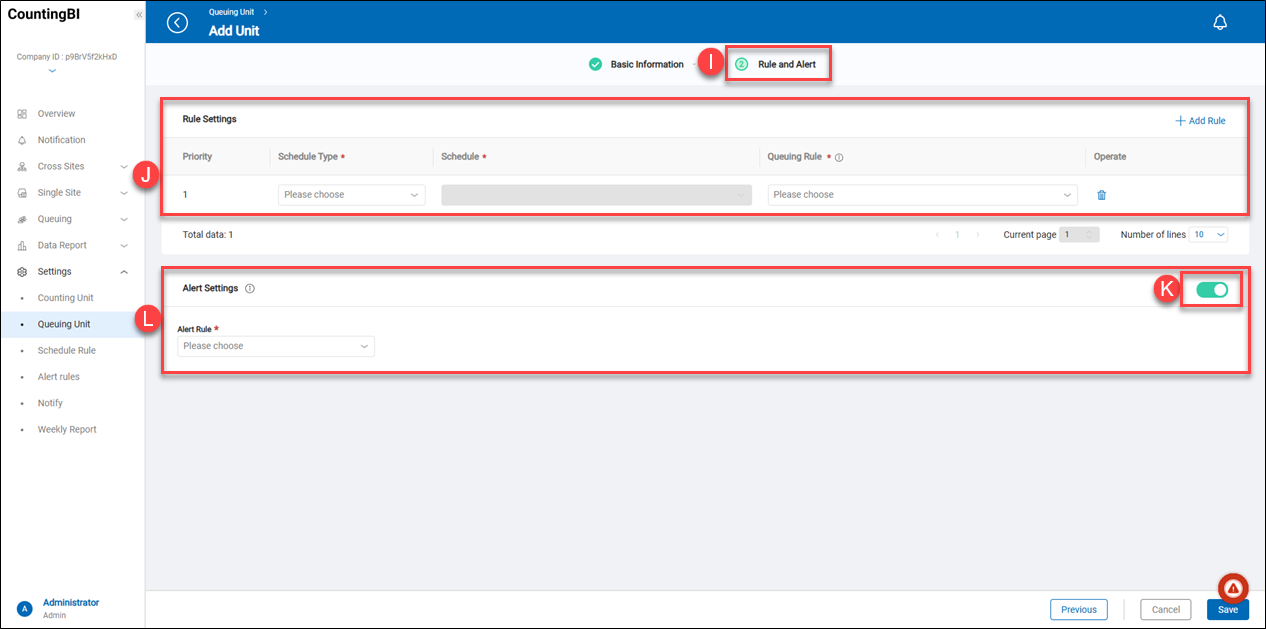 I.【Rule and Alert】 ⇒ Users can click on the title to continue setting up the rule and alert.
J.【Rule Settings】 ⇒ Users can perform CRUD operations on the rule settings. They can add rules to define the number of people in the queue that would exceed the limit during the scheduled time.
I.【Rule and Alert】 ⇒ Users can click on the title to continue setting up the rule and alert.
J.【Rule Settings】 ⇒ Users can perform CRUD operations on the rule settings. They can add rules to define the number of people in the queue that would exceed the limit during the scheduled time.
- 【Schedule Type】⇒ Users can select 'Single Scheduling' or 'Cyclic Scheduling' to use. For more details about the schedule types, please refer to the chapter 'Schedule Rule.'
- 【Schedule】⇒ According to the schedule type settings, users can select an added schedule that is associated with a 'Schedule Type.'
- 【Queuing Rule】⇒ Users can select an added queuing rule that is associated with a 'Queuing Rule.' For example, when the queue size exceeds 5 people. For more details about the queuing rule, please refer to the chapter 'Queuing Rule.'
K.【Alert Settings】 ⇒ Enable or disable the alert rule. It is designed to take some actions when the queue size meets the queuing rule. L.【Alert Rule】 ⇒ These alert rule options are from the 'Alert Rules' settings. Select an alert rule to add.
Queuing Rule
This rule is aimed at defining the number of people allowed in the queuing zone. What if the number of people in the queuing zone exceeds the limit? In such cases, users can send a notification to someone via instant messaging platforms like WhatsApp.
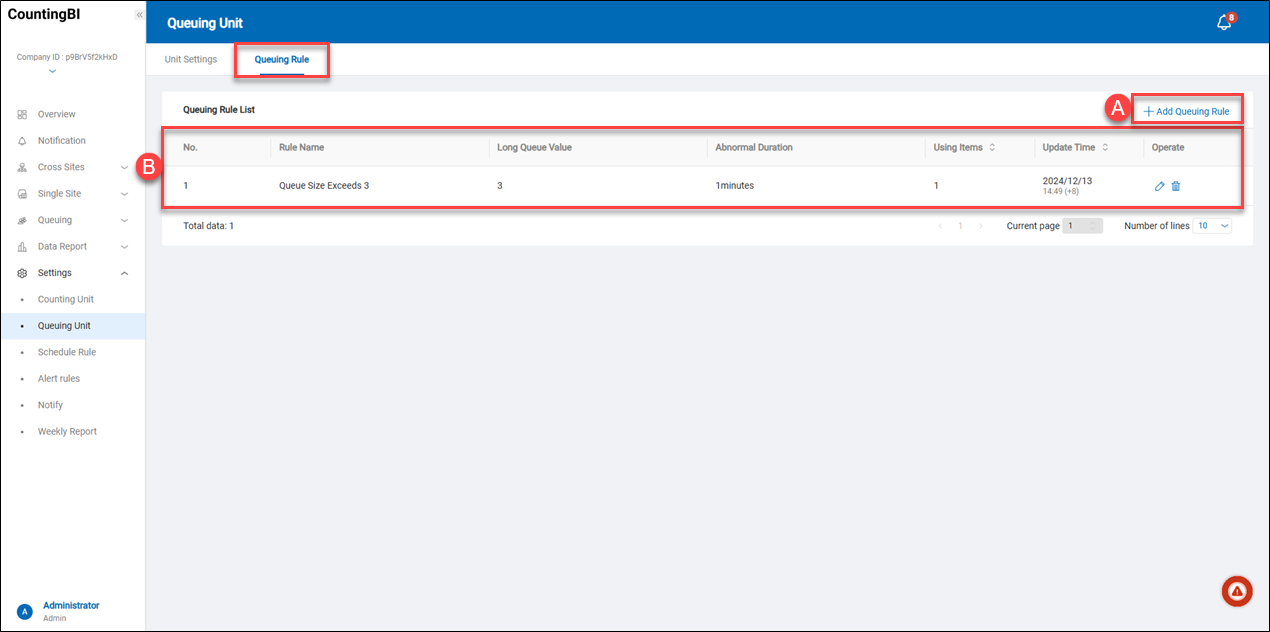 A.【+ Add Queuing Rule】 ⇒ This option allows users to add a queuing rule.
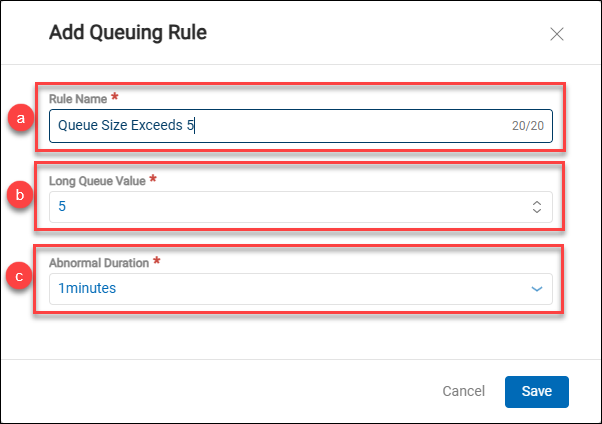 a.【Rule Name】 ⇒ Set the name of the queuing rule.
b.【Long Queue Value】 ⇒ Set the number of queuing people.
c.【Abnormal Duration】 ⇒ This item is designed to calculate the duration during which the number of queuing people reaches the 'Long Queue Value.' The options provide 'immediately,' '1 minute,' '5 minutes,' and '10 minutes.'
a.【Rule Name】 ⇒ Set the name of the queuing rule.
b.【Long Queue Value】 ⇒ Set the number of queuing people.
c.【Abnormal Duration】 ⇒ This item is designed to calculate the duration during which the number of queuing people reaches the 'Long Queue Value.' The options provide 'immediately,' '1 minute,' '5 minutes,' and '10 minutes.'
B.【Edit/Delete Queuing Rule】 ⇒ Users can perform CRUD operations on the queuing rule.
Schedule Rule
Schedule Rule is a feature designed for flexible management and configuration of system behavior. It allows users to set scheduling rules based on specific time periods to automatically trigger alerts or send instant messages.
 A.【Schedule Rule List】 ⇒ List all added schedule rules and allow users to perform CRUD operations.
- Rule Name ⇒ It displays the name of the schedule rule.
- Schedule Type ⇒ It shows which schedule type the schedule rule is applied to.
- Using Items ⇒ It shows how many 'Rule and Alert' items use this schedule rule.
- Update Time ⇒ It shows the last time for the modified settings.
- Operate ⇒ Allow users to perform CRUD operations.
B.【+ Add Schedule Rule】 ⇒ Users can click on it to add a new schedule rule.
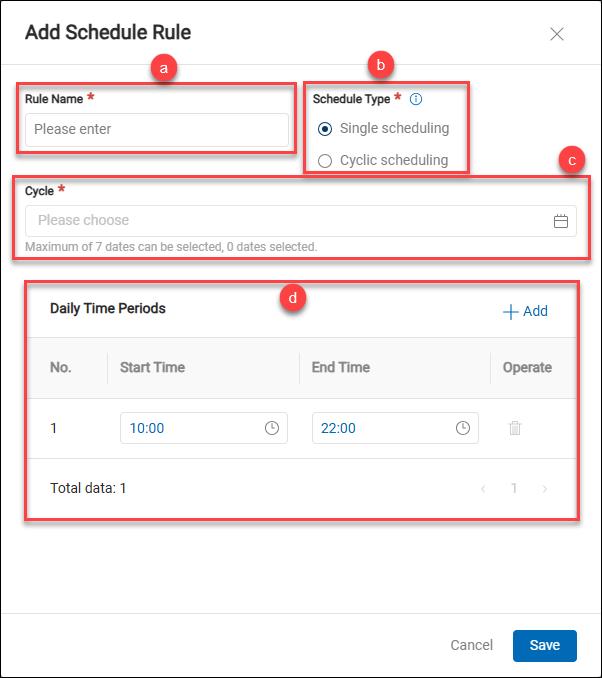 a.【Rule Name】 ⇒ Set the name of the schedule rule.
b.【Schedule Type】 ⇒ There are 2 schedule types, described below.
a.【Rule Name】 ⇒ Set the name of the schedule rule.
b.【Schedule Type】 ⇒ There are 2 schedule types, described below.
- Single scheduling ⇒ This feature allows users to set a one-time schedule. Users can choose any date, with a maximum of seven dates.
- Cyclic scheduling ⇒ This feature allows users to set a cyclic schedule. Users can choose any day throughout the week. It repeats the cyclic schedule every week, with a maximum of seven days.
c.【Cycle】 ⇒ It depends on the 'Schedule Type' settings, described below.
-
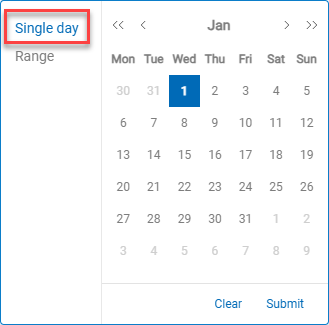
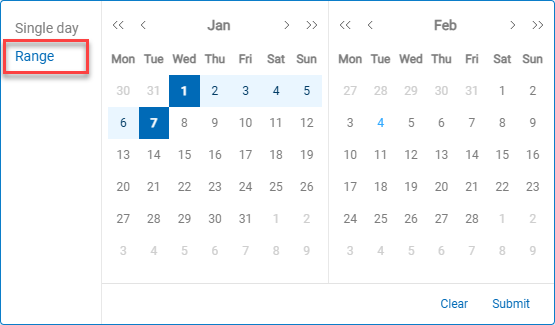
Single scheduling ⇒ In 'Single Scheduling' mode, it provides two options for selecting the date.
-
Single Day ⇒ Users can choose any date, with a maximum of seven dates.
-
Range ⇒ Users can choose any continuous dates, with a maximum of seven.
-
-
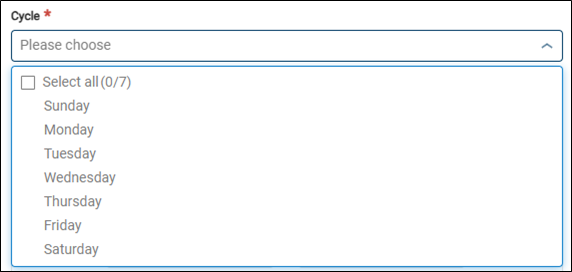
Cyclic scheduling ⇒ Users can choose any day throughout the week, with a maximum of seven days.
d.【Daily Time Periods】 ⇒ Users can set a daily time period with a start time and end time. This feature allows users to set multiple daily time period settings by clicking the "+ Add" button.
Alert Rule
The Alert Rule feature provides three levels: Level 1, Level 2, and Level 3. It is designed to trigger different alert levels based on the duration the queue size remains at its maximum limit. When the queue size reaches the preset limit, the system classifies the alert into three levels based on the duration the queue remains at the limit: Level 1 being the lowest alert level, Level 2 being the medium alert level, and Level 3 being the highest alert level. Users can set different alert actions according to these levels, allowing them to take prompt action when the queue situation reaches the predefined threshold. The alert actions include 'Web Notifications,' 'Web Sounds Alert,' and 'Web Pop-up,' and real-time notifications can also be sent via WhatsApp.
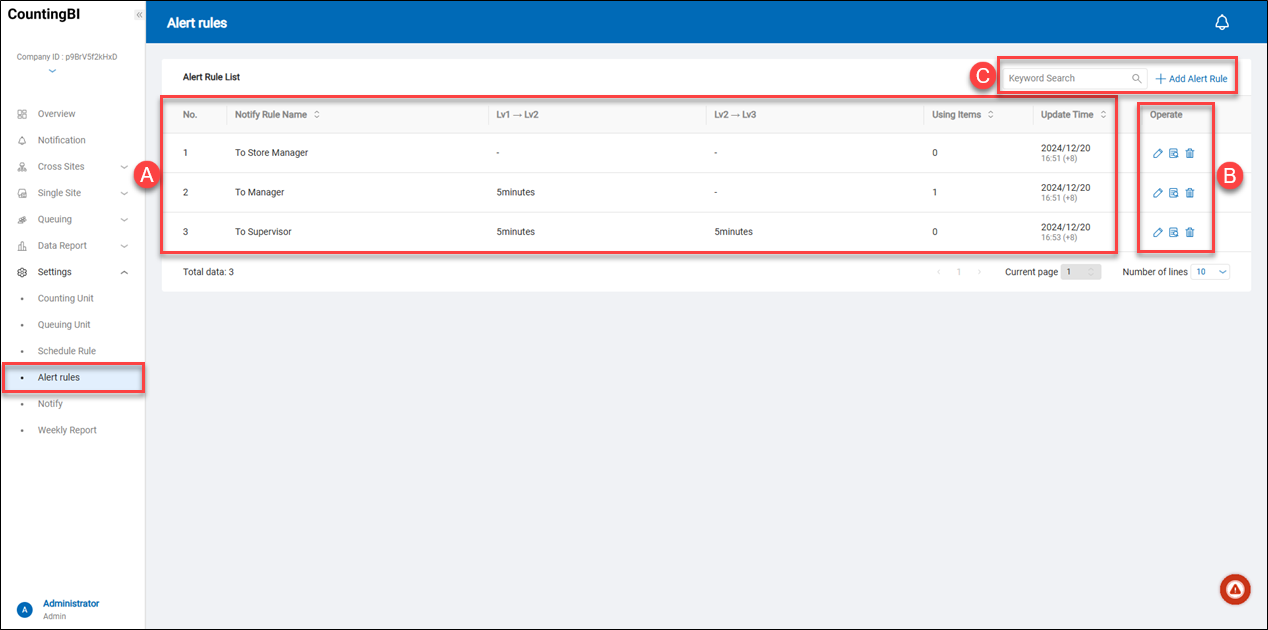 A.【Alert Rule List】 ⇒ List all added alert rules.
- Notify Rule Name ⇒ It displays the name of the alert rule.
- Lv1 -> Lv2 ⇒ The level 1 will move to the level 2, when the duration the queue size remains at its maximum limit.
- Lv2 -> Lv3 ⇒ The level 2 will move to the level 3, when the duration the queue size remains at its maximum limit.
- Using Items ⇒ It shows how many 'Rule and Alert' items use this alert rule.
- Update Time ⇒ It shows the last time for the modified settings.
- Operate ⇒ Allow users to perform CRUD operations.
B.【Operate】 ⇒ Allow users to perform CRUD operations.
C.【Search Data and Add Alert Rule】 ⇒ Users can enter keywords in the 'Keyword Search' field to search for notify rules. They can also click the '+ Add Alert Rule' button to add new rules.
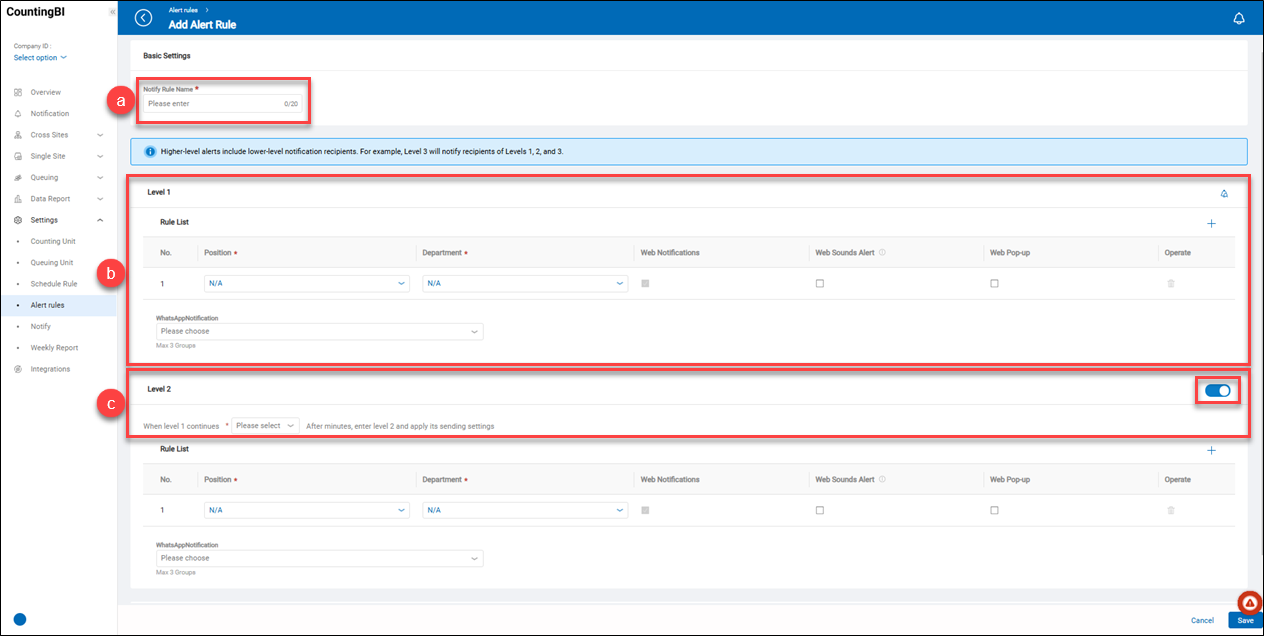 a.【Notify Rule Name】 ⇒ Set the name of the notify rule.
b.【List of Rules for Level 1】 ⇒ The first level of the notification can trigger some web alerts and send instant messages to the instant message groups. See below.
a.【Notify Rule Name】 ⇒ Set the name of the notify rule.
b.【List of Rules for Level 1】 ⇒ The first level of the notification can trigger some web alerts and send instant messages to the instant message groups. See below.
- Position ⇒ Assign a job position to receive the web notification.
- Department ⇒ Assign a department to receive the web notification.
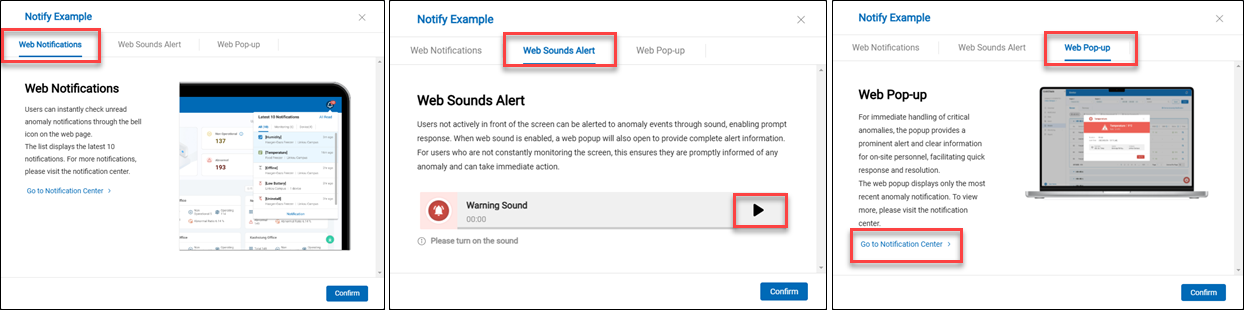
- Web Notifications ⇒ The 'Web Notifications' is always enabled, and the setting cannot be disabled. All web notifications can be found in the 'Notification Center.'
- Web Sounds Alert ⇒ If the 'Web Sounds Alert' is enabled, the 'Web Pop-up' will also be enabled simultaneously. The sound will continue to play when the alert condition is met, until users close the 'Web Pop-up' window.
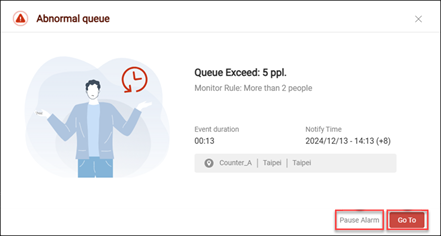
- Web Pop-up ⇒ If the 'Web Pop-up' is enabled, the system will display an alert window when the alert condition is met. Users can click the 'Pause Alarm' button to stop the sound or click the 'Go To' button to visit the 'Notification Center.' Refer to the note below.
- Operate ⇒ Delete the rule.
- WhatsApp Notification ⇒ The system will send WhatsApp notifications to groups when the alert rule is met. Users can add up to 3 notification groups.
- Add Rule ⇒ Click the
 button to add a new rule. Users can add up to 3 rules within a level.
 - Notify Example ⇒ The alert rule provides three notification examples to help users understand the notification behavior. Users can click on the
 play button to play the web sound sample, and they can also click the shortcut 'Go to Notification Center >' to quickly visit the 'Notification' page.
c.【Feature Toggle and Condition】 ⇒ Enable or disable Level 2 with the feature toggle. Set the duration for Level 1 to transition to Level 2.
> Note:
- Higher-level alert recipients will include lower-level notification recipients. For example, when the alert rule meets the conditions for Level 3, the system will notify recipients of Levels 1, 2, and 3.
- Web Pop-up alert window
Notify
WhatsApp Notification Settings
This feature allows users to set up WhatsApp instant notifications. When the system meets predefined alert conditions, notifications will be automatically sent to the specified recipient groups. Users can enable these notifications in the settings interface and designate the groups to receive the alerts.
【WhatsApp Group】
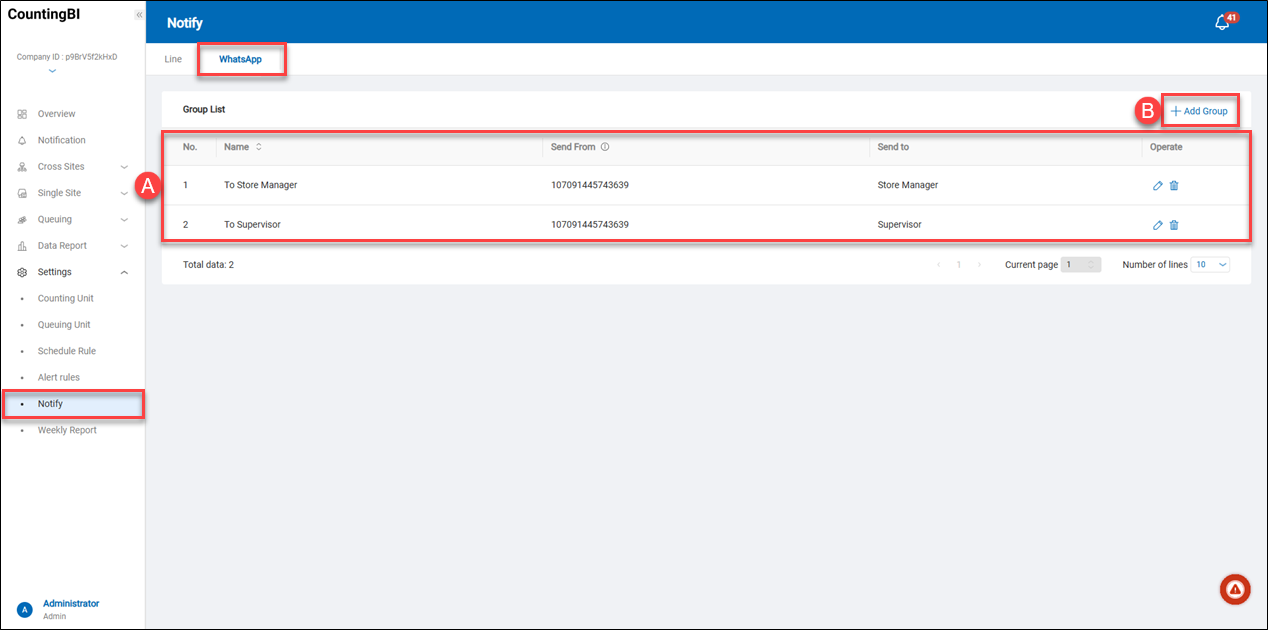 A.【Group List】 ⇒ List the added WhatsApp groups and allow users to perform CRUD operations.
B.【+ Add Group】 ⇒ To add a new WhatsApp notification group.
A.【Group List】 ⇒ List the added WhatsApp groups and allow users to perform CRUD operations.
B.【+ Add Group】 ⇒ To add a new WhatsApp notification group.
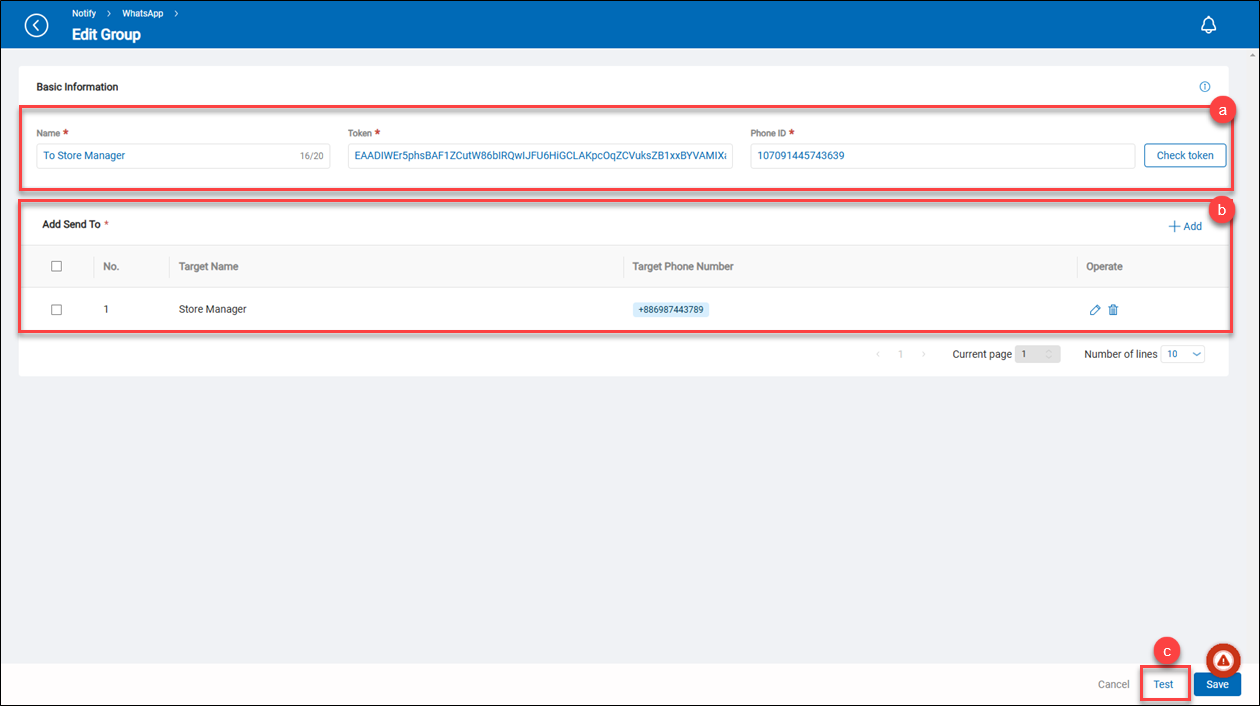 a.【Basic Information】 ⇒ Define the name of the WhatsApp notification group, a valid WhatsApp token, and the valid phone number associated with the token.
b.【Add Send To】 ⇒ List the added WhatsApp notification recipients and allow users to perform CRUD operations on them. See below.
- Target Name ⇒ It displays the self-defined name of the WhatsApp notification recipient.
- Target Phone Number ⇒ The cell phone number of the person who will receive the notification.
- Operate ⇒ Allow users to perform CRUD operations on them.
- Check Token ⇒ Allow users to test the WhatsApp token validity.
- + Add ⇒ Add the WhatsApp notification recipient.

- Target Name ⇒ Define the name of the WhatsApp notification recipient.
- Target Phone Number ⇒ The cell phone number of the person who will receive the notification. > Note The target phone number should be in international format, such as +886988123456 (country code + cell phone number)
c.【Test】 ⇒ Allow users to quickly check the WhatsApp token validity. Whether it passes or fails, the test result will be displayed at the top of the window. If the test passes, a WhatsApp test message will be sent to the recipient.


> Note Before using WhatsApp Notify, user need to obtain a WhatsApp notification token. Please click the link to access the instructions on how to obtain a valid token. Click here to check how to obtain a valid WhatsApp token.
Weekly Report
This section explains how to use the weekly report settings to send weekly statistical reports by email to personnel in specified roles.
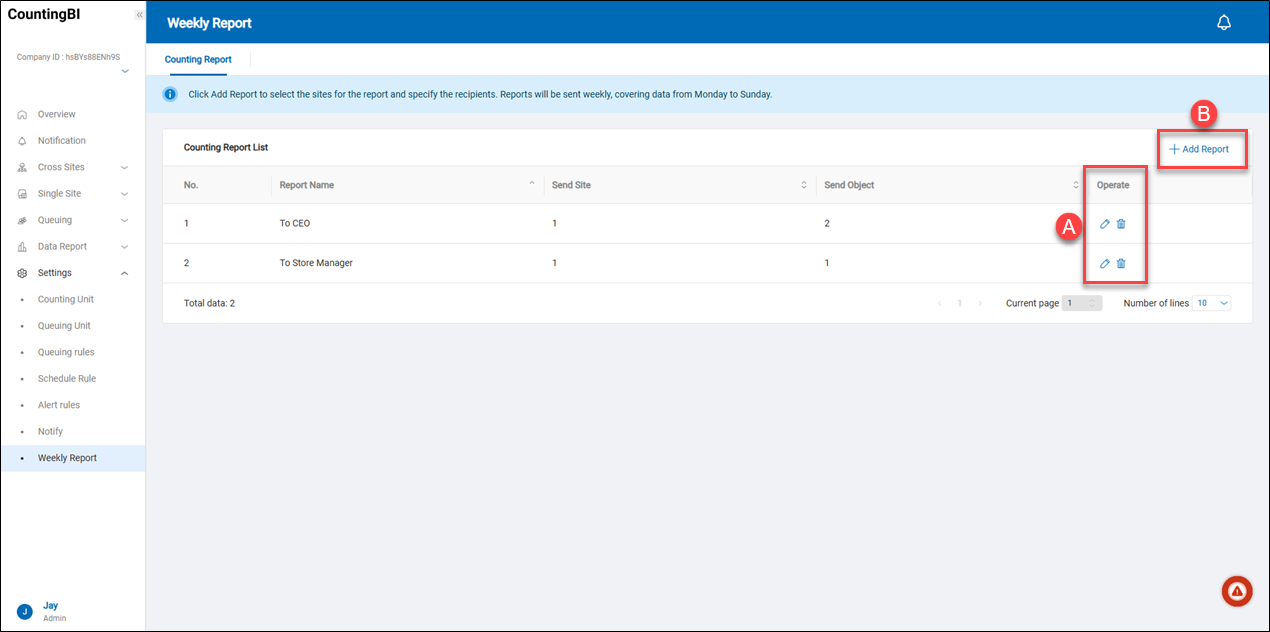 A.【Edit/Delete】 ⇒ Allows modification of the recipient list for the weekly report or deletion of the list entry.
B.【+ Add Report】 ⇒ Users can click on "+ Add Weekly Report" to add recipients for the operational weekly report.
A.【Edit/Delete】 ⇒ Allows modification of the recipient list for the weekly report or deletion of the list entry.
B.【+ Add Report】 ⇒ Users can click on "+ Add Weekly Report" to add recipients for the operational weekly report.
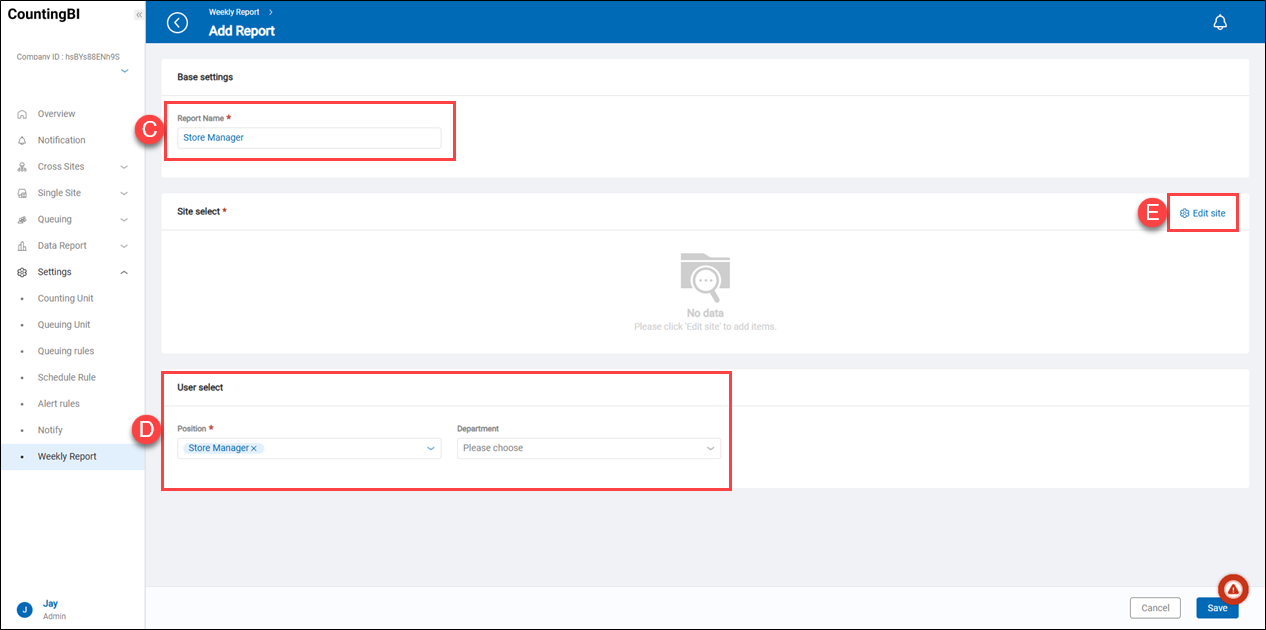 C.【Weekly Report Name】 ⇒ Assign a name to the new weekly report list.
D.【User Selection】 ⇒ Select the job roles or department types to receive the weekly report. All user accounts with the selected roles will receive the report.
E.【Edit Site】 ⇒ Choose the sites for sending the weekly report; only the chosen sites will have their reports sent to the users.
C.【Weekly Report Name】 ⇒ Assign a name to the new weekly report list.
D.【User Selection】 ⇒ Select the job roles or department types to receive the weekly report. All user accounts with the selected roles will receive the report.
E.【Edit Site】 ⇒ Choose the sites for sending the weekly report; only the chosen sites will have their reports sent to the users.
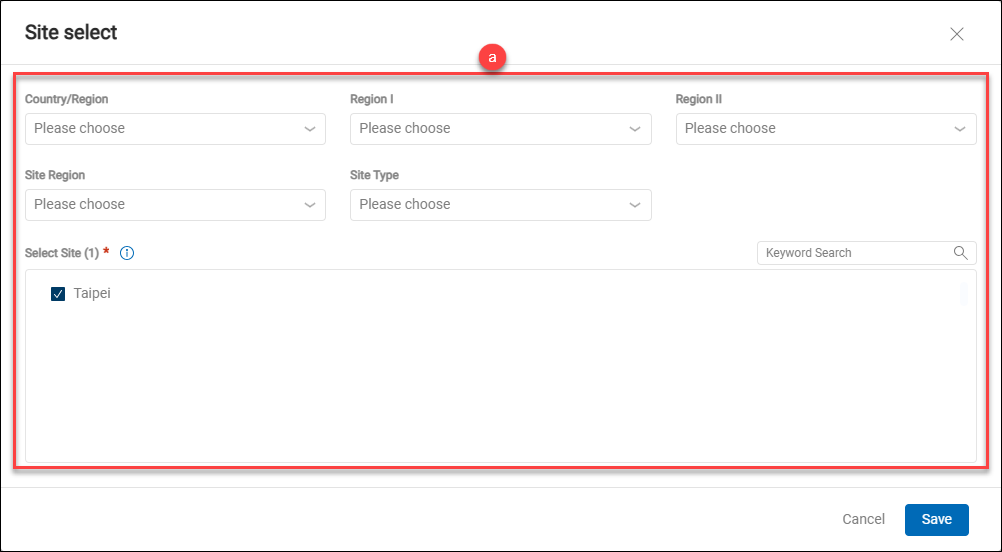 a.【Site Select】 ⇒ Filter locations based on country/region, area, site group, site type, or site name keywords. Select the locations for which the operational weekly report will be sent to the designated recipients.
Example of Counting Unit Setup
The counting unit mentioned at the beginning of this section can accommodate data from one or multiple people-counting cameras. Using this as an example, the following explains how to set up a counting unit.
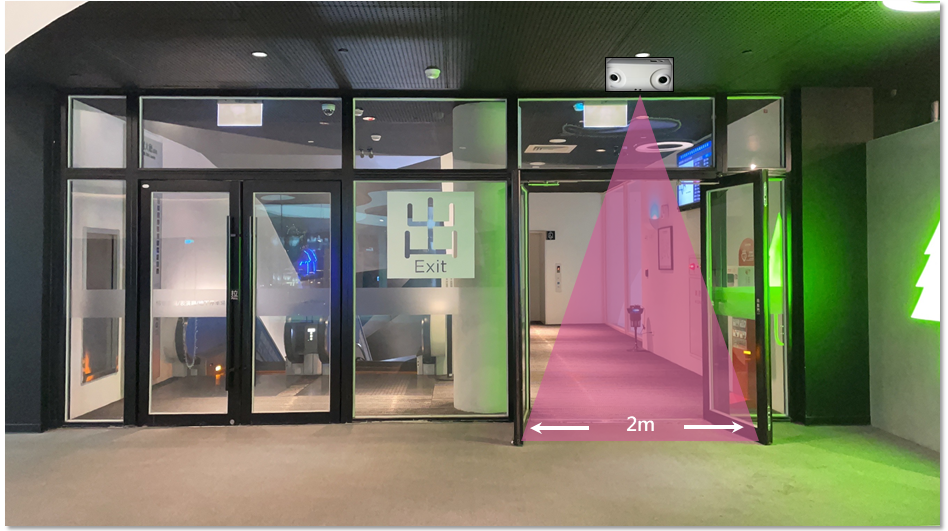
Example Setup for Counting Unit with a Single UCAM-130 Camera
Scenario Example Explanation:
As shown in the example, there is only one entrance that requires people-counting at this location. Assuming the detection area can be fully covered by a single people-counting camera, this example will focus on counting people entering the store.
Setup Steps:
- Select Counting Unit from the function list on the left side.
- At the desired site for adding a new counting unit, click the "+ Add Unit" button.
-
In the "Base setting of Counting unit" menu, enter the following information:
- Unit Name ⇒ Customize the unit name, typically named by the entrance/exit for easy identification. For example: East Entrance.
- Unit Type ⇒ Select "Entry"
-
Click the "+ Add Device" button.
-
In the "Device Name" menu, select UCAM_1. In this example, the unit name corresponds with the device name on the UCAM side. After selecting UCAM_1, the count line setting below will be grayed out.
-
Click the "Save" button to apply the new device settings.
-
Click "Save" again to apply the new unit settings. Once completed, the new unit will appear in the counting unit list.

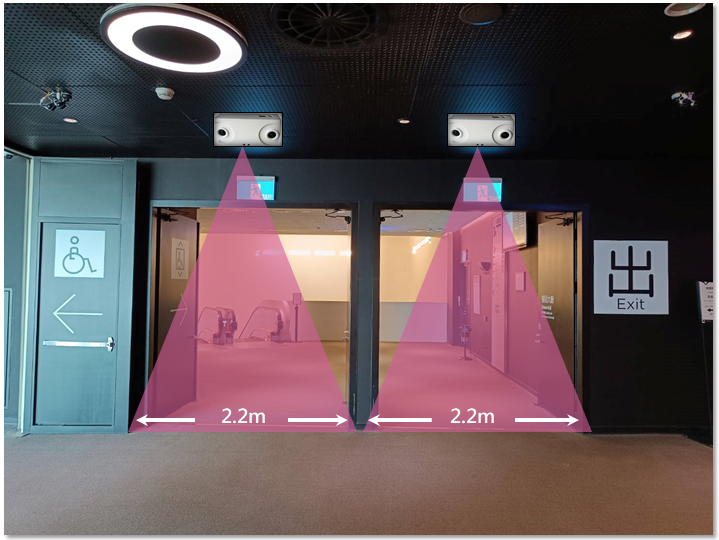
Example Setup for Counting Unit with Multiple UCAM-130 Cameras
Scenario Example Explanation:
As shown in the example, there are multiple doors at an entrance that require people-counting. When the detection range of a single people-counting camera is insufficient, multiple cameras are needed to cover the required detection area. In this case, these cameras can be treated as a single counting unit during the setup.
Setup Steps:
- Select "Counting Unit" from the function list on the left side.
- At the desired site for adding a new counting unit, click the "+ Add Unit" button.
-
In the "Base setting of Counting unit" menu, enter the following information:
- Unit Name ⇒ Customize the unit name, typically named by the entrance/exit for easy identification. For example: East Entrance.
- Unit Type ⇒ Select "Entry"
-
Click the "+ Add Device" button.
-
In the "Device Name" menu, select UCAM_1. In this example, the unit name corresponds with the device name on the UCAM side. After selecting UCAM_1, the count line settings below will be grayed out.
-
Click the "Save" button to apply the new device settings.
-
Repeat steps 4 to 6 to add all UCAM cameras to the counting unit. Once finished, click the "Save" button to apply the new device settings.
