Person List
The Person List module in Face Vision is used to manage facial data required for the facial recognition system. It supports both individual face registration and batch face registration, providing a complete and accurate data source for the recognition functionality.
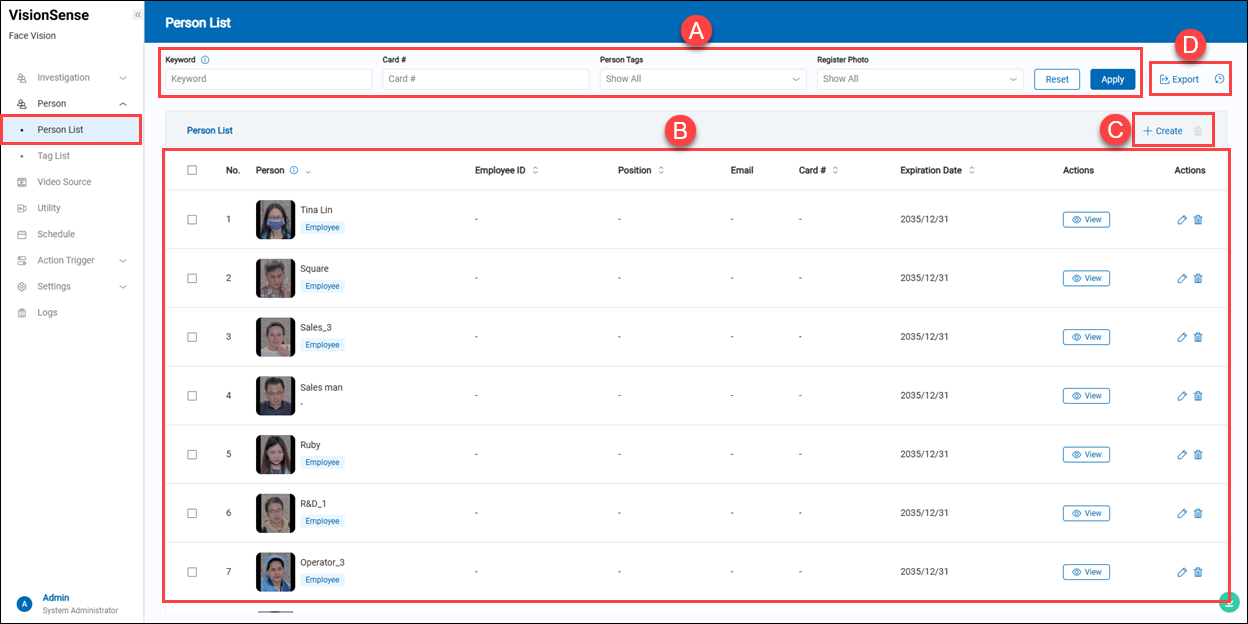 A.【Filtering】 ⇒ Use the display filters to narrow down results by name, employee ID, position, email, card number, person tags, and whether a registered face photo is available.
B.【Person List】 ⇒ It is a function in Face Vision used to manage the facial data of registered individuals. It provides an intuitive list view and advanced filtering features, supporting registration and query operations required by the facial recognition system.
- Person: Displays the face photo, name, and person tag.
- Employee ID: Shows the employee’s ID.
- Position: Displays the person’s position.
- Email: Displays email address.
- Card Number: Displays access card number.
- Expiration Date: Displays expiration date of the record.
- Actions: Click
 'View' to see details; use the
  'edit' to edit, or the
  'delete' to delete.
C.【+ Create / Delete】 ⇒ Users can click ![]() '+ Create' to add a new person profile or click
'+ Create' to add a new person profile or click ![]() 'Delete' to remove multiple selected person profiles at a time.
'Delete' to remove multiple selected person profiles at a time.
【Create Single Person】
Create a new person profile manually.
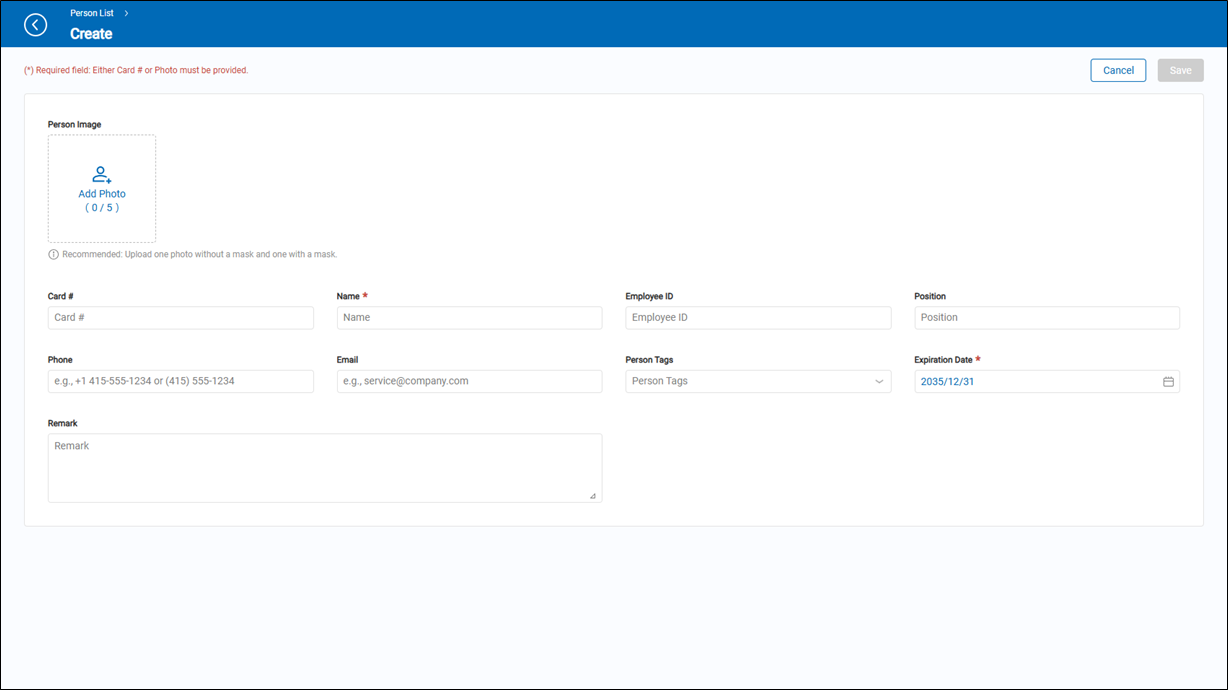
- Photo Image: Click 'Add Photo' to upload up to 5 face photos. Recommended to include one photo with a mask and one without.
- Card #: Enter the card number associated with the person.
- Name: Required field. Enter the person's full name.
- Employee ID: Optional. Input the employee identification number.
- Position: Enter the person's job title.
- Phone: Enter a contact phone number.
- Email: Provide a valid email address.
- Person Tags: Assign tags for easier search and categorization.
- Expiration Date: Required. Set the expiration date for this profile.
- Remark: Add any additional notes or remarks.
【Batch Enrollment】
The Batch Enrollment module provides users with a fast and efficient way to add multiple person profiles. By uploading an Excel file together with a ZIP archive of face images, it significantly streamlines the process of creating facial data.

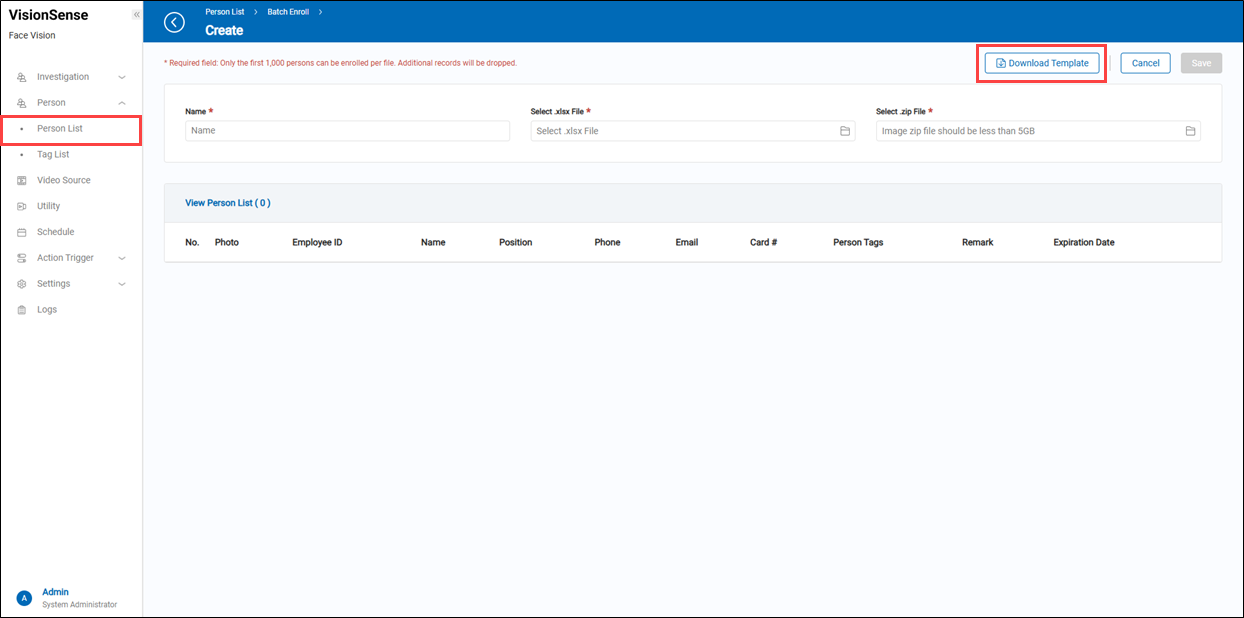
a.【Batch Enrollment】
- Downlaod Template: Click 'Download Template' to download the template file.
- Name: Required field to name this batch enrollment task.
- Select .xlsx File: Upload the Excel file that contains personal information (must follow the system template format).
- Select .zip File: Upload a ZIP file containing face images. The filenames must match the names in the Excel sheet. The ZIP file size must be less than 5GB.
- View Person List: After uploading, you can preview the person list below.
> Notes Up to 1,000 persons can be imported per batch. Additional records will be ignored.
D.【Export / Enrollment History】
-
Export: Hover over the
 'Export' to expand the options.
- Person List: Export the person profile list to an Excel file.
- Batch Enrollment Data: Export the person profile list along with face images into an Excel file and image folder, which can be used for batch enrollment.
-
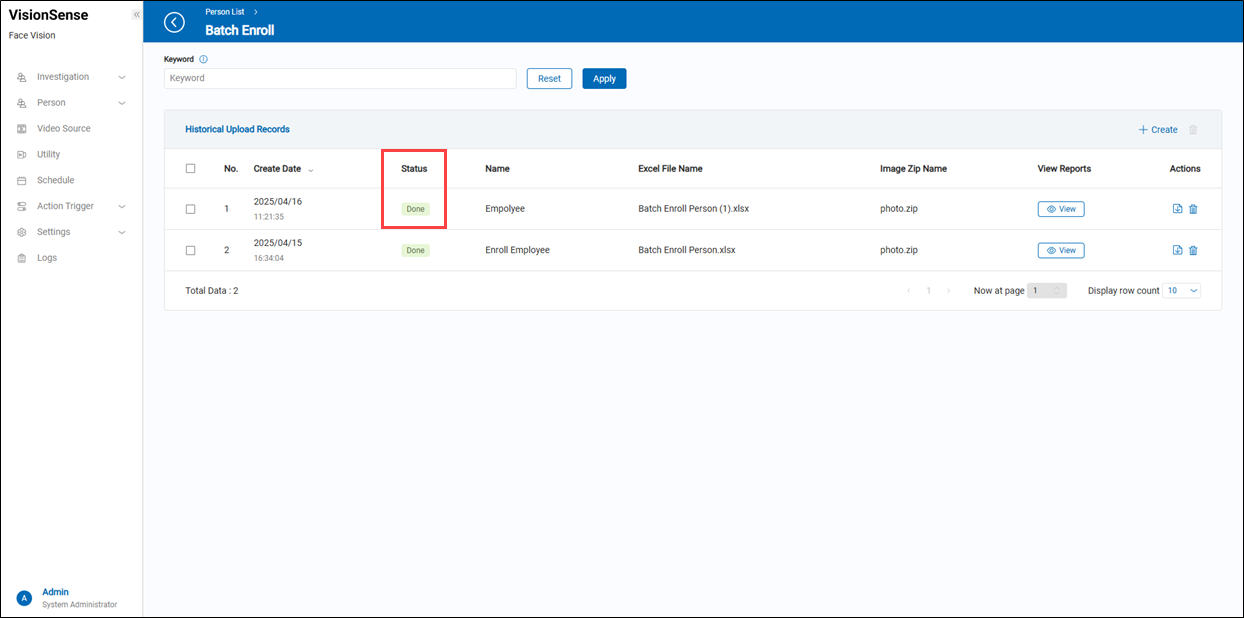
View Batch Enrollment History:
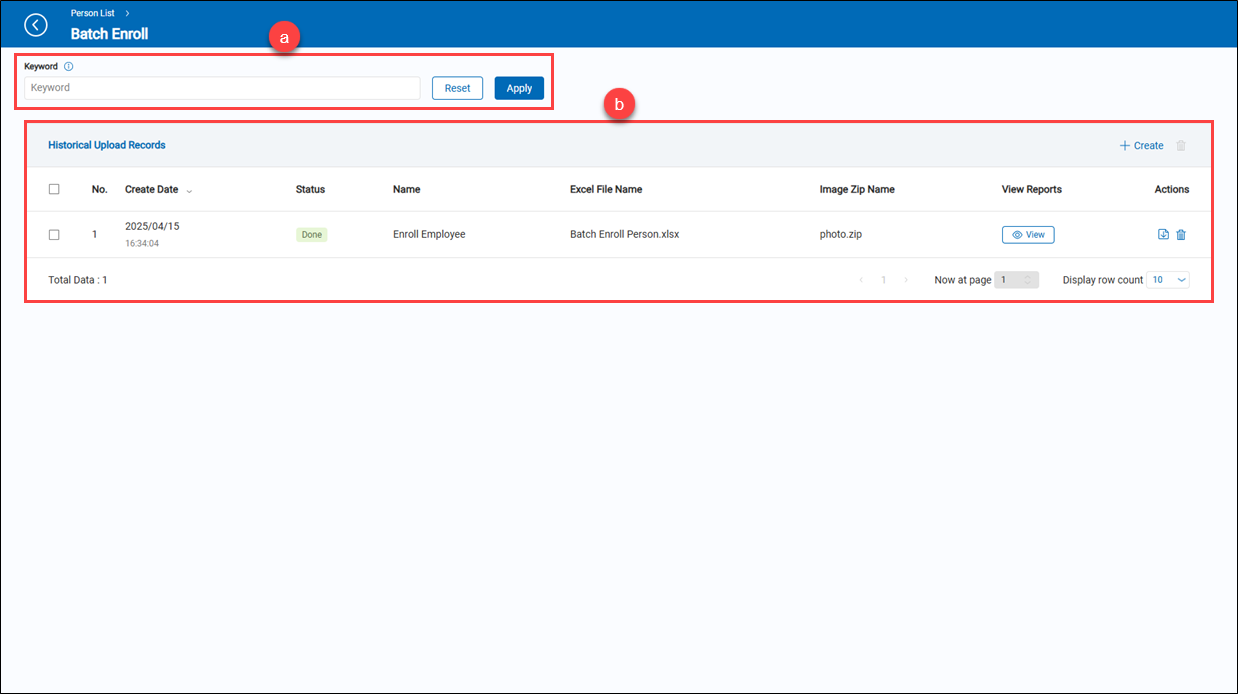 a.【Filter】 ⇒ Use the display filters to narrow down results by batch enrollment name.
b.【Historical Upload Records】
a.【Filter】 ⇒ Use the display filters to narrow down results by batch enrollment name.
b.【Historical Upload Records】- Create Date: The date the batch enrollment was created.
- Status: Current status of the upload (e.g., Done, Failed).
- Name: The name assigned to the batch enrollment record.
- Excel File Name: The name of the uploaded Excel file.
- Image Zip Name: The name of the uploaded image ZIP file.
- View Reports: Click to view detailed enrollment results or logs.
- Action: Hover over
 'Export' to expand the options. There are three downloadable options available: 'Download All Reports', 'Download Failed Reports' and 'Download Failed Person List'. You can also click 'Delete' to remove the selected data.
How to perform batch enrollment?
 👉 Step 1: Download the template and fill in the personal information.
The file names of the personnel photos (including file extensions) must be entered in the Photo column, as shown in the example below.
If a person needs to register two photos, enter the file names in both the Photo and Photo1 columns.
👉 Step 1: Download the template and fill in the personal information.
The file names of the personnel photos (including file extensions) must be entered in the Photo column, as shown in the example below.
If a person needs to register two photos, enter the file names in both the Photo and Photo1 columns.
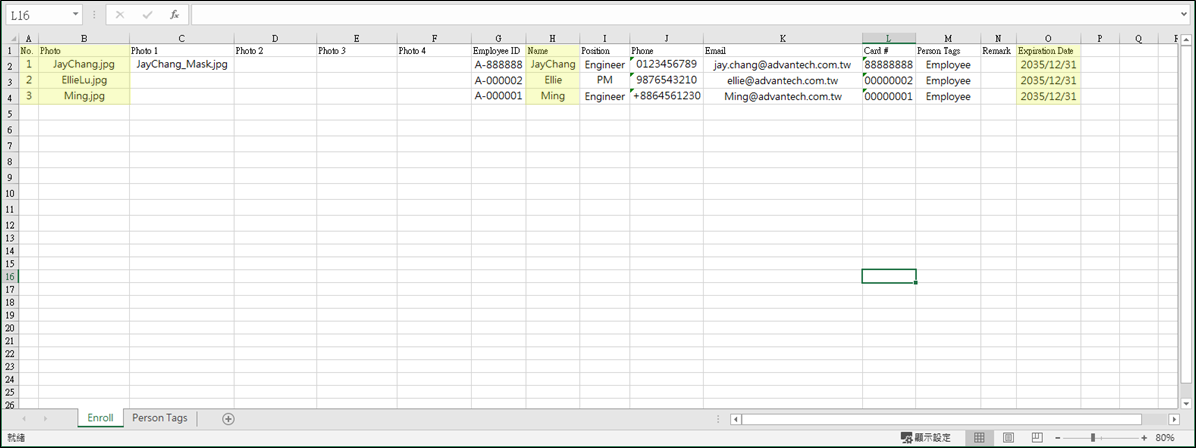 All required fields must be filled with valid data according to the specified data type of each column.
> Note:
Mandatory fields are highlighted in yellow.
All required fields must be filled with valid data according to the specified data type of each column.
> Note:
Mandatory fields are highlighted in yellow.
👉 Step 2: Prepare a ZIP file containing face images. The photo file name must match the content entered in the 'Photo' column of the Excel sheet.
 👉 Step 3: Upload the Excel file and the image ZIP file, then click 'Save' to start the batch enrollment process.
 ���👉 Step 4: Once the batch enrollment process begins, the screen will automatically redirect to the 'Historical Upload Records' page. Please wait patiently until the batch import is completed.
Tag List
Displays all tags in the system along with the number of associated persons, providing a way to categorize and manage personnel.
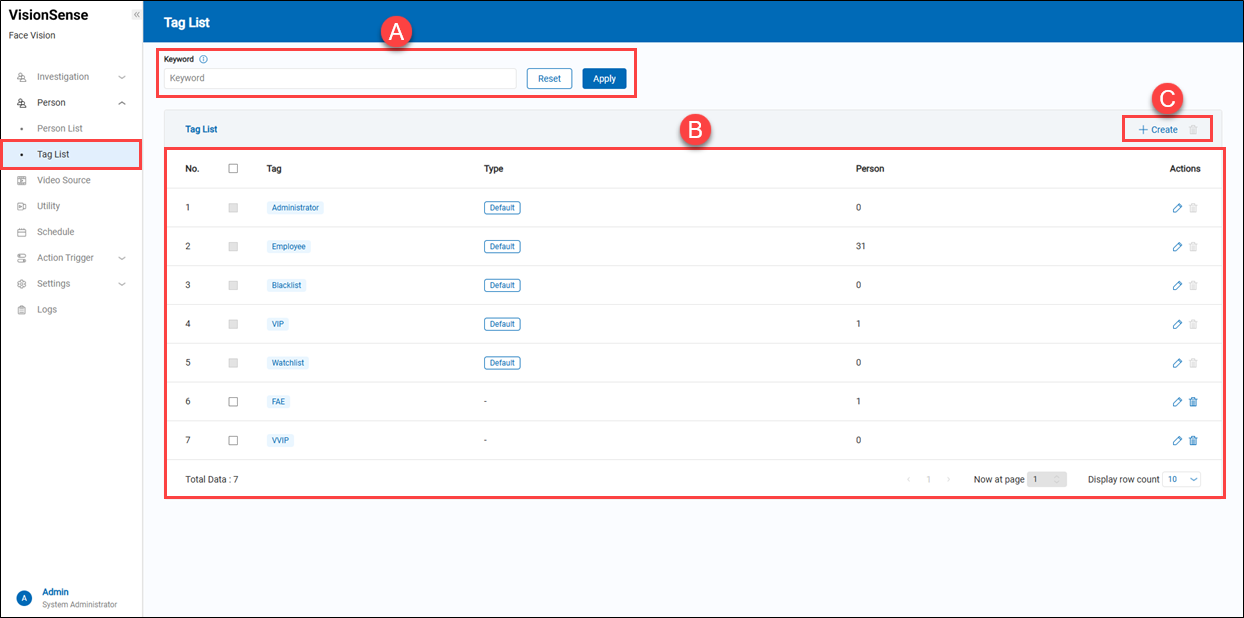
A.【Filtering】 ⇒ Use the display filters to narrow down results by tag name. B.【Tag List】
- Tag: The name of the tag, either custom-defined or system-default.
- Type: Tags with the default system type will display as 'Default' and cannot be deleted.
- Person: The number of individuals assigned to this tag.
- Action: Click 'Edit' to modify the tag name or 'Delete' to delete the tag.
C.【Operation】 ⇒ Click the ![]() '+ Create' to add a new tag, or the
'+ Create' to add a new tag, or the ![]() 'Delete' to remove multiple selected tags.
'Delete' to remove multiple selected tags.
【+ Create】
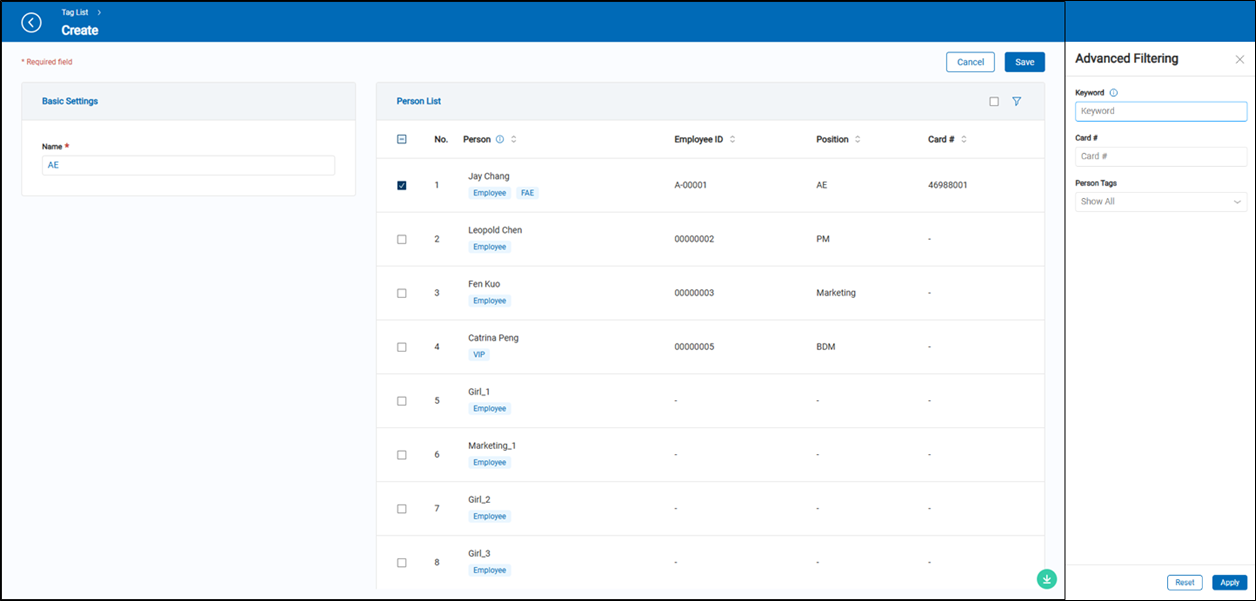
- Name: Required field. Enter the tag's name.
- Person List: Display all registered personnel. Select the individuals you want to assign to this tag.
You can also use the
 'filter' to expend the filter panel and narrow down the results by name, employee ID, position, email, card number, and person tags.