-
Tenant management
Changelog
Version Author Update date Comment 2.1.0 ITsung.Shen 2024/07/02 First Version 2.2.0 ITsung.Shen 2024/07/29 First released 2.3.0 ITsung.Shen 2025/02/11 Add chapter 9~11 2.5.0 ITsung.Shen 2025/08/19 Update chapter 5, allow to edit tenant ownerand expiration date of trial subtenant 1. Introduction
EdgeHub provides a tenant management interface that allows users to manage tenant-related functions. Currently, EdgeHub supports the following methods to generate tenants:
- Purchasing an EdgeHub license key
- Applying for an EdgeHub trial
- Manually created by the EdgeHub system administrator
- Creation via the SI Console
Through this interface, system administrators or general users can use the following tenant management functions:
- Display the tenant list
- Add sub-tenants
- Update tenants
- Activate license keys
- Allocate quotas
- Retry deductions
Next, we will provide a detailed explanation of each sub-function.
2. Display Tenant List (Tenant List)
2.1 General Tenants
-
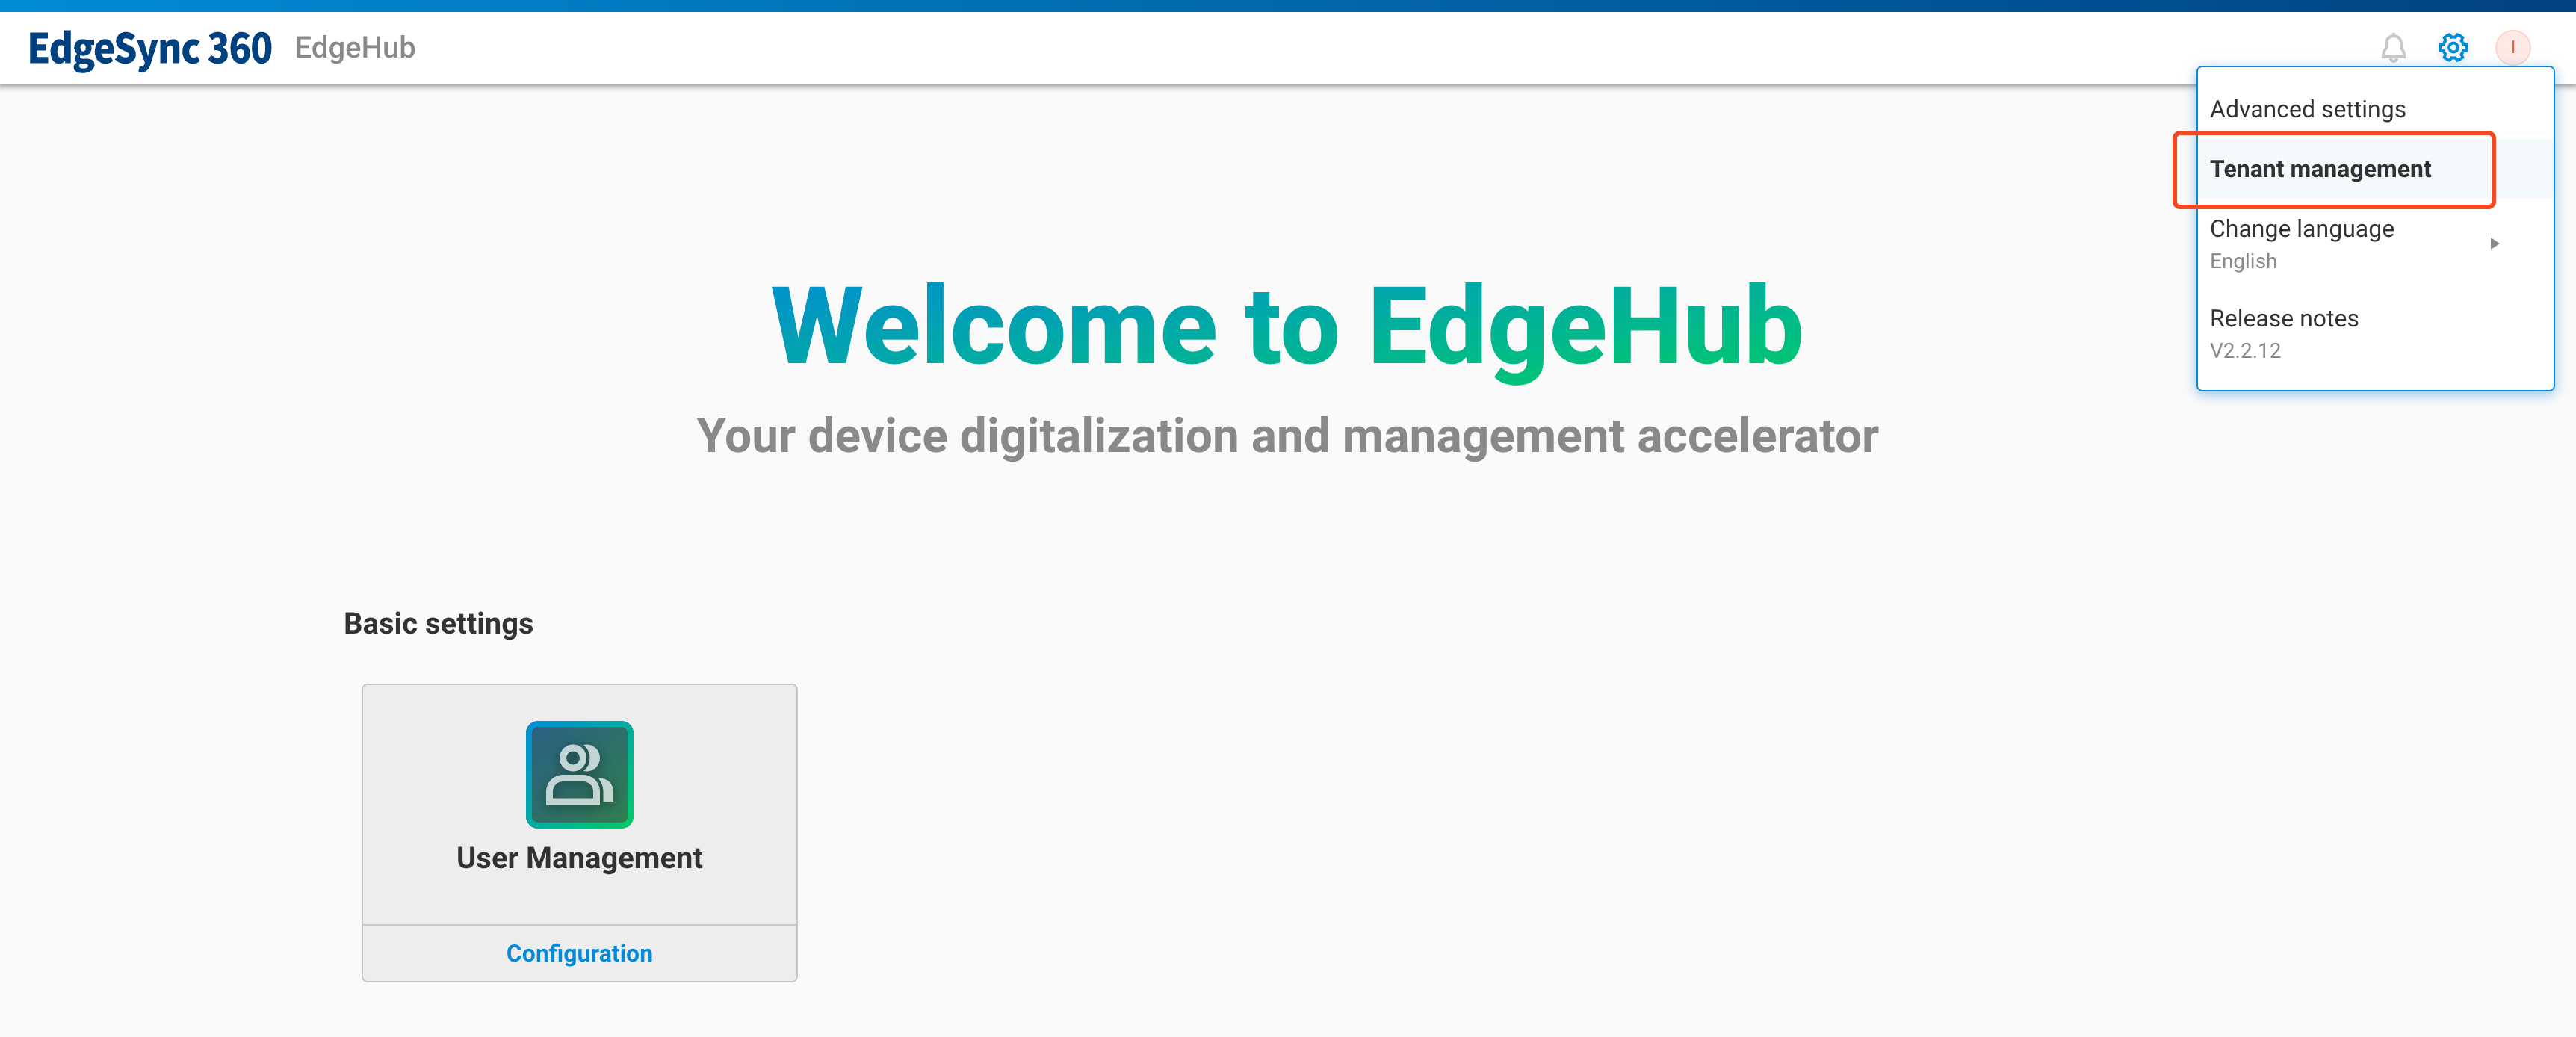
For general EdgeHub users, after entering a tenant, they can access the tenant list through the tenant management menu in the top right corner of the screen.

-
Upon entering the tenant list page, users can see their own tenant and a list of directly managed sub-tenants (the root node is the current tenant).
The displayed columns are explained as follows:
Column Name Description Tenant Name The name of the tenant Labels Labels indicating the tenant type, including:- Subscribed- Trial- Custom- SI Console- Licensed Subtenant- Custom Subtenant Description Description of the tenant License Quota (used/quota) Displays the tenant's contract quota and current usage. Currently, it mainly shows two types:- Parameter quantity- Device quantity Status Displays the current status of the tenant- Enabled- Disabled Date Created The creation date of the tenant Expiration Date The expiration date of the tenant Log Operation log of the tenant (This feature is not available in EdgeHub version 2.2) Actions Operations menu for the tenant, including:- Allocate license quota- Switch status- Edit tenant
2.2 Root Tenant
-
For EdgeHub system administrators, the tenant management interface can be used to manage all tenants on the entire site. First, enter the
Root tenant.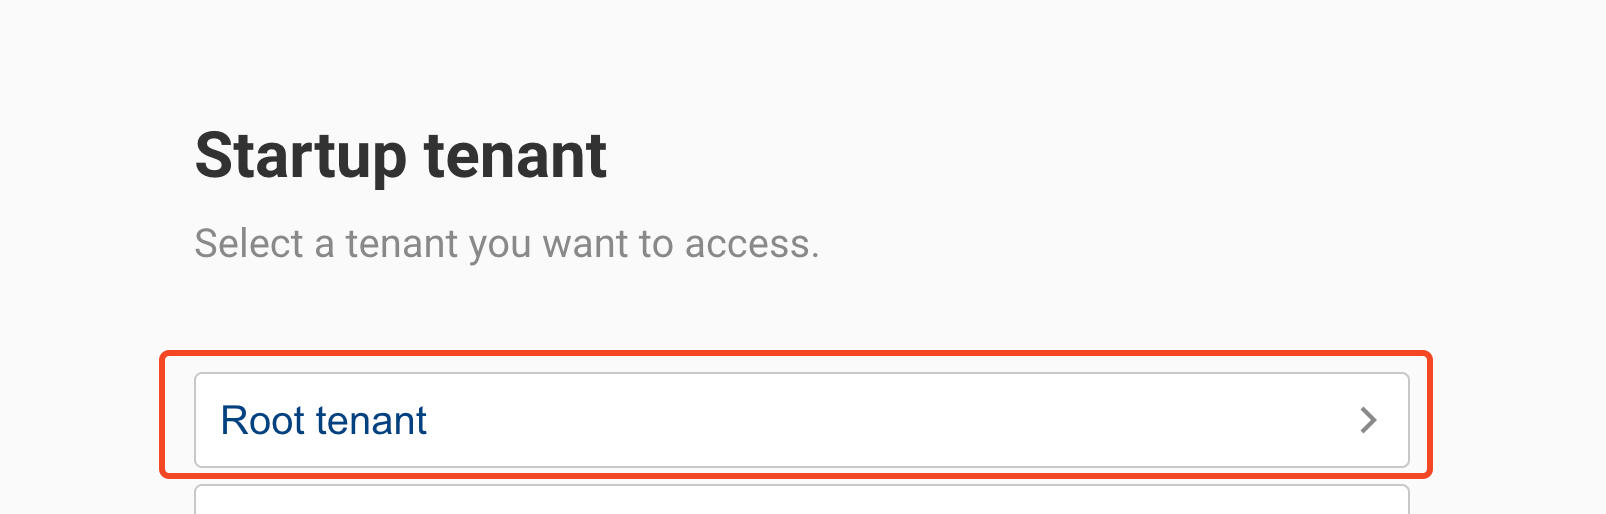
-
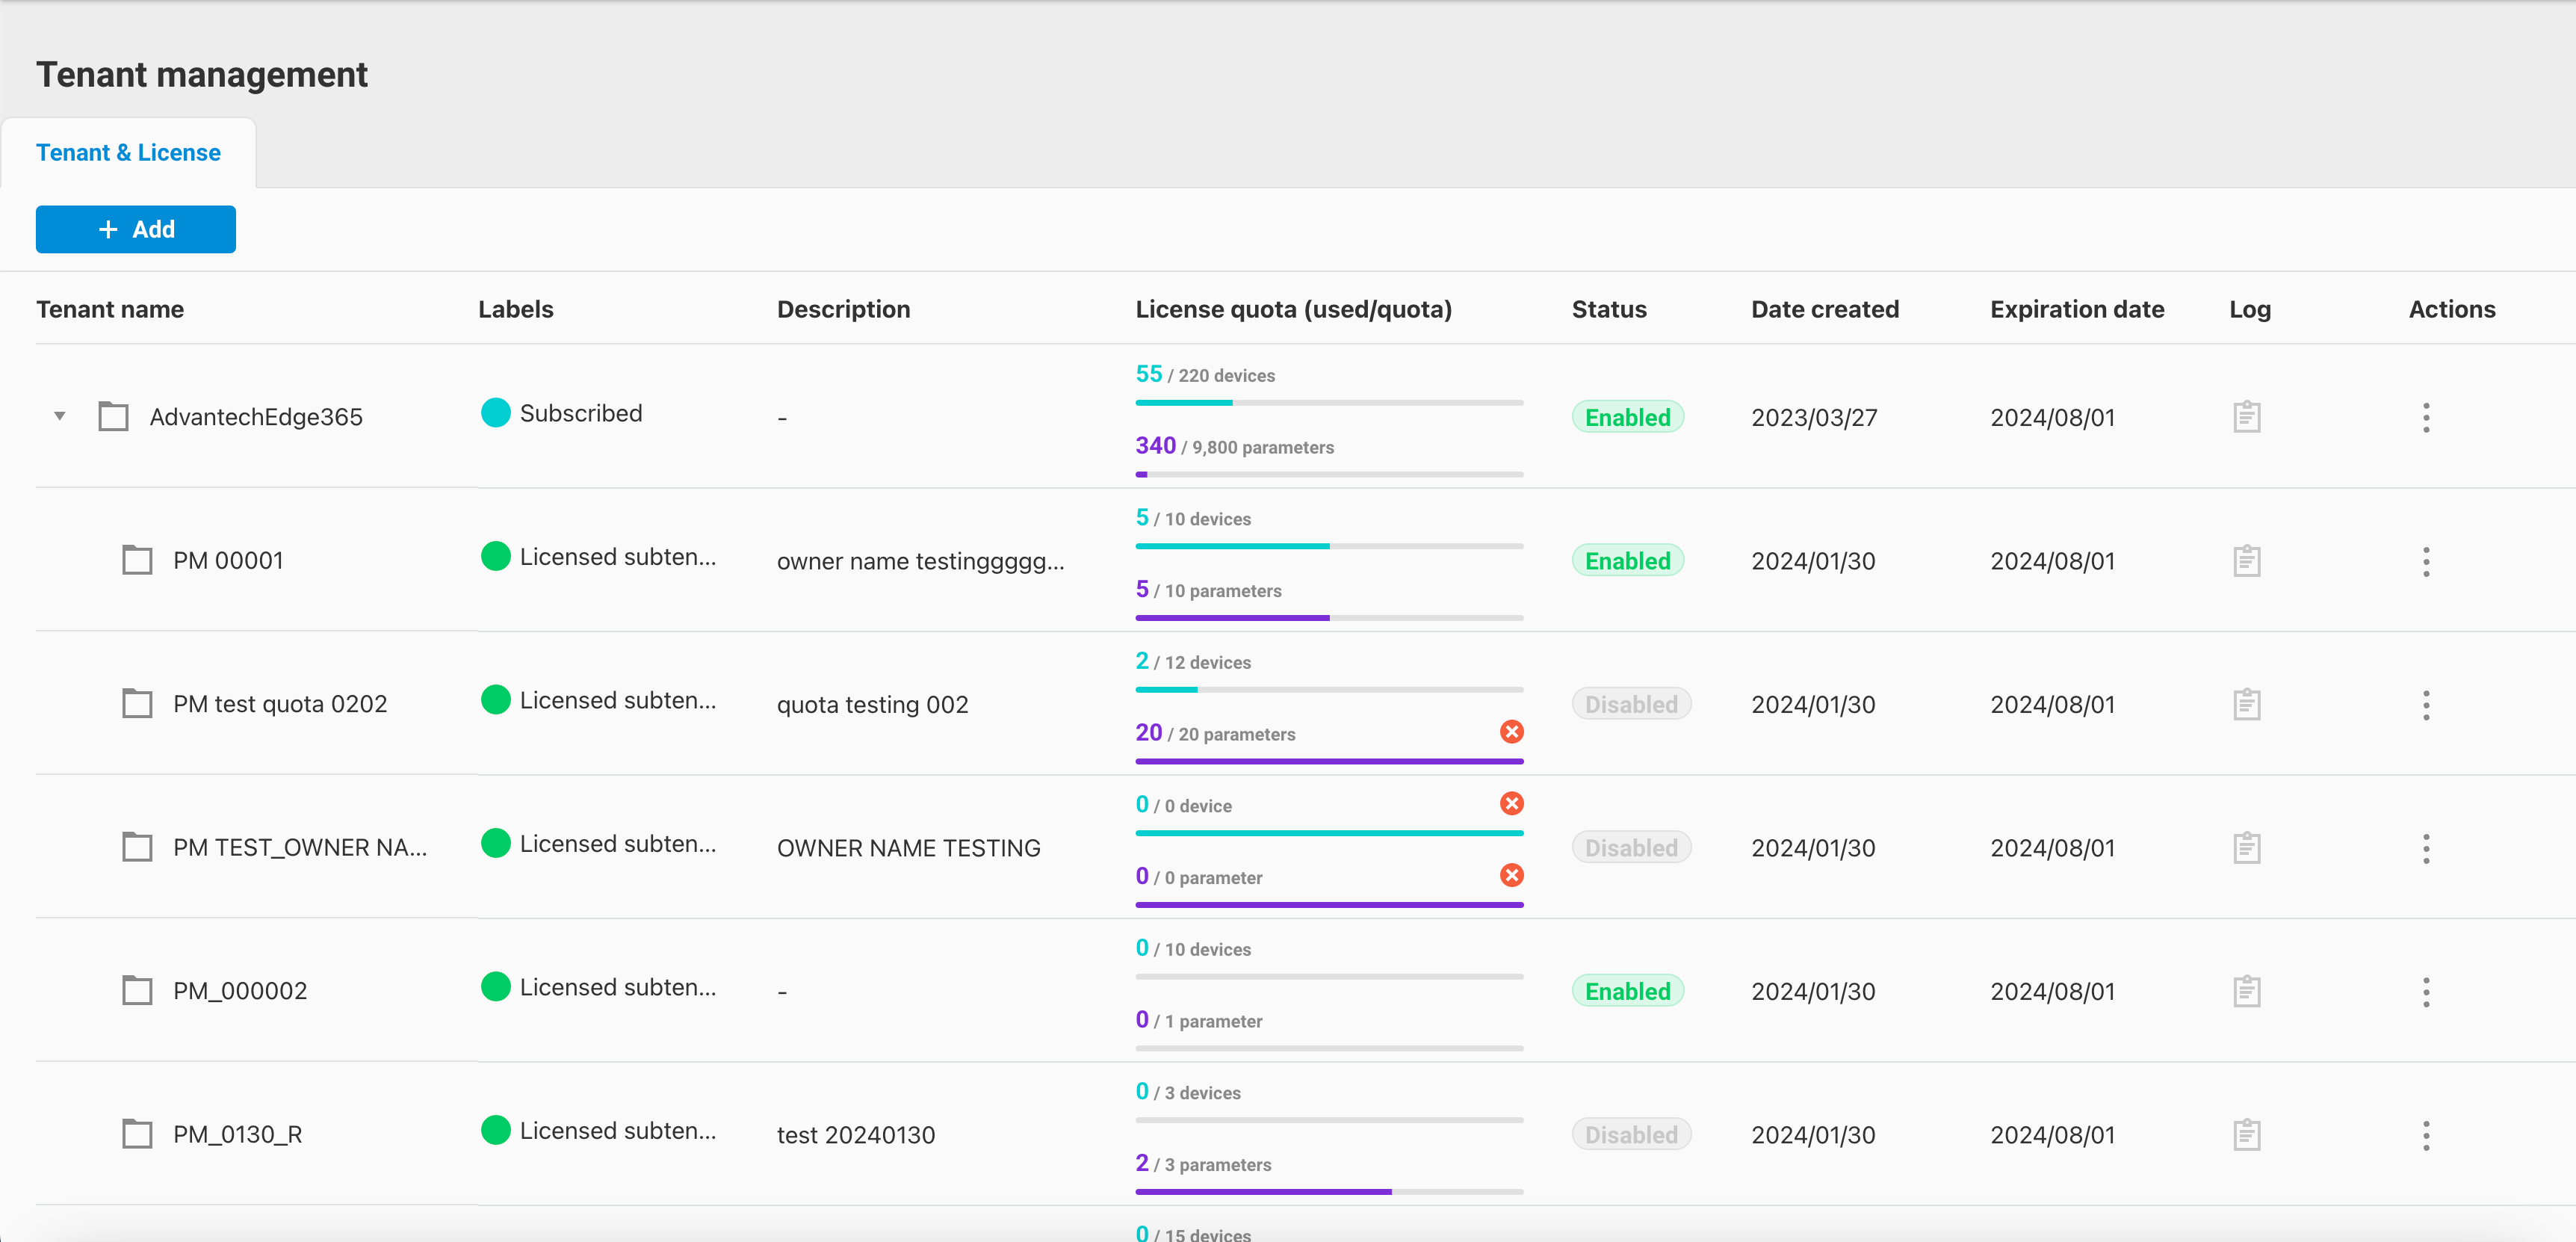
After entering, you can access the tenant list through the tenant management menu in the top right corner of the screen.
-
Upon entering the tenant list page, you can see a list of all tenants on the entire site (the root node is the
Root tenant).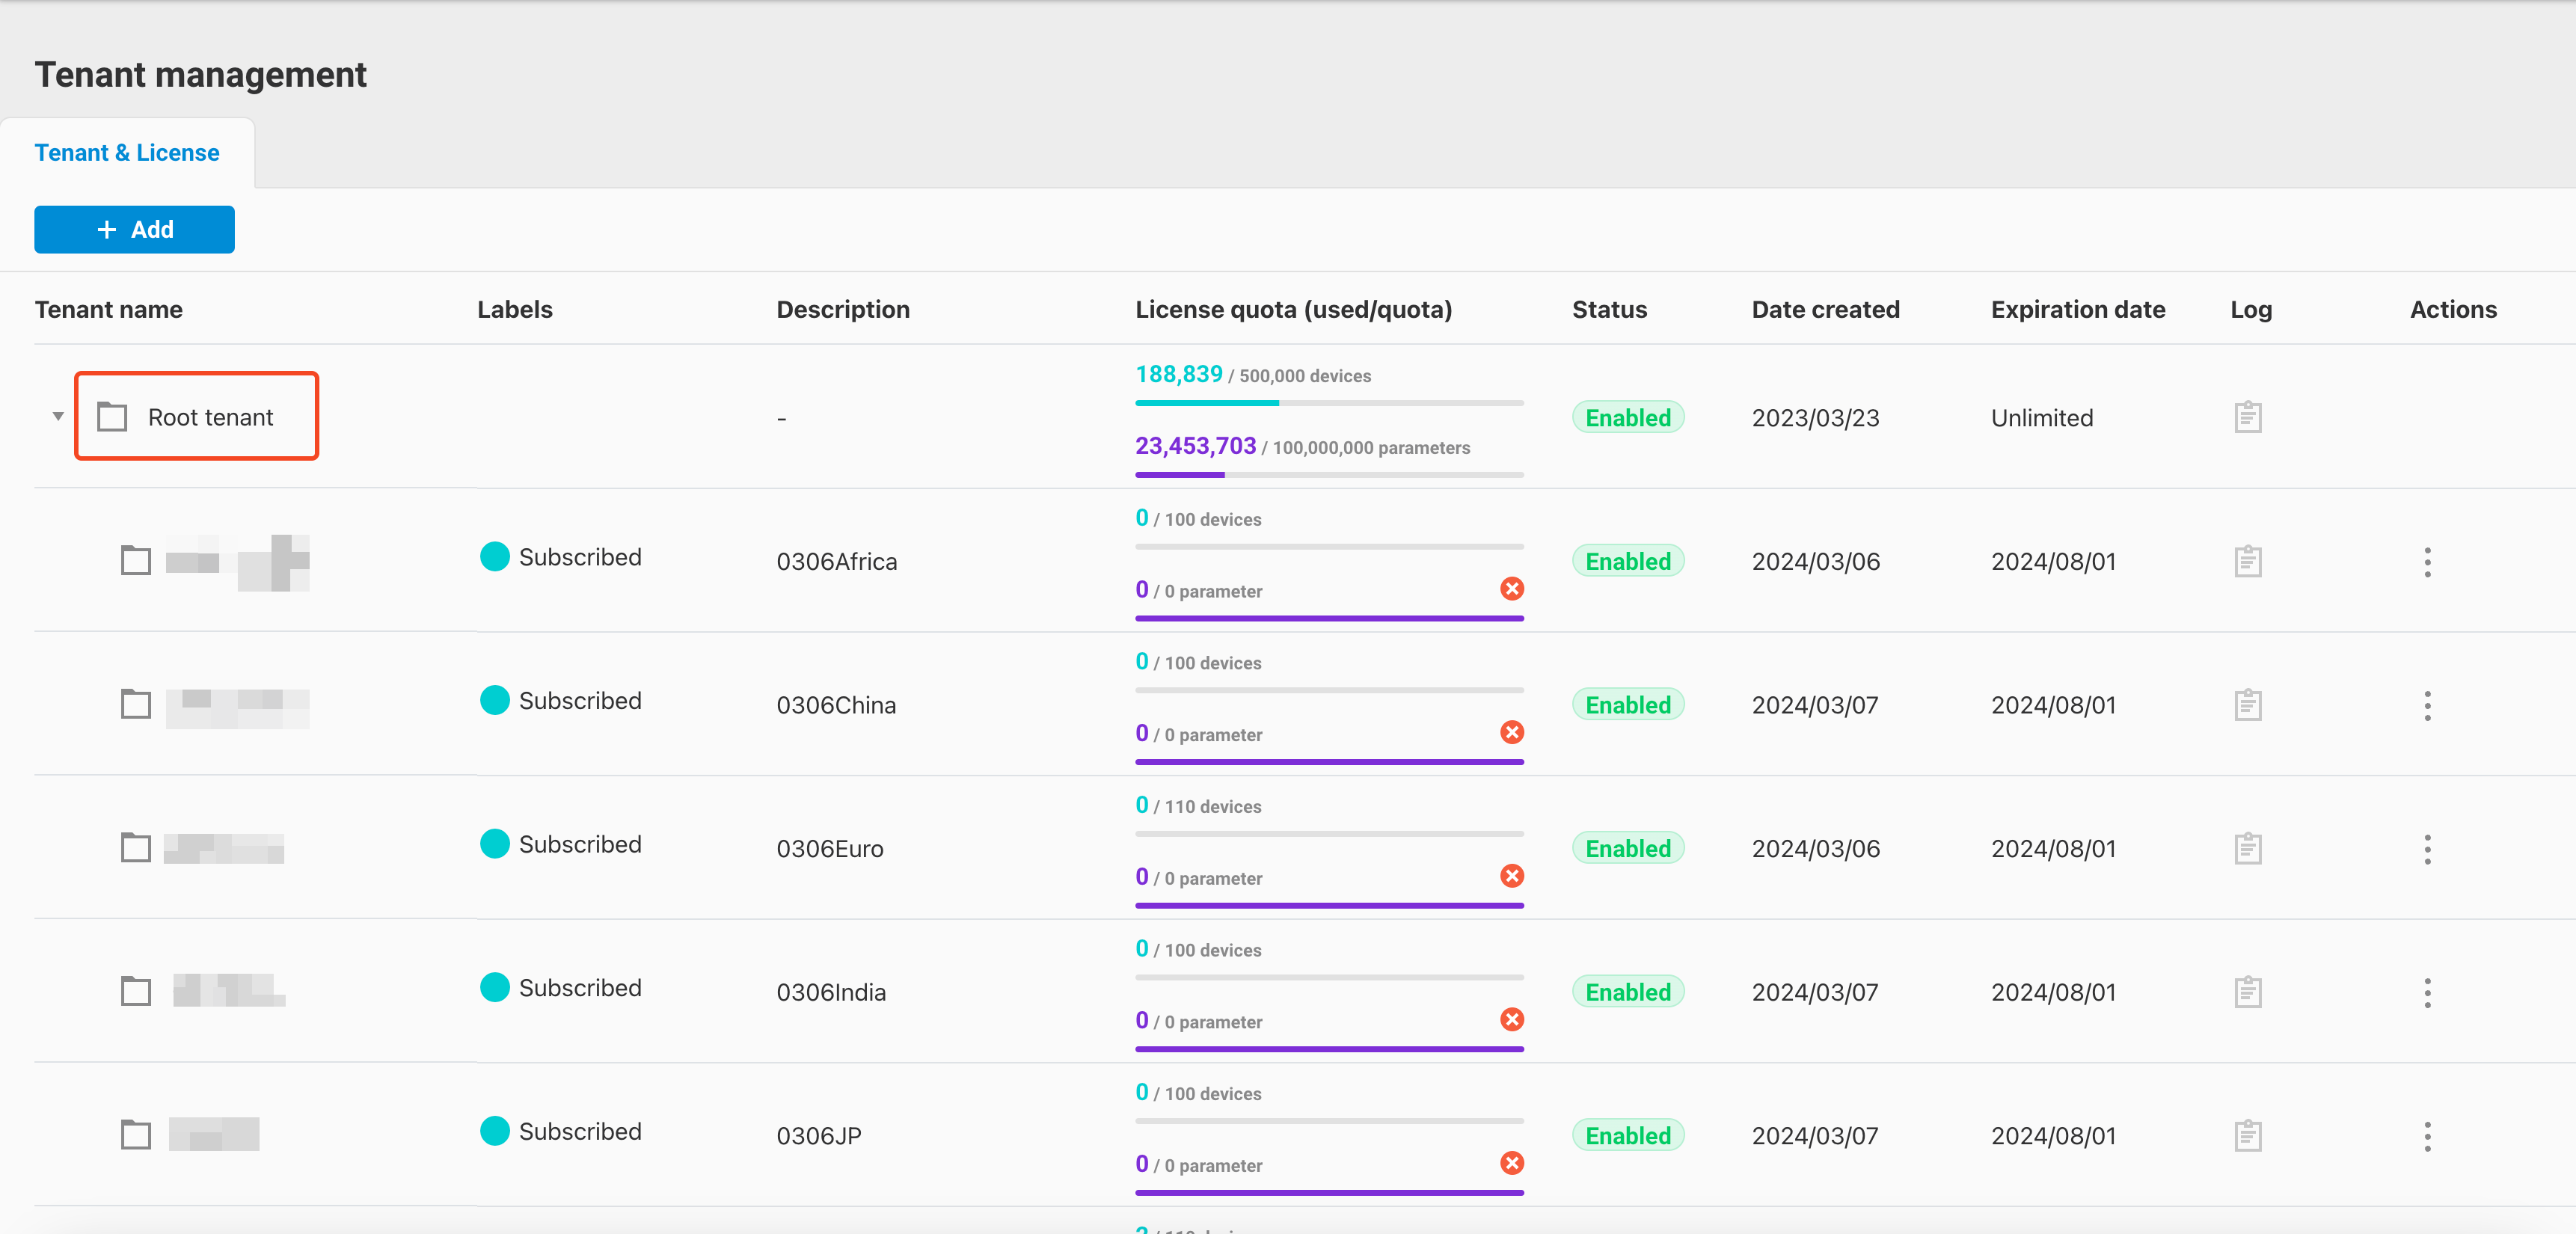
3. Add Sub-Tenant (Add Subtenant)
3.1 General Tenants
-
Users of general tenants (excluding SI Console type) can use the tenant management interface to add sub-tenants. Click the
Addbutton on the screen and selectAdd subtenant.
-
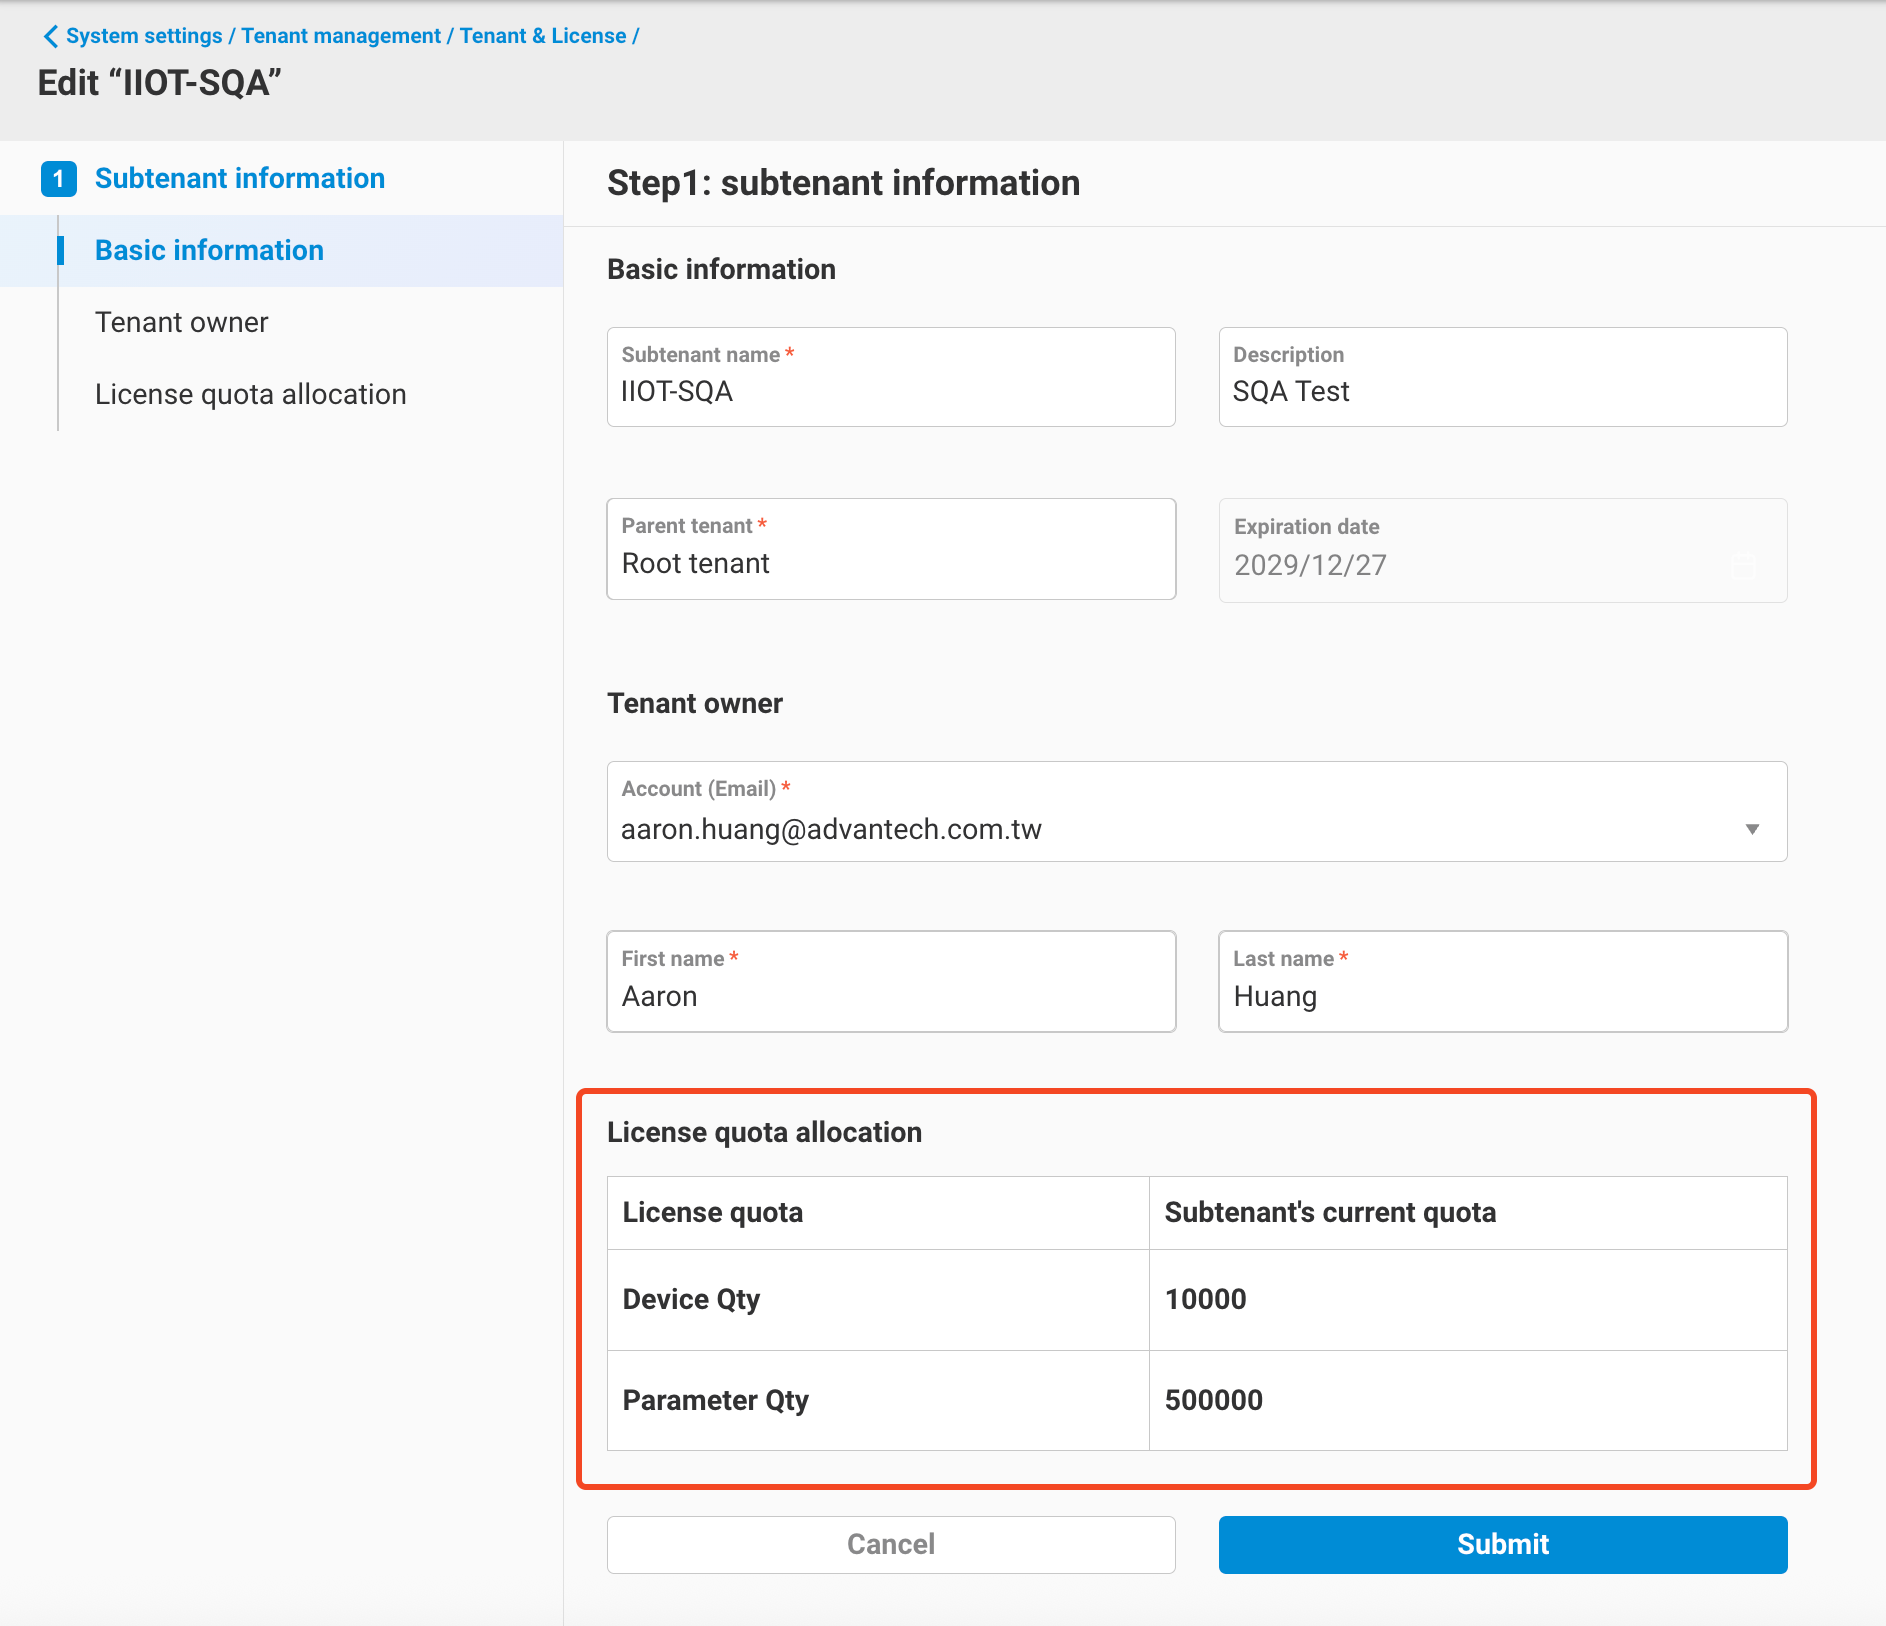
Enter the add subtenant page and fill in the subtenant information.

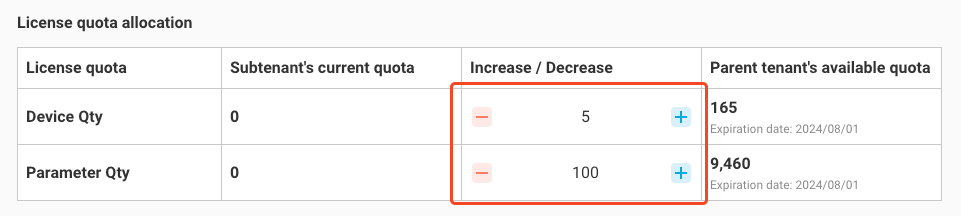
Column Name Description Subtenant Name Name of the subtenant to be added Description Description of the subtenant Parent Tenant Name of the parent tenant, which is fixed as the current tenant and cannot be changed Expiration Date Expiration date of the subtenant. Whether this field can be set depends on the type of parent tenant:- Subscribed, SI Console, Licensed Subtenant: Cannot be modified, date is the same as the parent tenant- Others: Can be modified, but cannot exceed the parent tenant's date Email Email account of the subtenant owner First Name First name of the subtenant owner (if the email is of an existing user, it will be auto-filled) Last Name Last name of the subtenant owner (if the email is of an existing user, it will be auto-filled) In addition to the above fields, you also need to set the subtenant's quota (License quota), including Device Qty and Parameter Qty. The UI will restrict the amount of quota that can be allocated to the subtenant, which cannot exceed the available quota of the parent tenant.
-
After entering all information, click
Submitto complete adding the subtenant.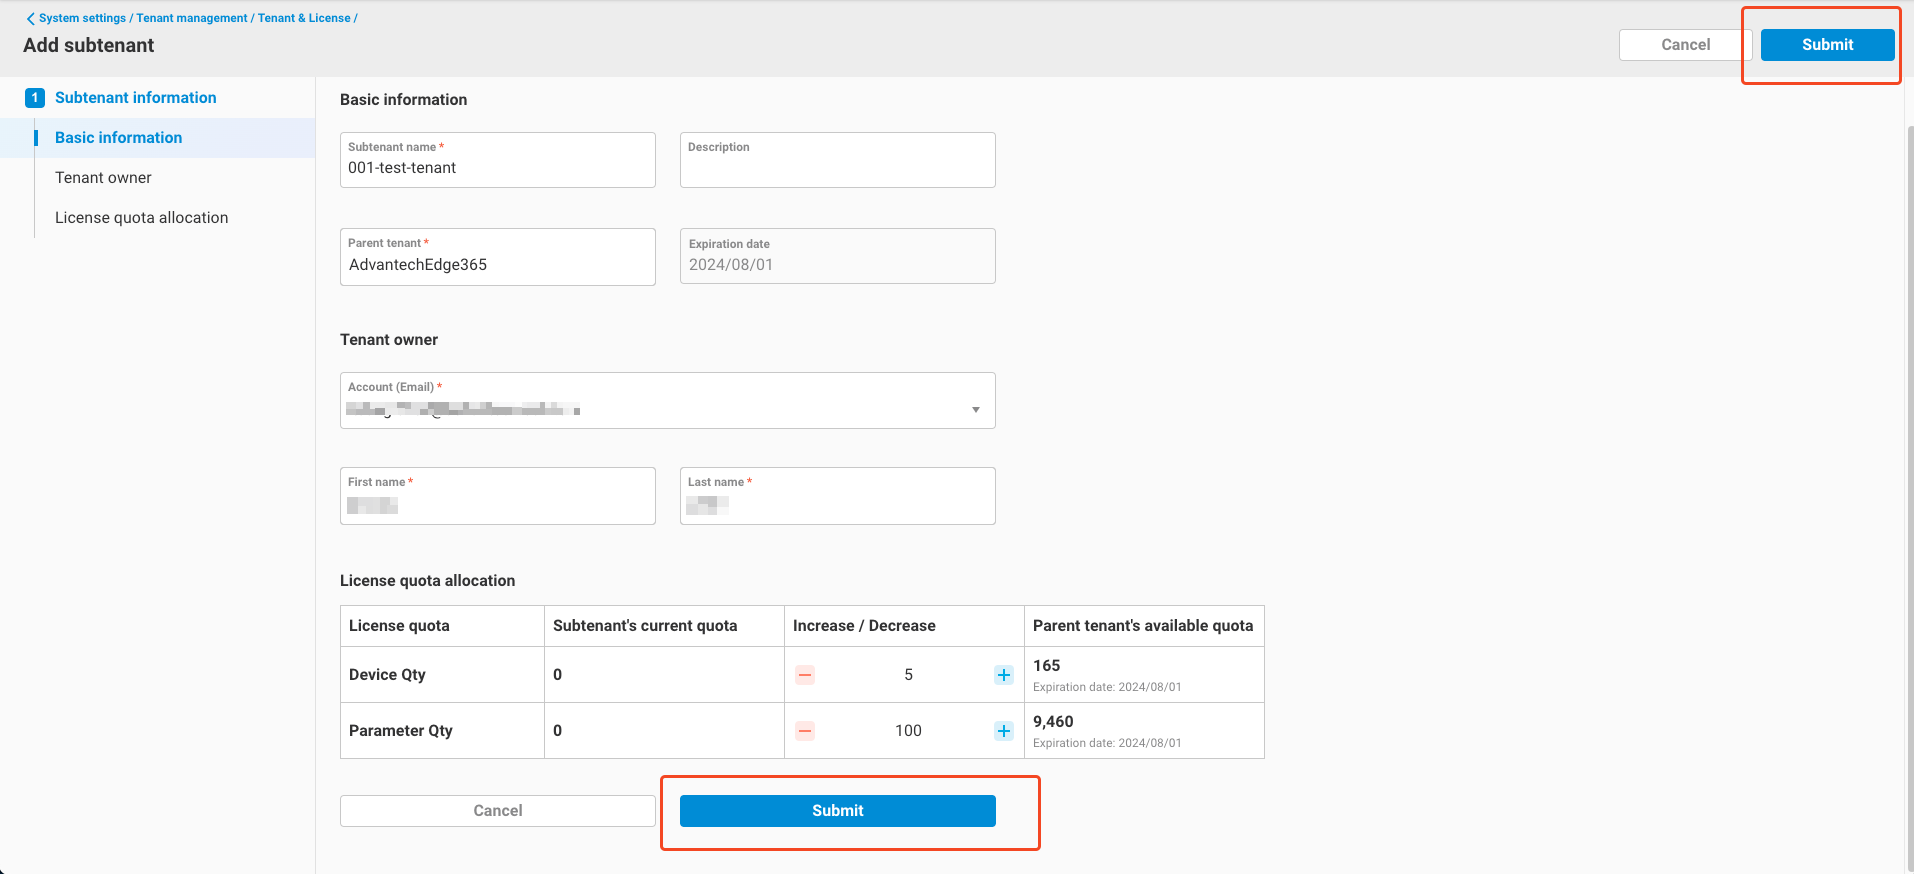
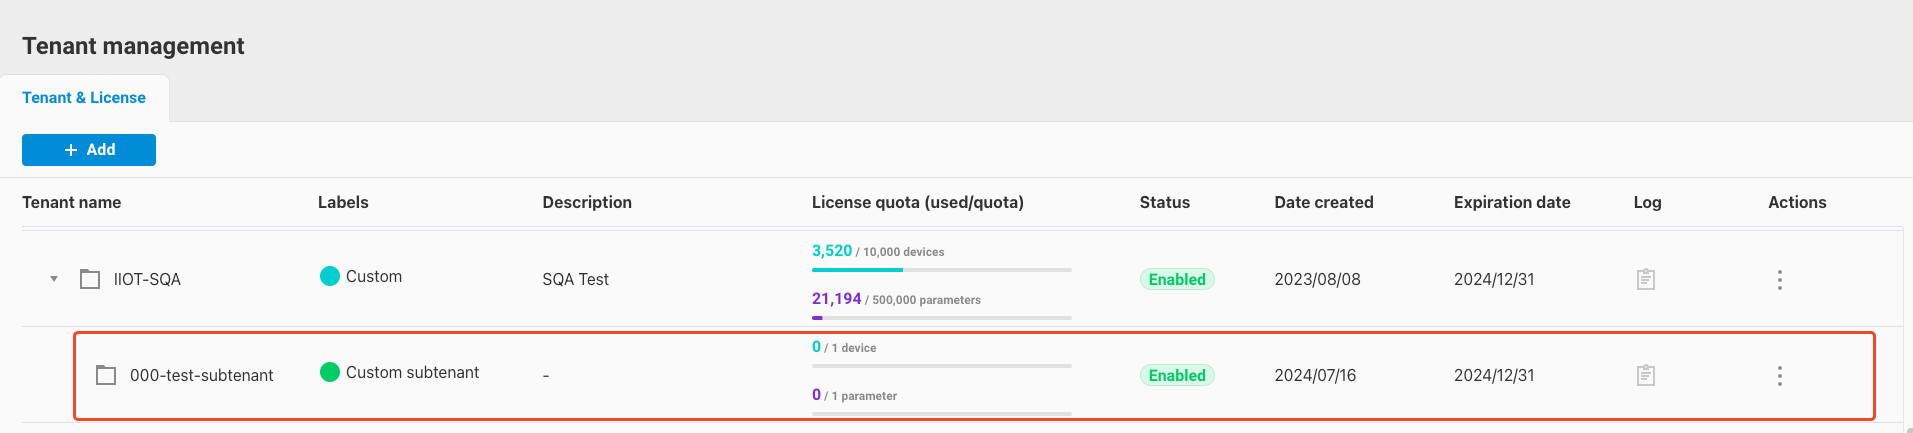
-
After adding, return to the tenant list to view the newly added subtenant.

3.2 Root Tenant
-
Similar to general tenants, the root tenant can click the
Addbutton on the screen and selectAdd subtenant.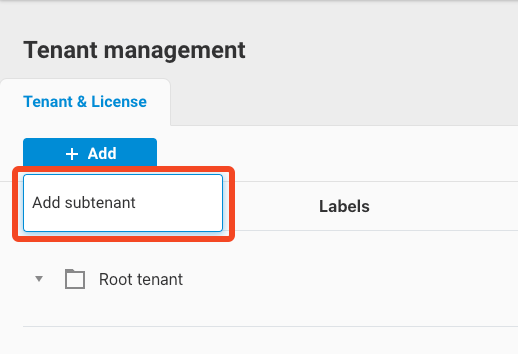
-
After entering the add subtenant page, the fields to be filled are the same as in section 3.1. The only difference is that the root tenant can add subtenants for any tenant on the entire site (excluding SI Console type). Click the
+button in the Parent Tenant field, and the tenant list of the entire site will be displayed on the right side of the screen. Select one as the parent tenant.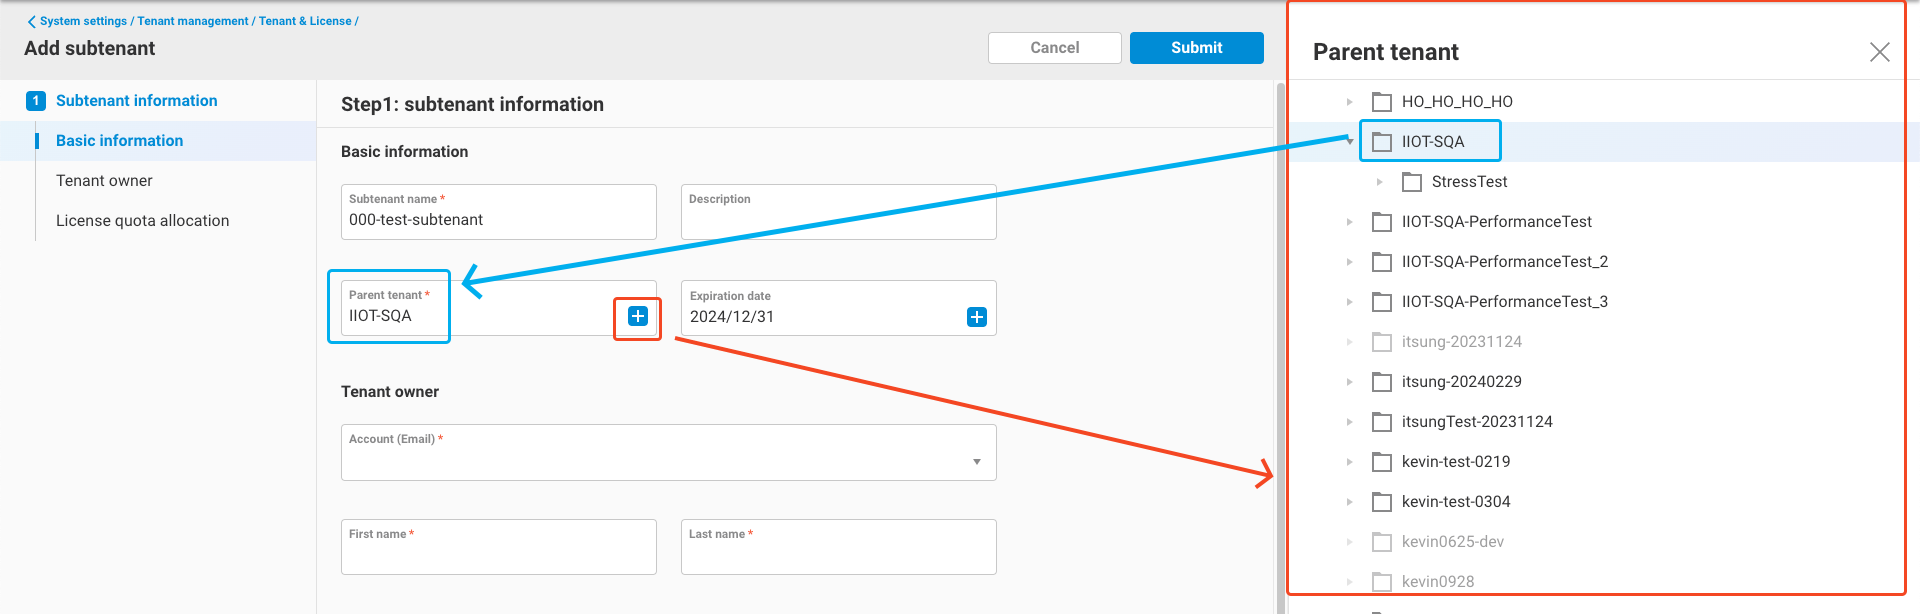
-
After selection, the other filling logic is the same as in section 3.1. After filling in all information, click
Submitto complete adding the subtenant.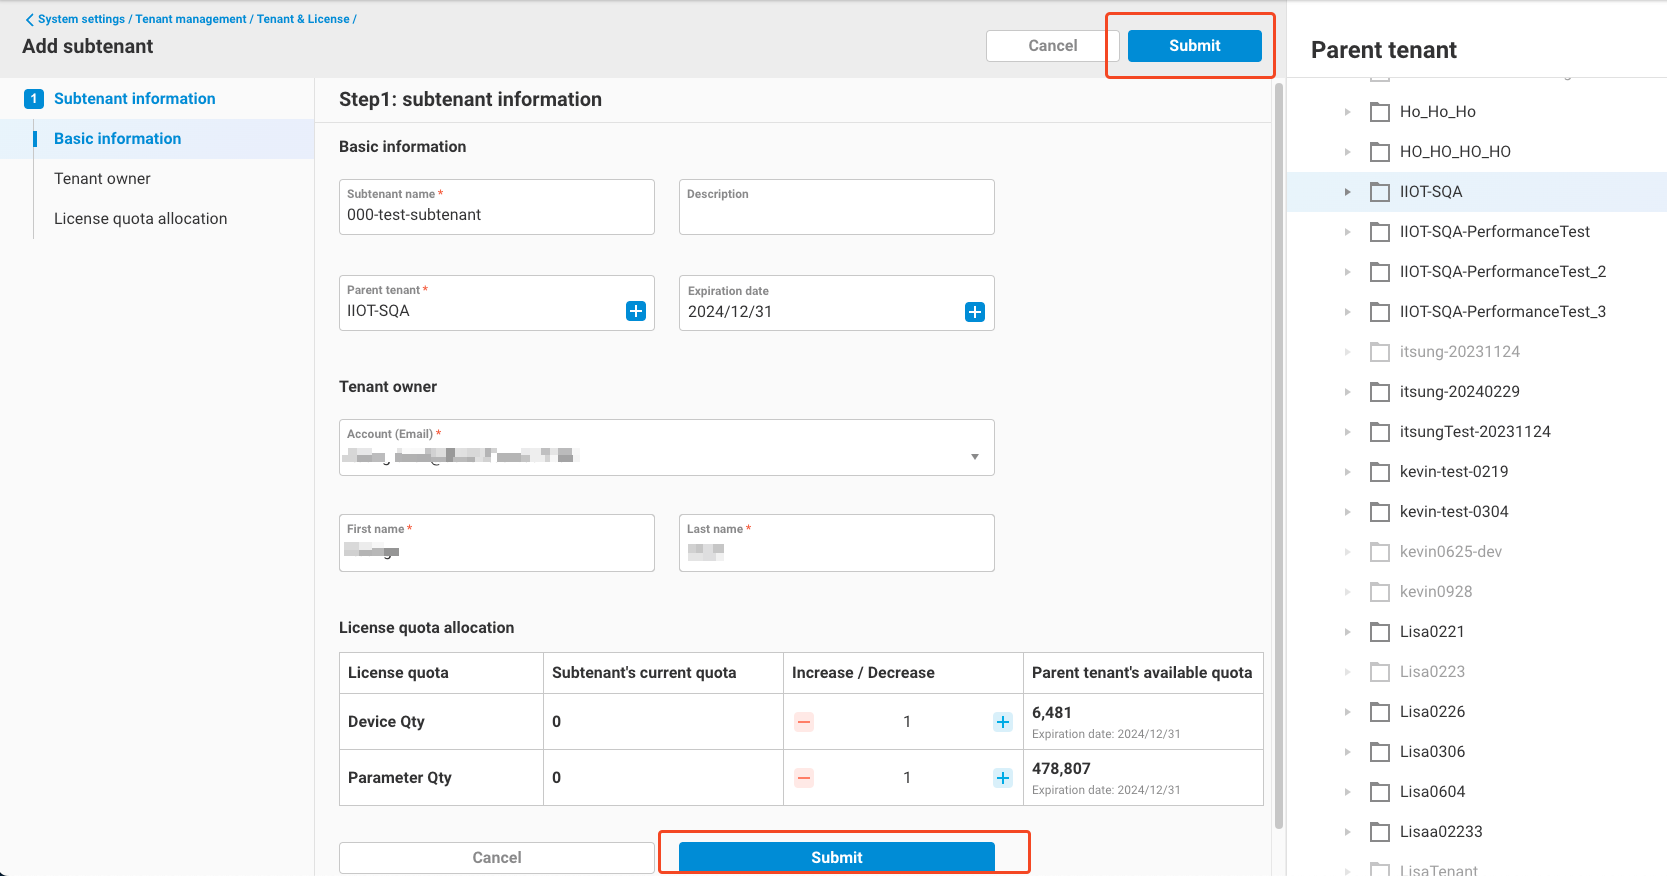
-
After adding, return to the tenant list to see the newly added subtenant.
-
Note, the types of subtenants added using this feature from the root tenant will include:
- Custom - When the specified parent tenant at the time of addition is the
Root tenant - Licensed Subtenant - When the parent tenant type specified during addition is Subscribed, Trial, or Licensed Subtenant
- Custom Subtenant - When the parent tenant type specified during addition is Custom or Custom Subtenant
- Custom - When the specified parent tenant at the time of addition is the
4. Activate License Key
If your tenant type is one of the following, you can use this feature:
- Subscribed - Use this feature to increase the tenant's quota.
- Trial - Use this feature to convert the tenant to a subscribed tenant.
- Custom - Use this feature to convert the tenant to a subscribed tenant.
Here are the detailed steps:
-
First, refer to the
Get License Keys From WISE-Marketplacesection in the SOP document to purchase a license key. -
After obtaining the license key, return to this interface, click
+ Add->Enter license key.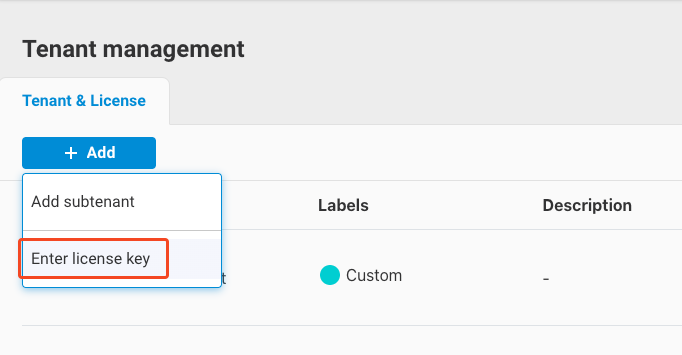
-
A dialog box for activating the license key will appear in the center of the screen. Enter the license key you purchased and click the
Verificationbutton.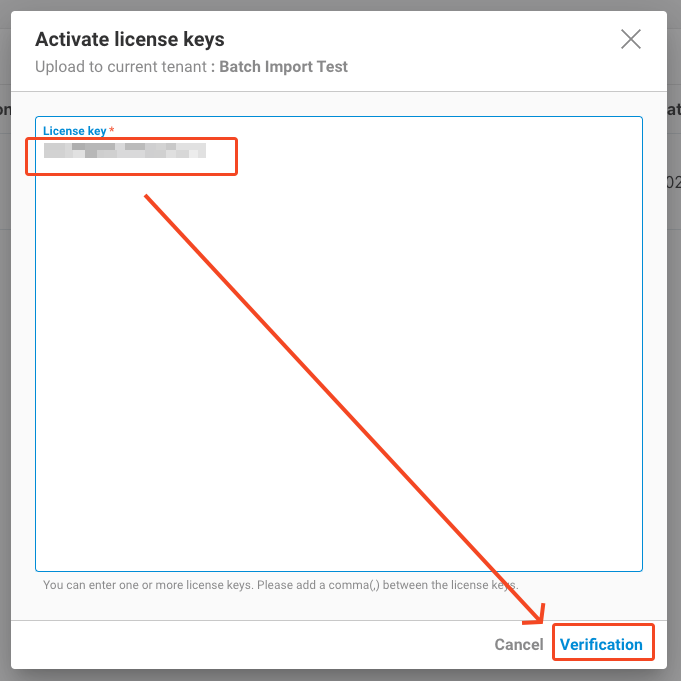
-
If the key is valid, the screen will indicate that the key is
Valid. Then, click theActivate license keysbutton.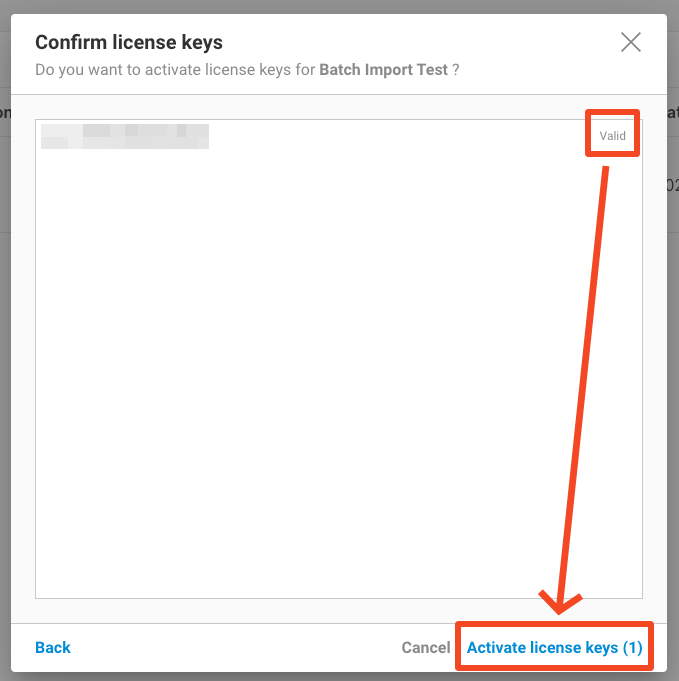
-
After activation, the screen will return to the tenant list. You will see that the tenant type has changed to
Subscribed, and the quota has been updated to the purchased amount.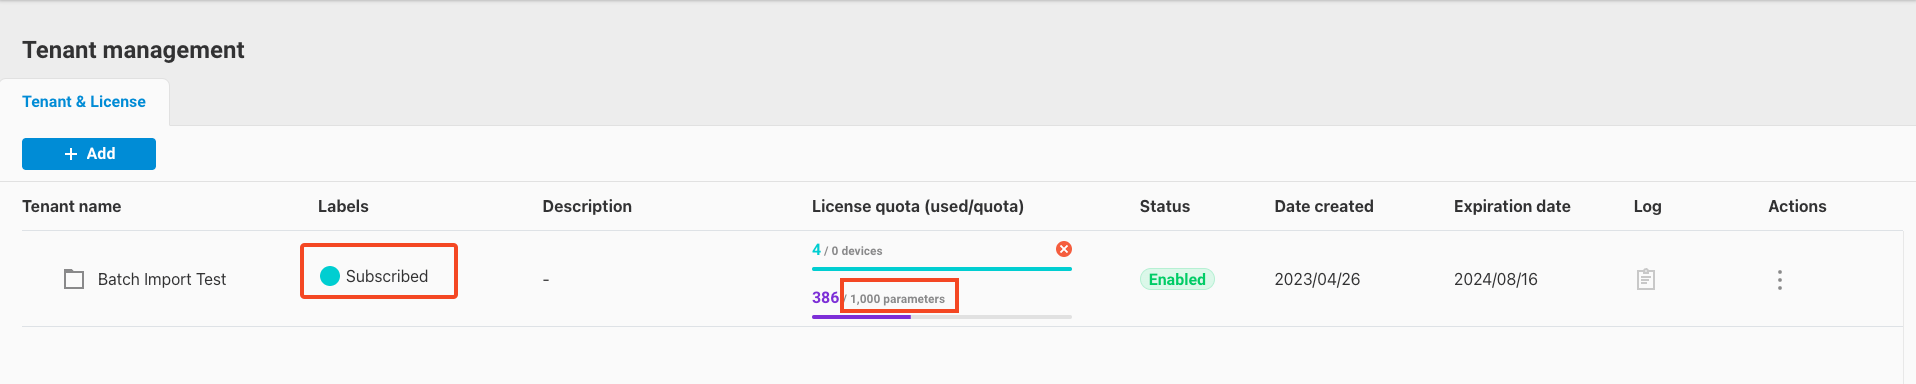
-
Regarding quota changes after activation, please note the following:
- If the original tenant type was Subscribed - After activation, the total quota will be the original subscribed quota plus the activated quota.
- If the original tenant type was Trial - After activation, the total quota will be the original trial quota plus the activated quota. However, the original trial quota will expire and be automatically returned after 90 days.
- If the original tenant type was Custom - After activation, the total quota will be the activated quota. The original quota allocated to the tenant will be immediately returned, leaving only the activated quota.
5. Edit Tenant
Users can use this feature to edit the settings of the current tenant or subtenant. The editable items are as follows:
-
Current Tenant
- Tenant Name
- Description
- Tenant Owner
- Note: Once edited, the original tenant owner will be reassigned as the tenant admin.
-
Subtenant
- Tenant Name
- Description
- Expiration Date: Can be changed, but the new date cannot exceed the expiration date of the current tenant.
- Note: Expiration date can only be edited for two types of subtenants: Trial subtenants and Custom subtenants.
- Tenant Owner
- Note: Once edited, the original tenant owner will be reassigned as the tenant admin.
- Quota - Device Quantity: Can increase or decrease the subtenant’s quota.
- Quota - Parameter Quantity: Can increase or decrease the subtenant’s quota.
Follow these steps to update the tenant:
-
Click the
Actionsbutton on the right side of the tenant list and selectEdit tenant.
-
If editing the current tenant, quota cannot be modified.
-
If editing a subtenant, you can additionally modify the expiration date and quota.
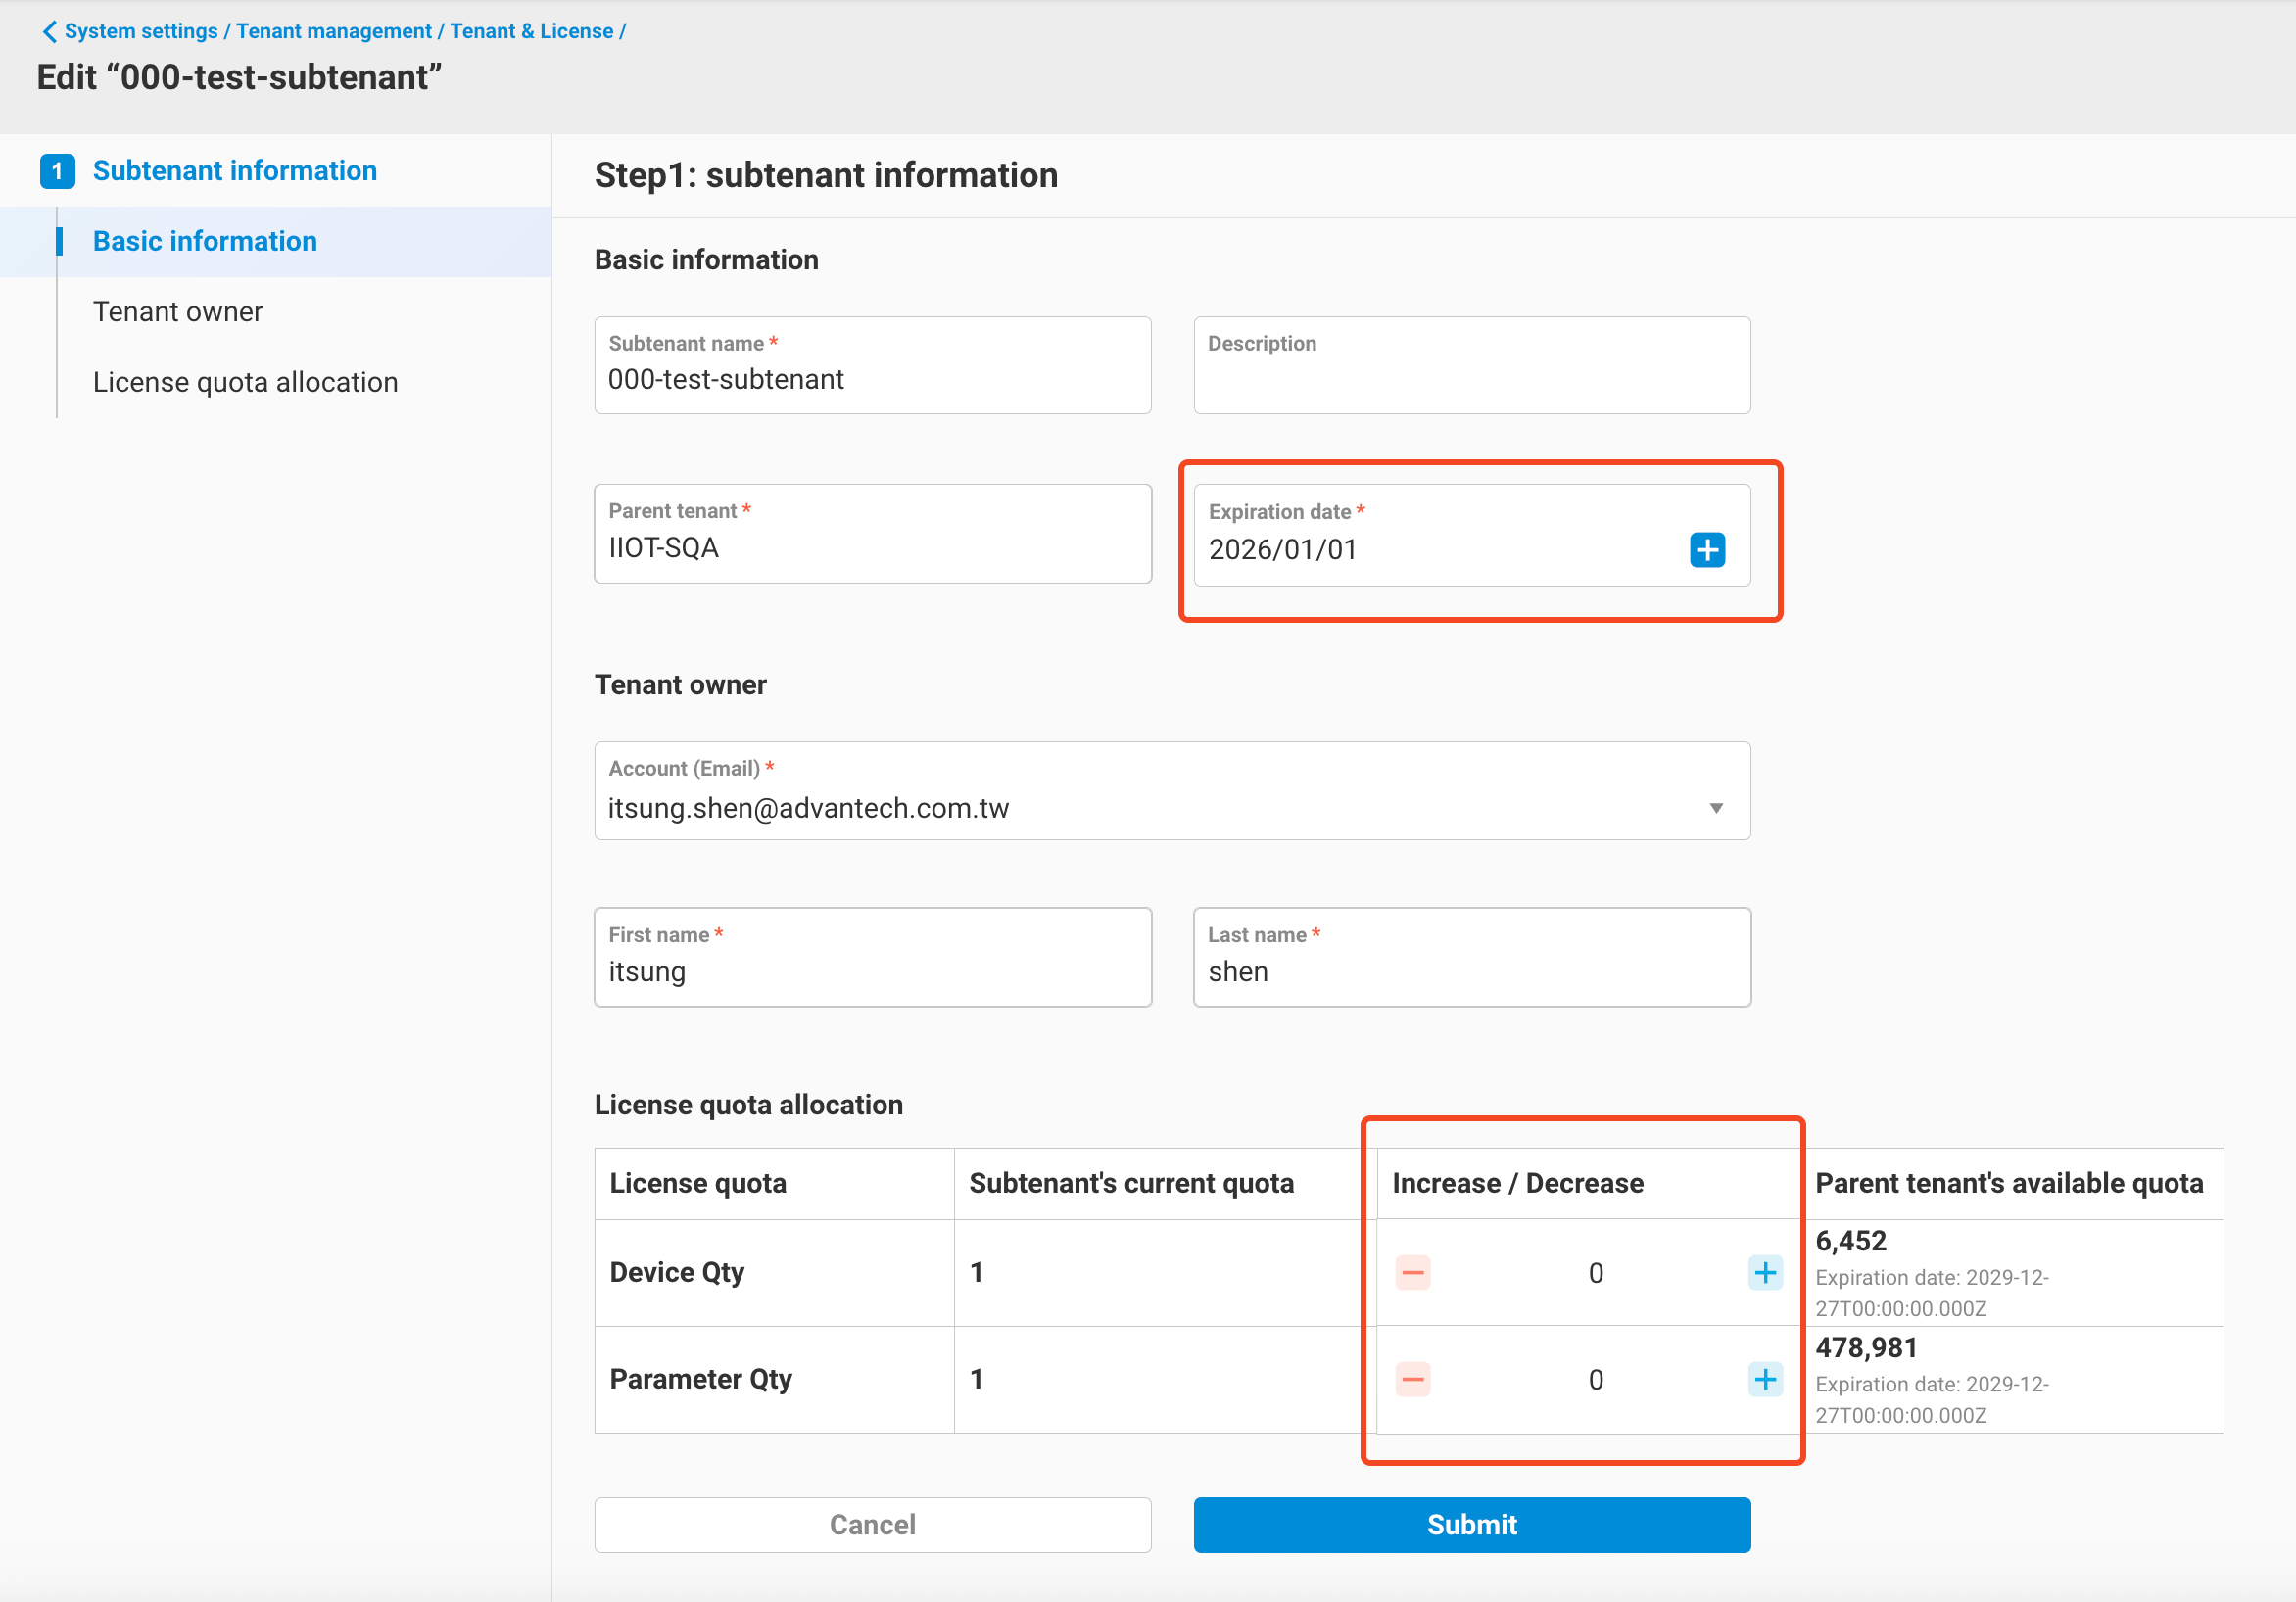
-
After making changes, click
Submitto complete the tenant editing.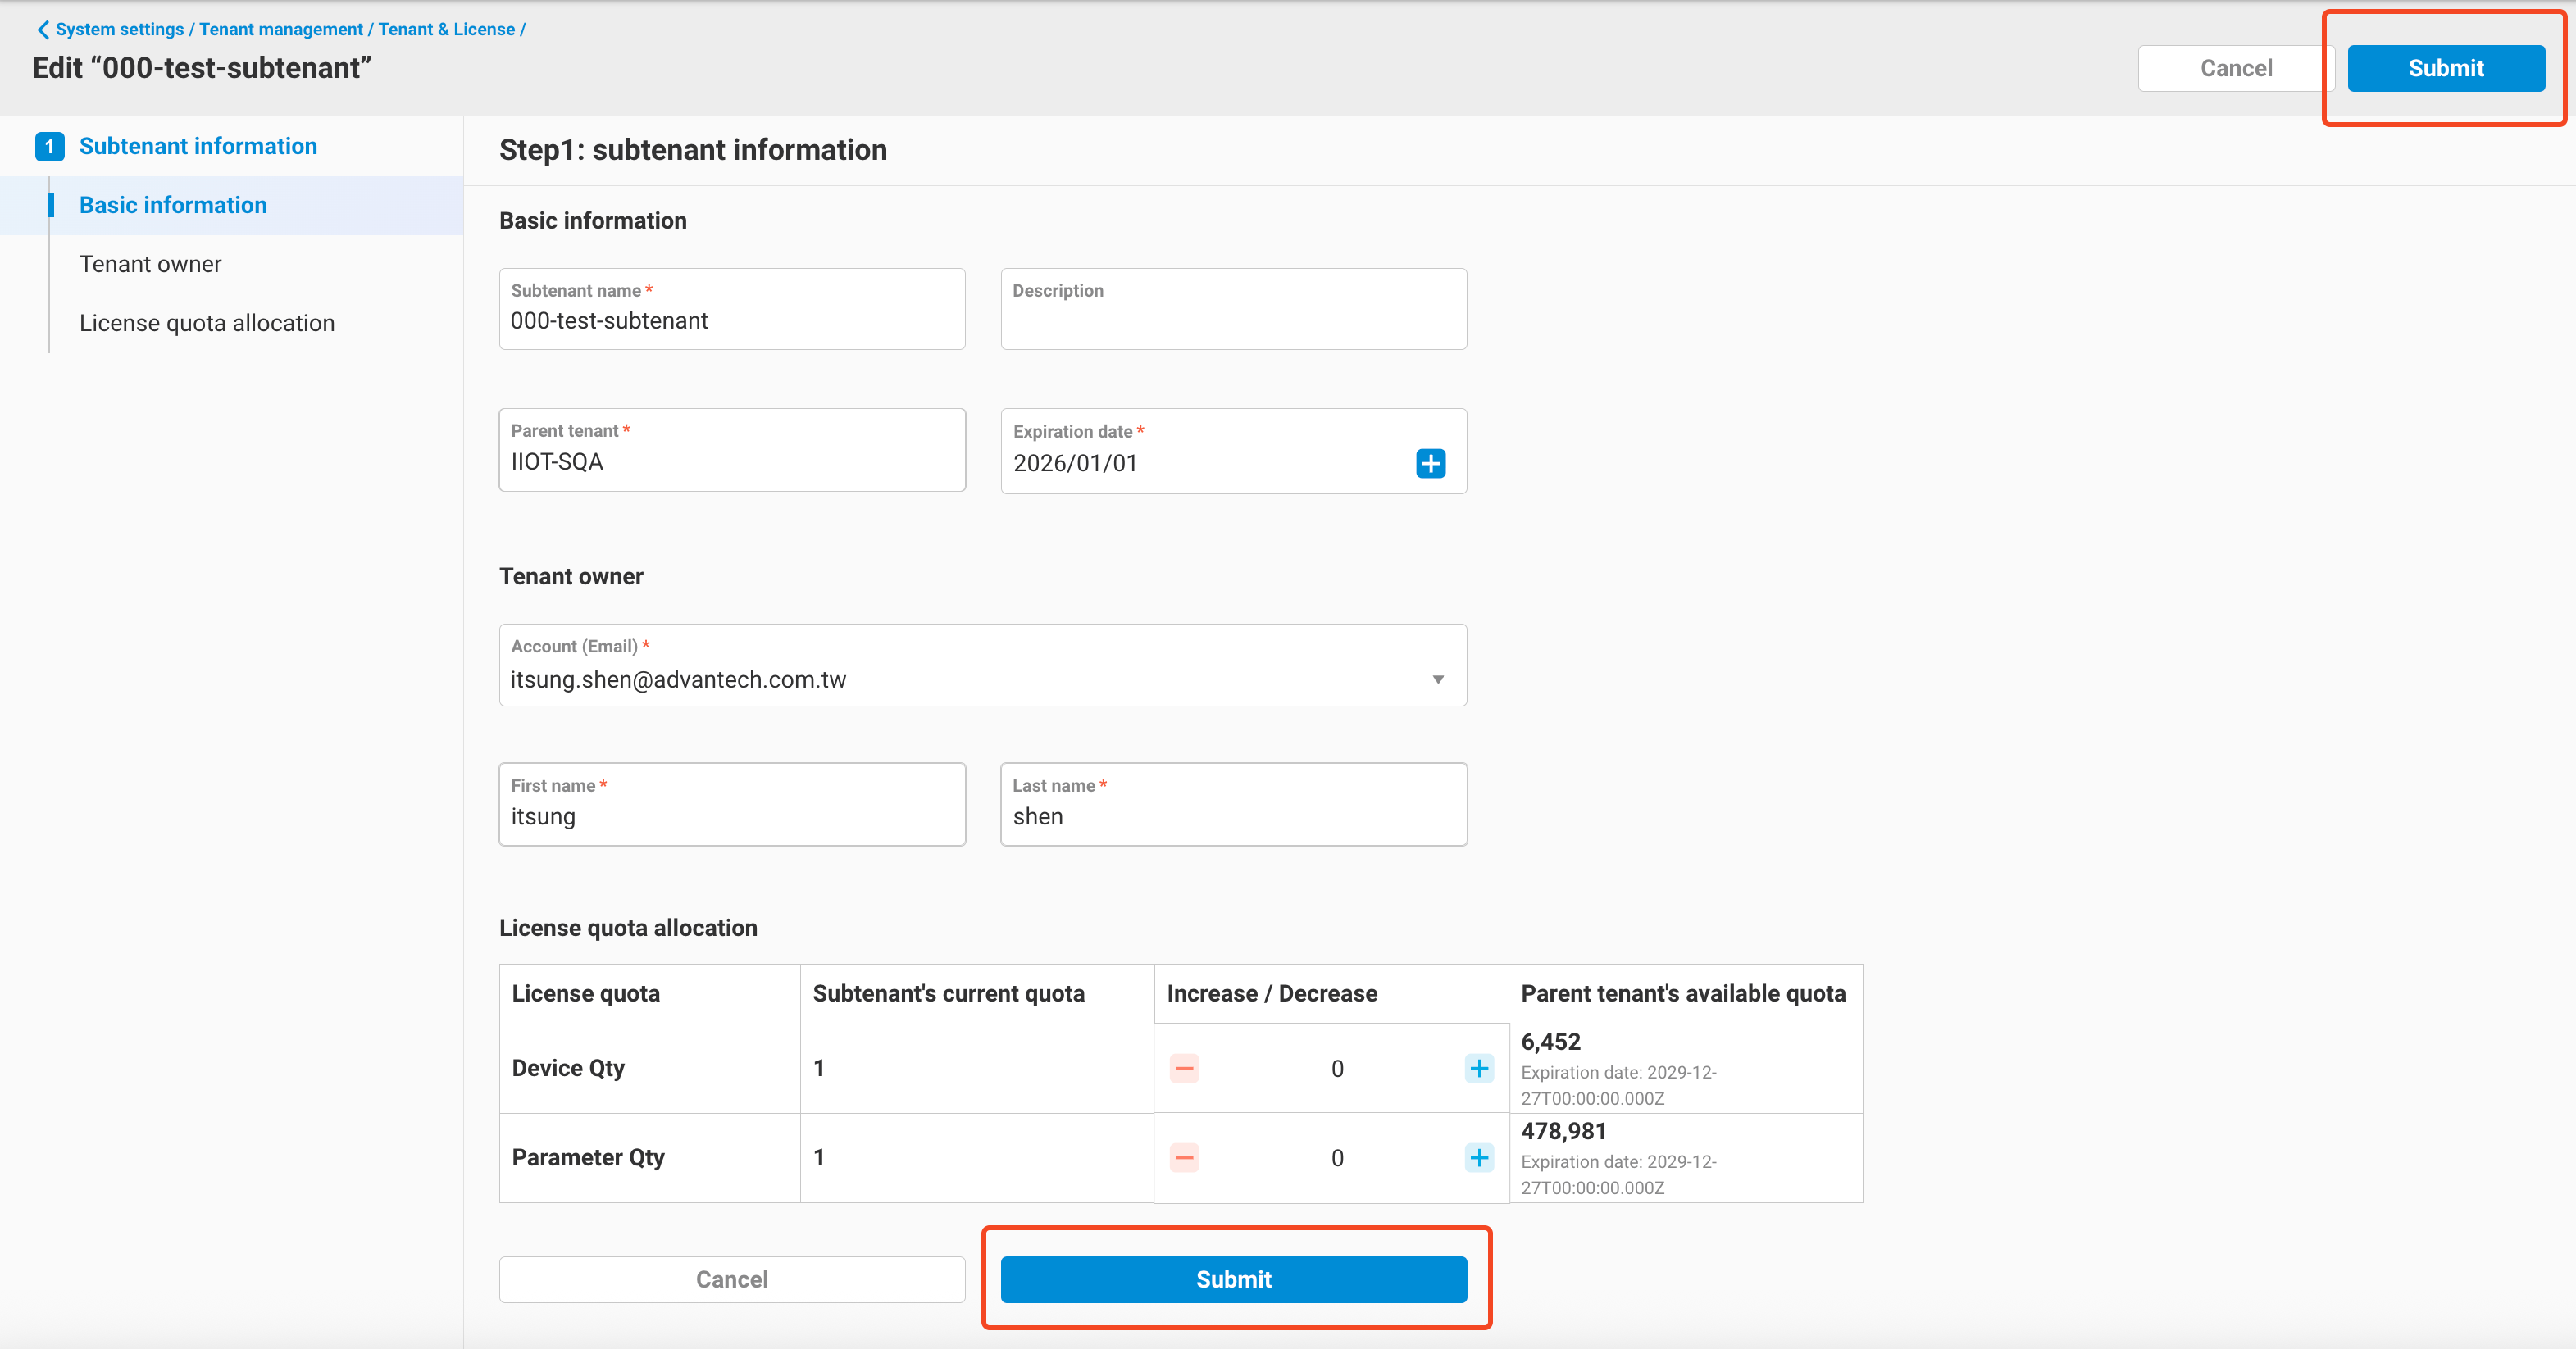
6. Allocate License Quota
As described in section 5, users can edit subtenants, including modifying quotas. For subtenants where quotas can be adjusted, the tenant management interface provides a separate option to directly allocate quotas.
-
Click the
Actionsbutton on the right side of the tenant list and selectAllocate license quota.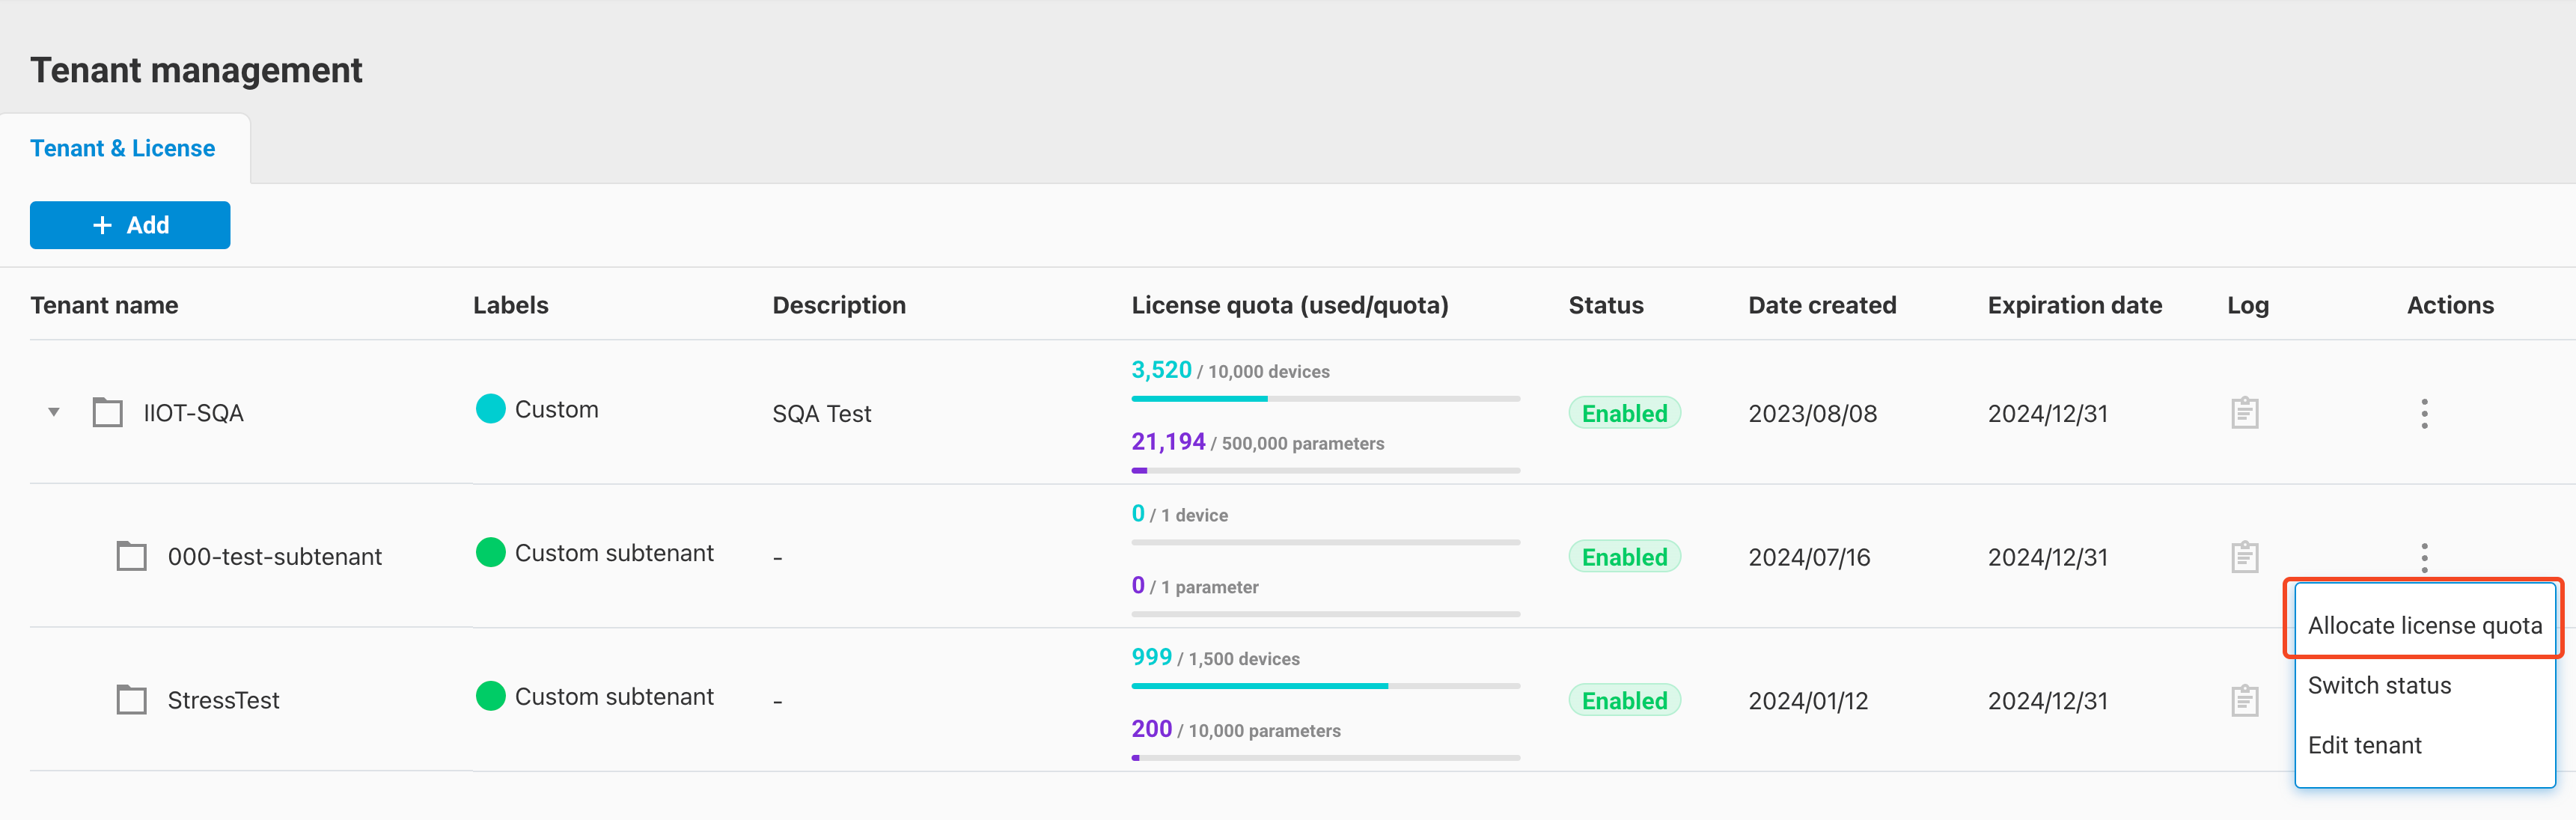
-
Enter the allocation screen, which is similar to the tenant editing interface, and adjust the quota directly.
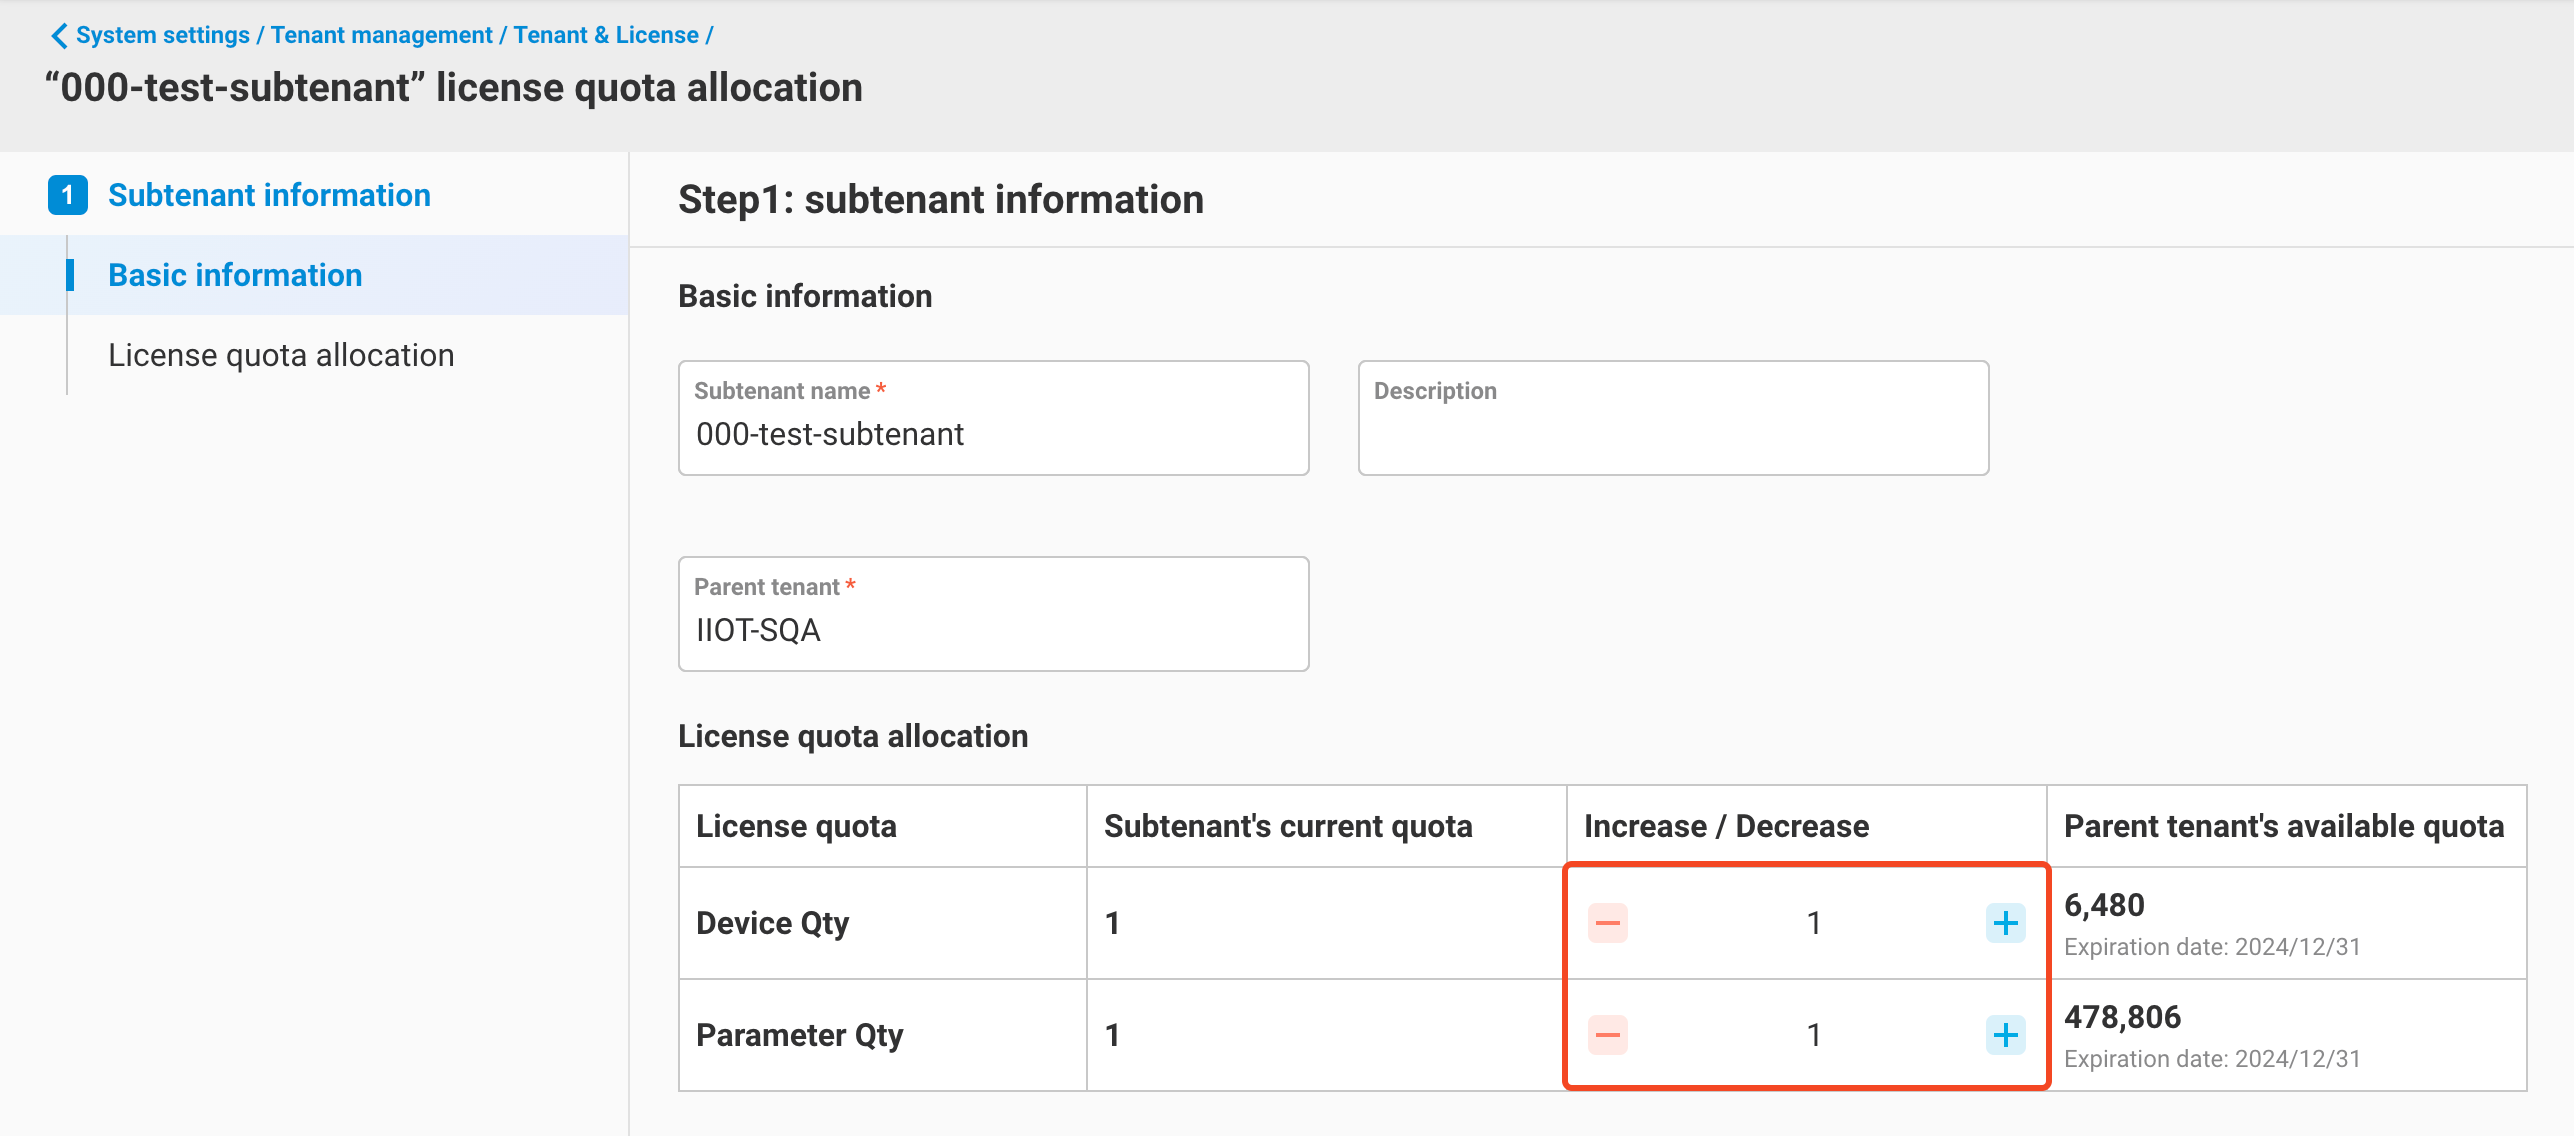
-
After making the changes, click
Submitto complete the quota modification.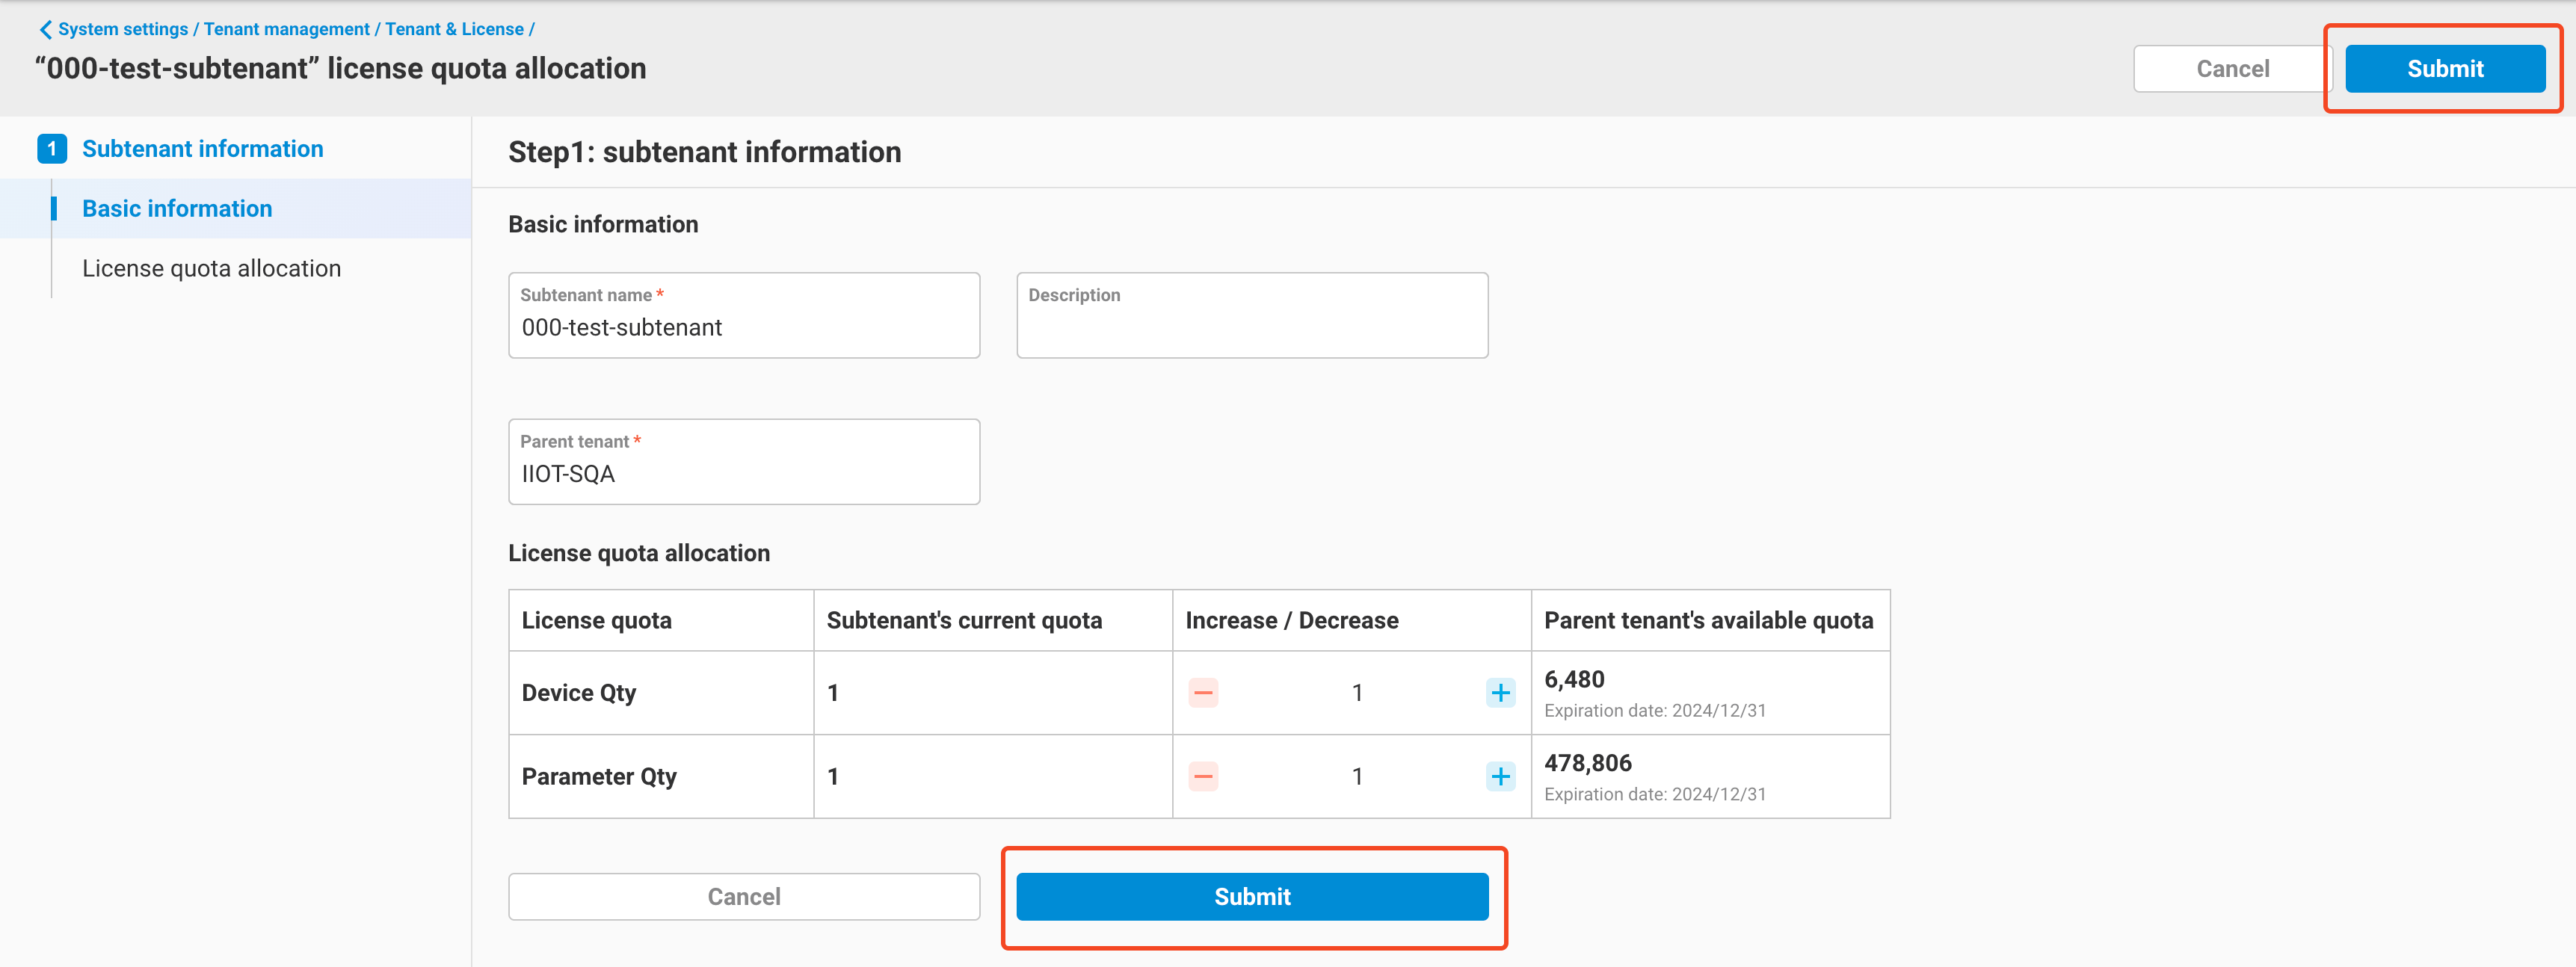
7. Switch Status
For subtenants under the current tenant, users can use this feature to switch the subtenant’s status between enabled and disabled.
- Enabled: Users of the tenant can use EdgeHub functions normally.
- Disabled: Users of the tenant cannot access EdgeHub functions.
Here's how to perform this action:
-
Go to the tenant list, find the subtenant you want to modify, click the
Actionsbutton on the right side of the tenant, and selectSwitch status.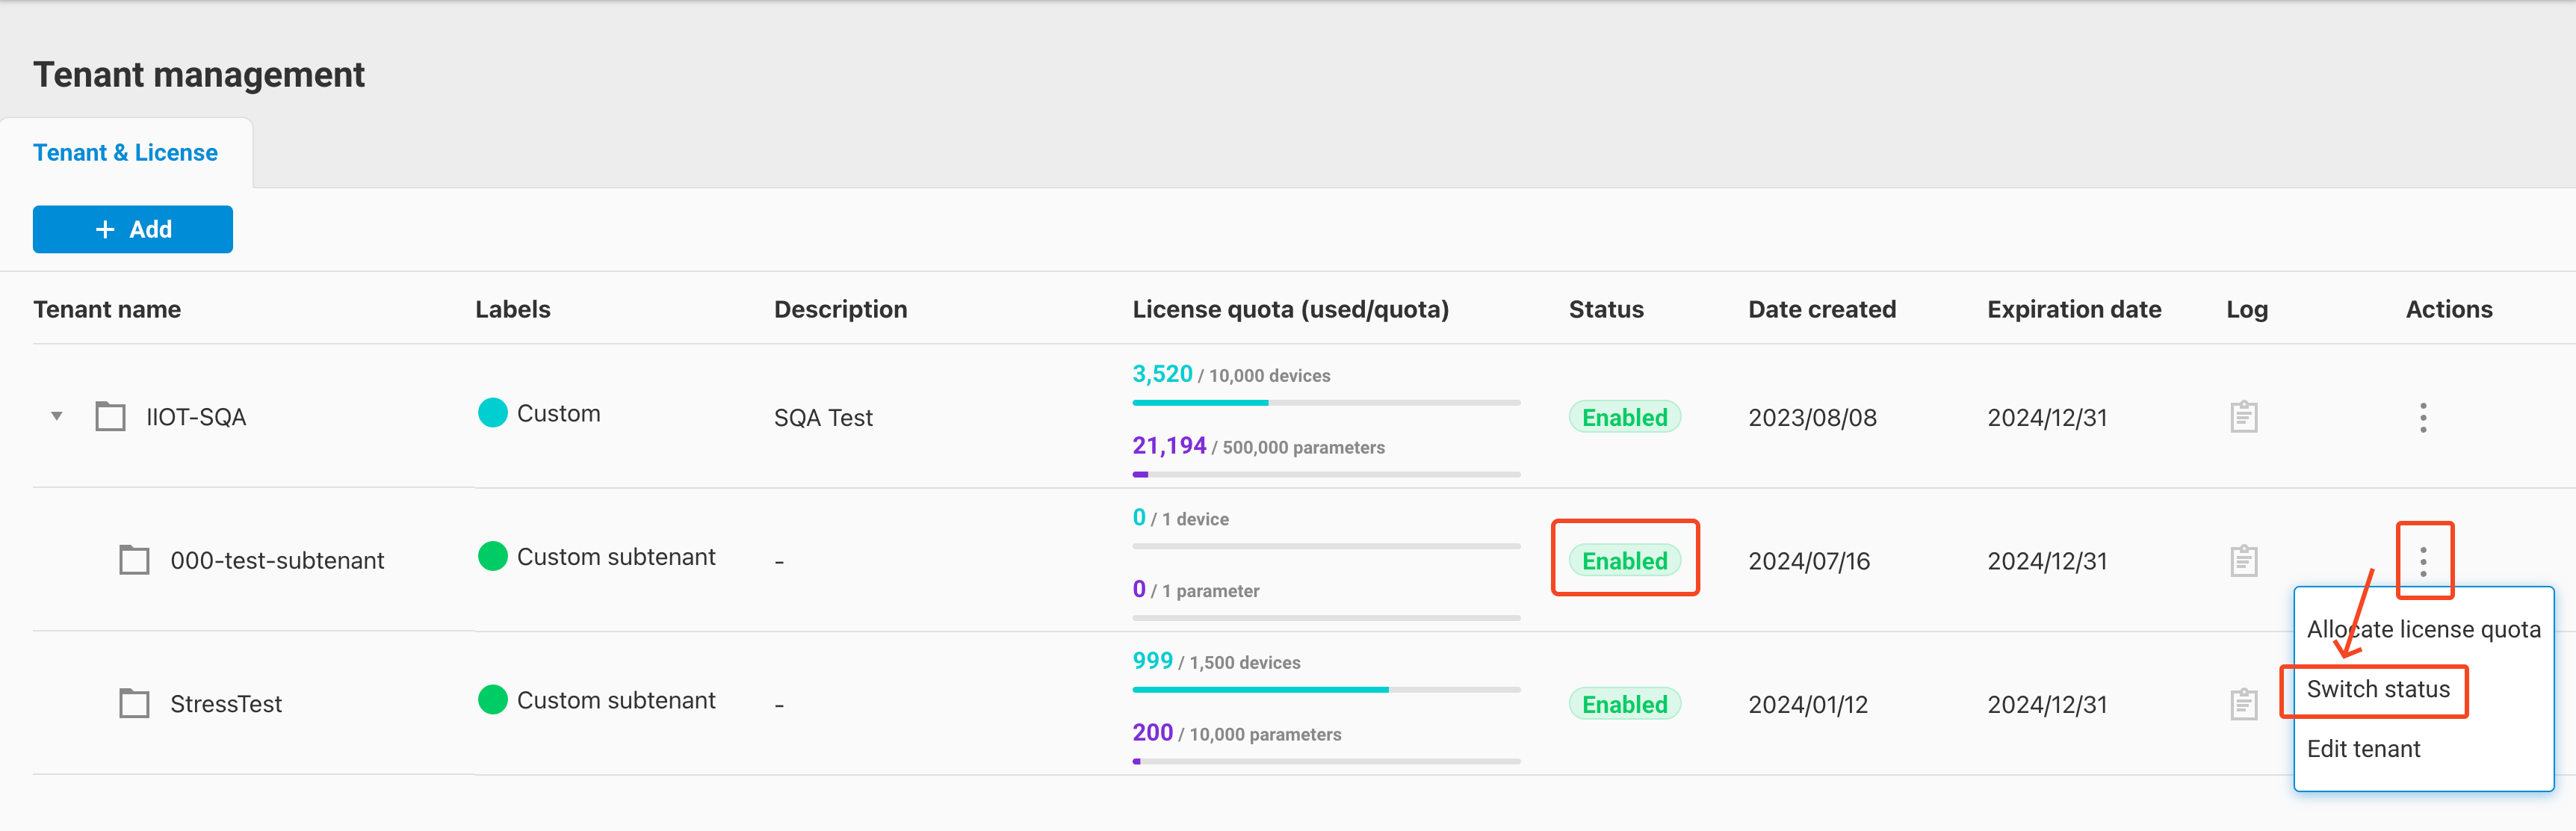
-
A dialog box will appear for switching the status. Click the toggle to change the status to enabled or disabled, then click the
Confirmbutton to submit.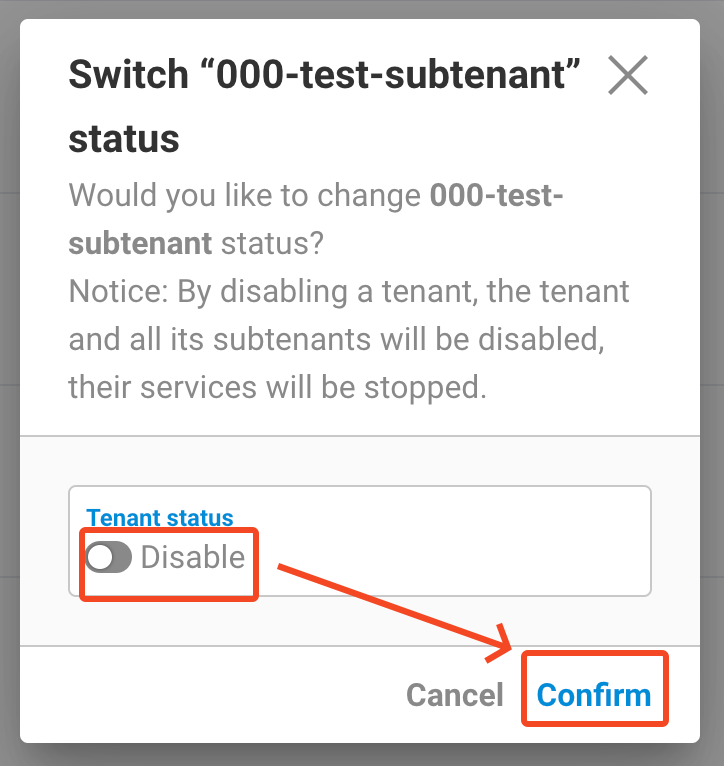
-
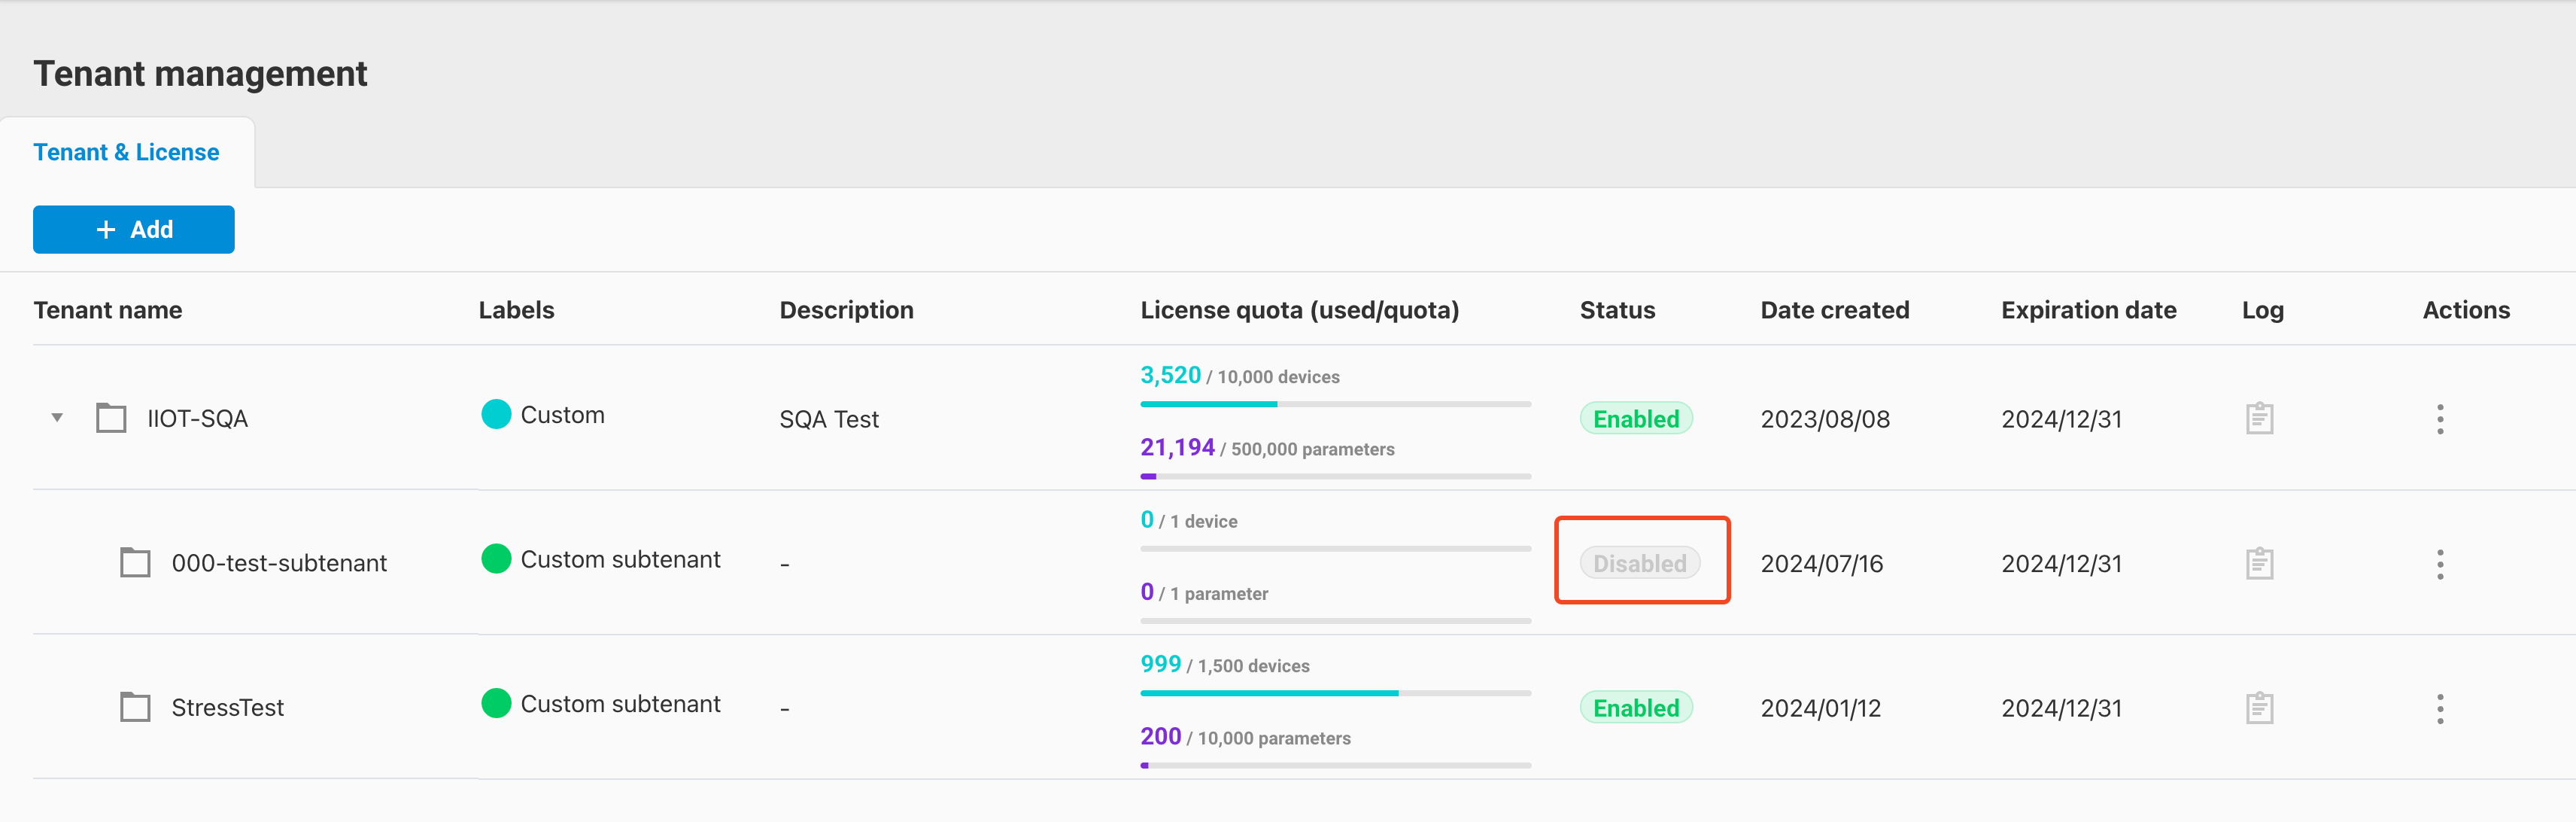
Return to the tenant list to see that the subtenant's status has been successfully updated.
8. Retry Deduction
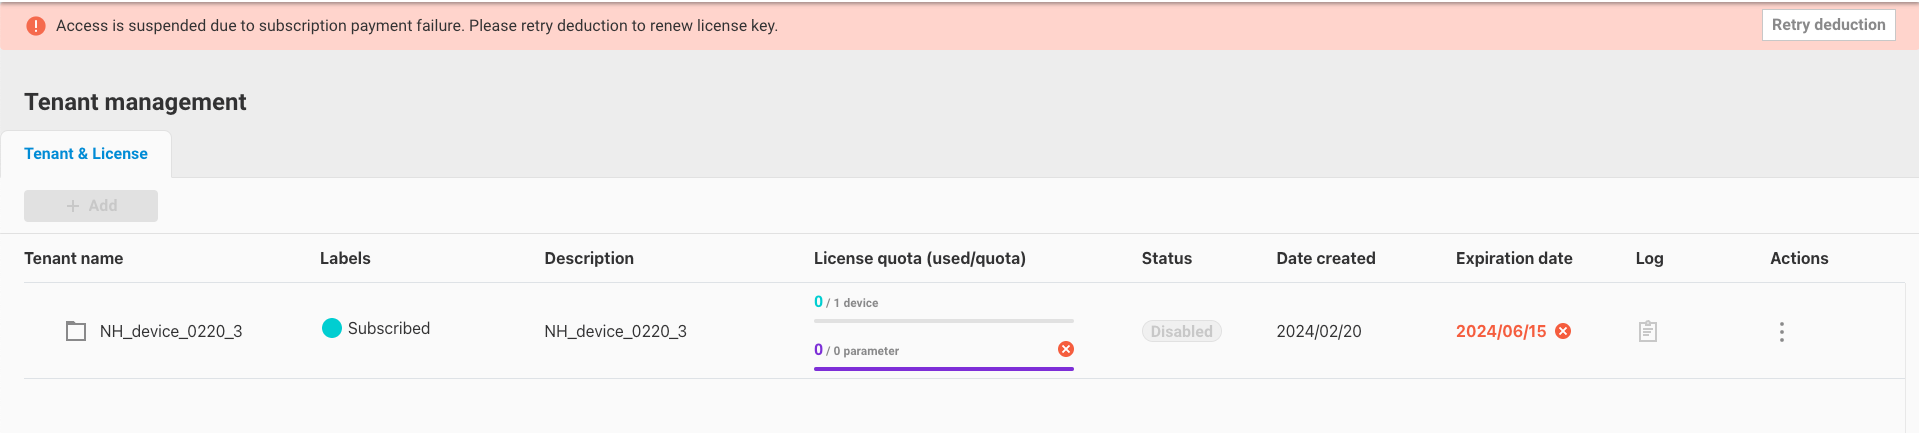
This feature is only applicable to subscription-type tenants. For these tenants, the expiration date is the 1st of each month. EdgeHub will attempt to deduct the corresponding amount from the Advantech Marketplace based on the purchased license key on that day. If the customer’s Marketplace account balance is insufficient, the deduction will fail, and the tenant will immediately enter a
Disabledstate, preventing the tenant's users from continuing to use EdgeHub services.Within the next 30 days, users must promptly top up their Advantech Marketplace account. After recharging, you can use this feature to retry the deduction. If successful, the tenant will return to an
Enabledstate, and the tenant's expiration date will be updated to the 1st of the following month.Here are the steps to retry a failed deduction:
-
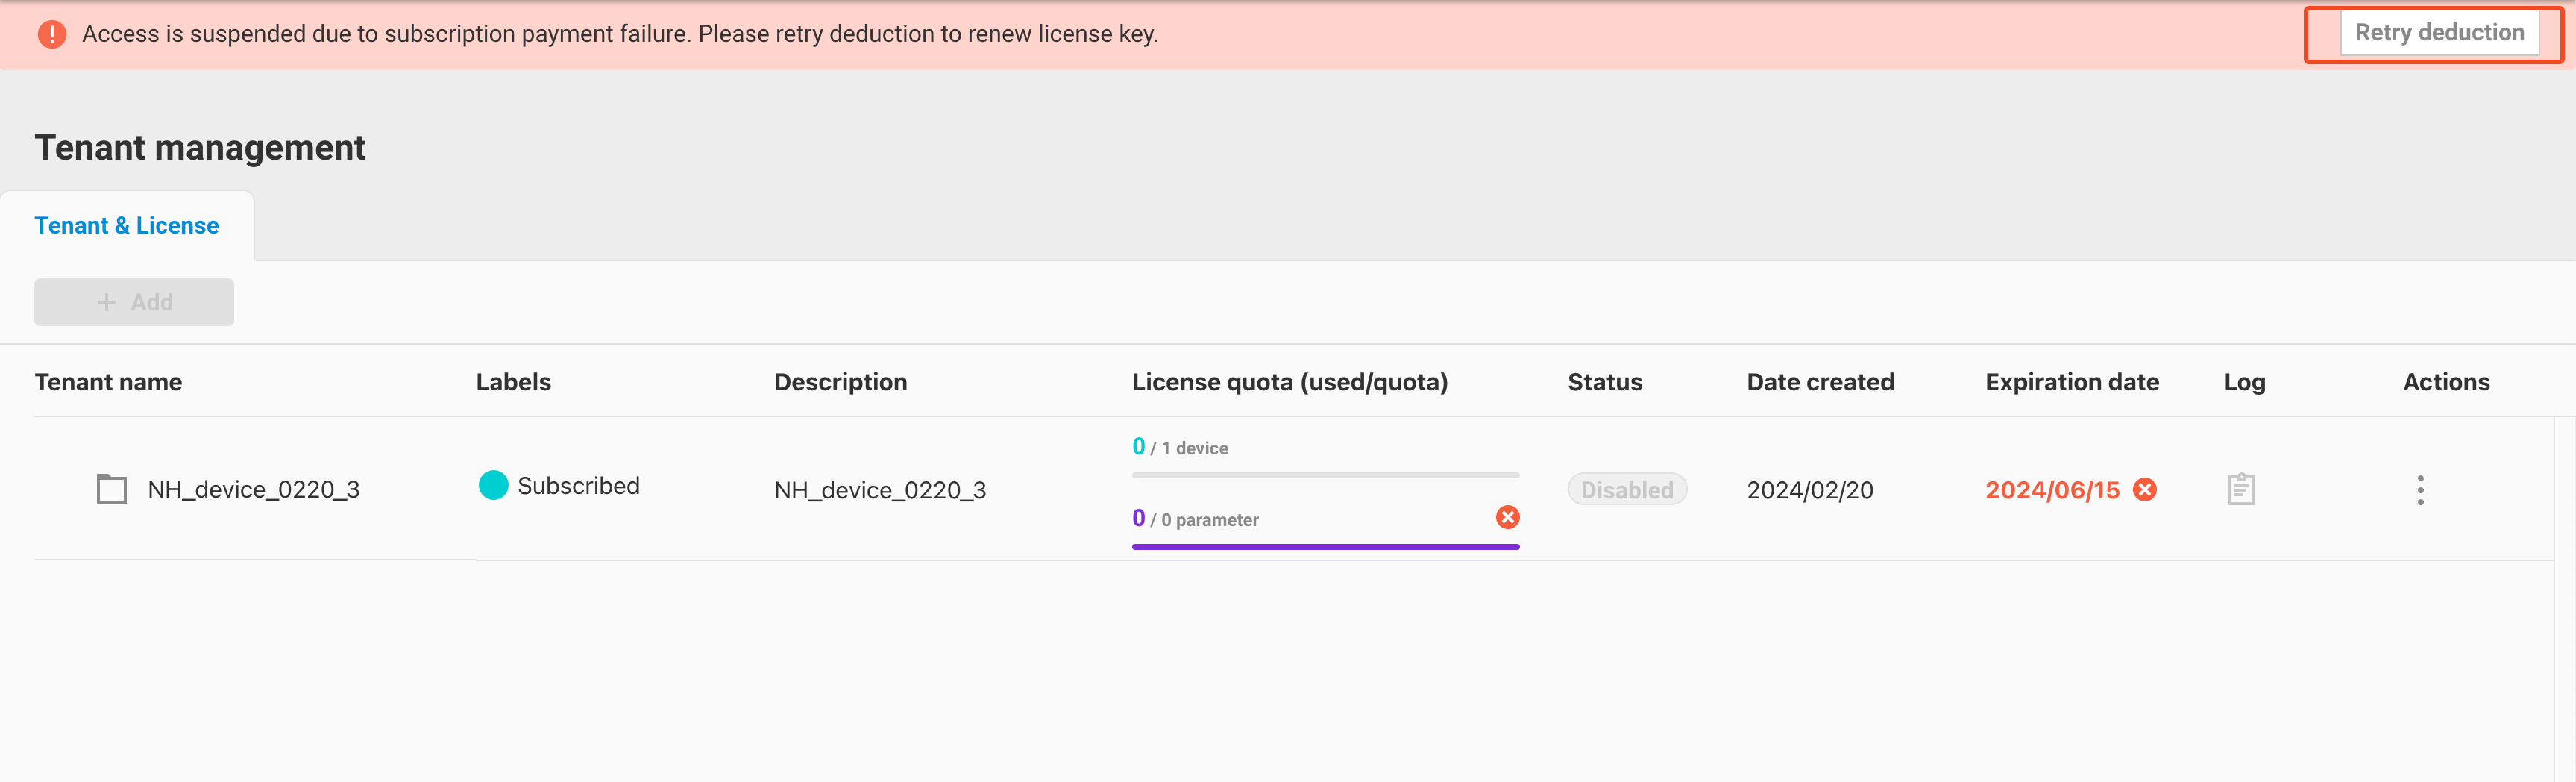
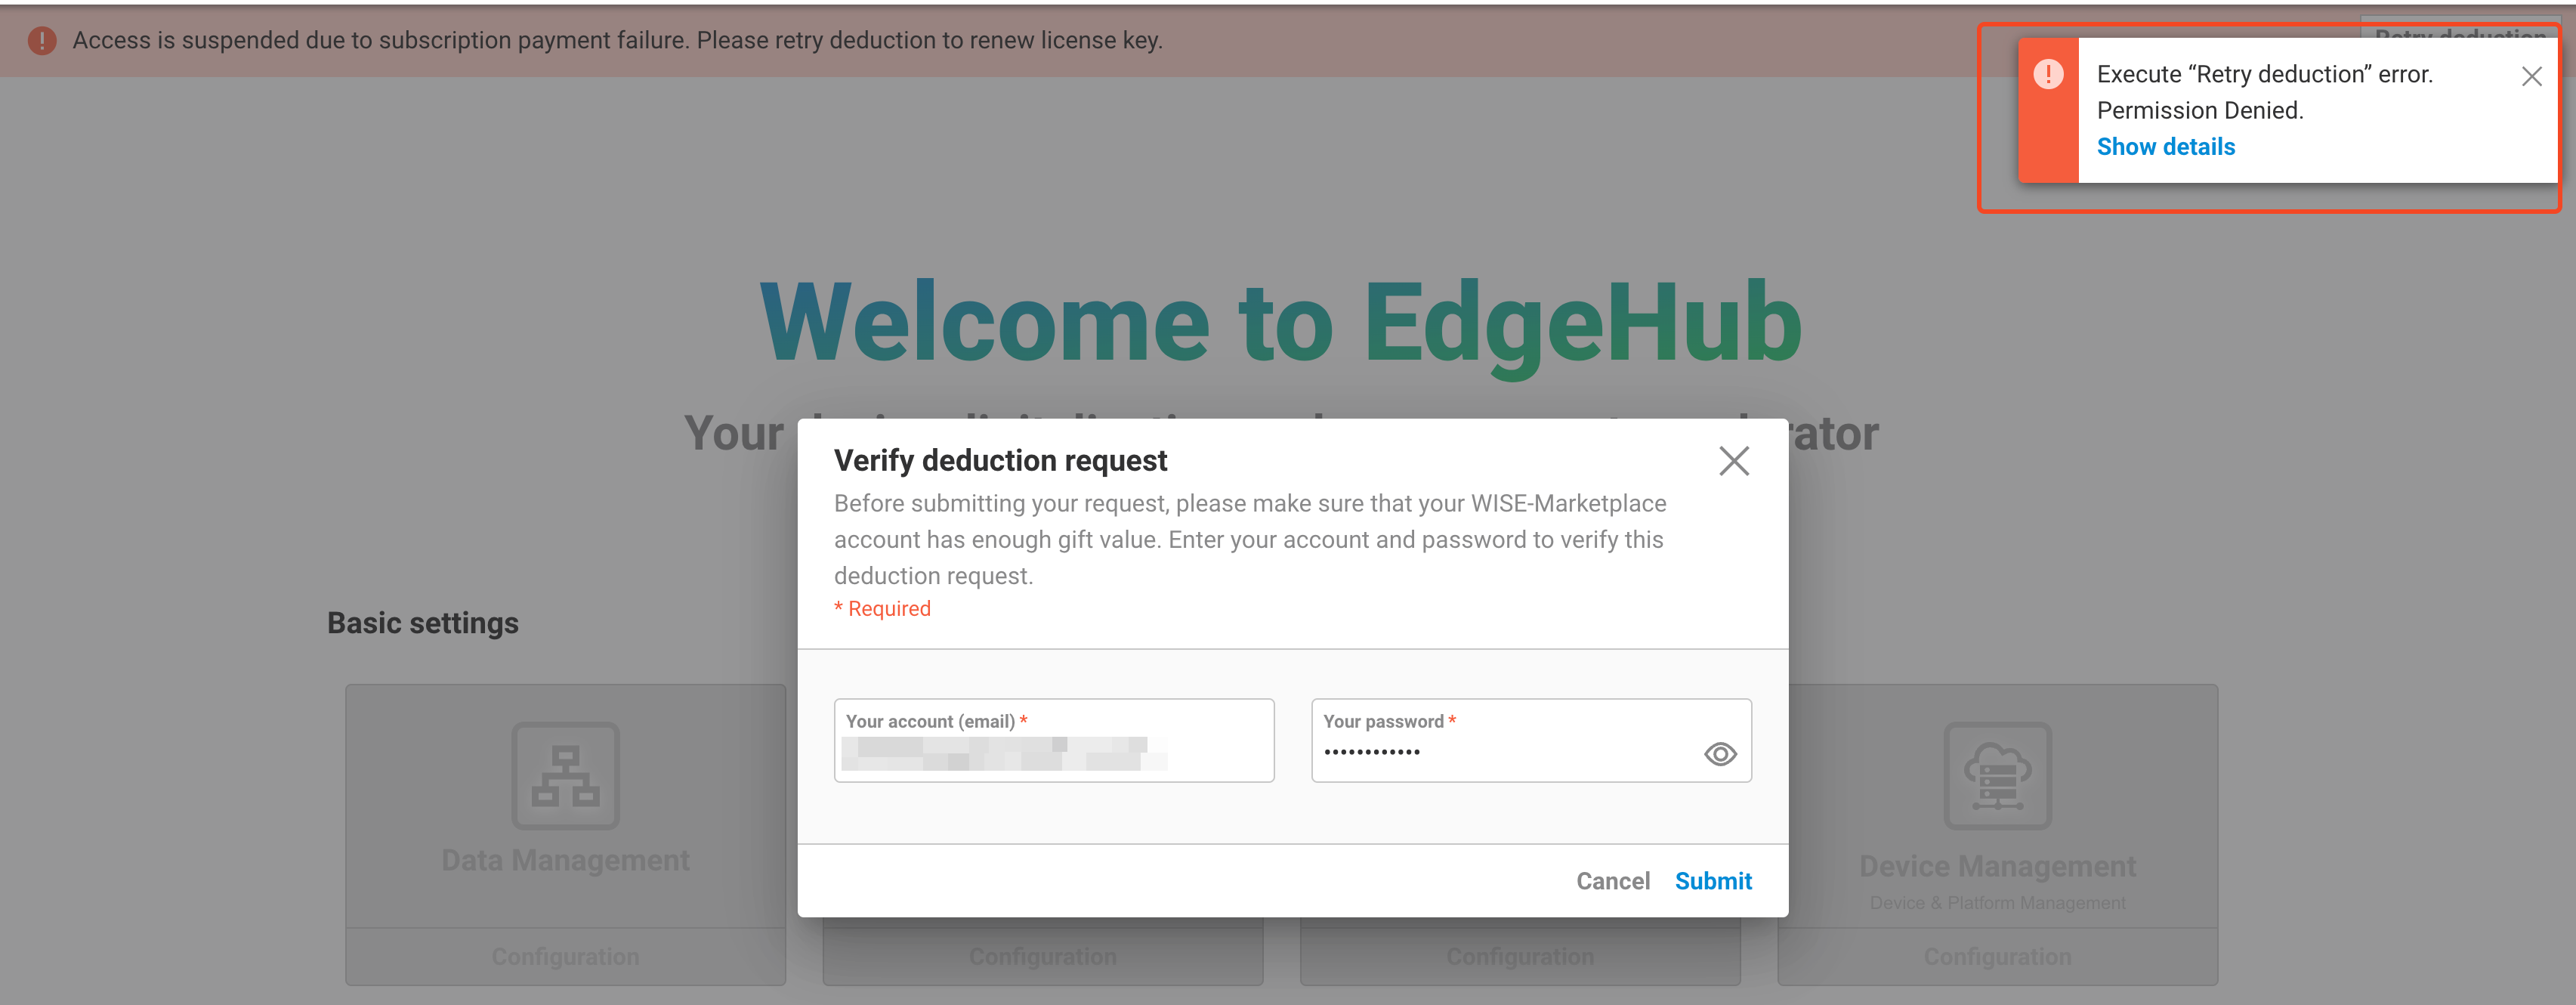
Go to the subscription tenant with the failed deduction. At the top of the tenant management interface, you will see a notification indicating the deduction failure.
-
Click the button next to the notification to start the retry deduction process. Note that you must first top up your account on Advantech Marketplace before performing this action.
-
A verification dialog will appear. Enter your username and password to authenticate. Note that the account entered here must be the
Tenant owneraccount to allow the deduction action.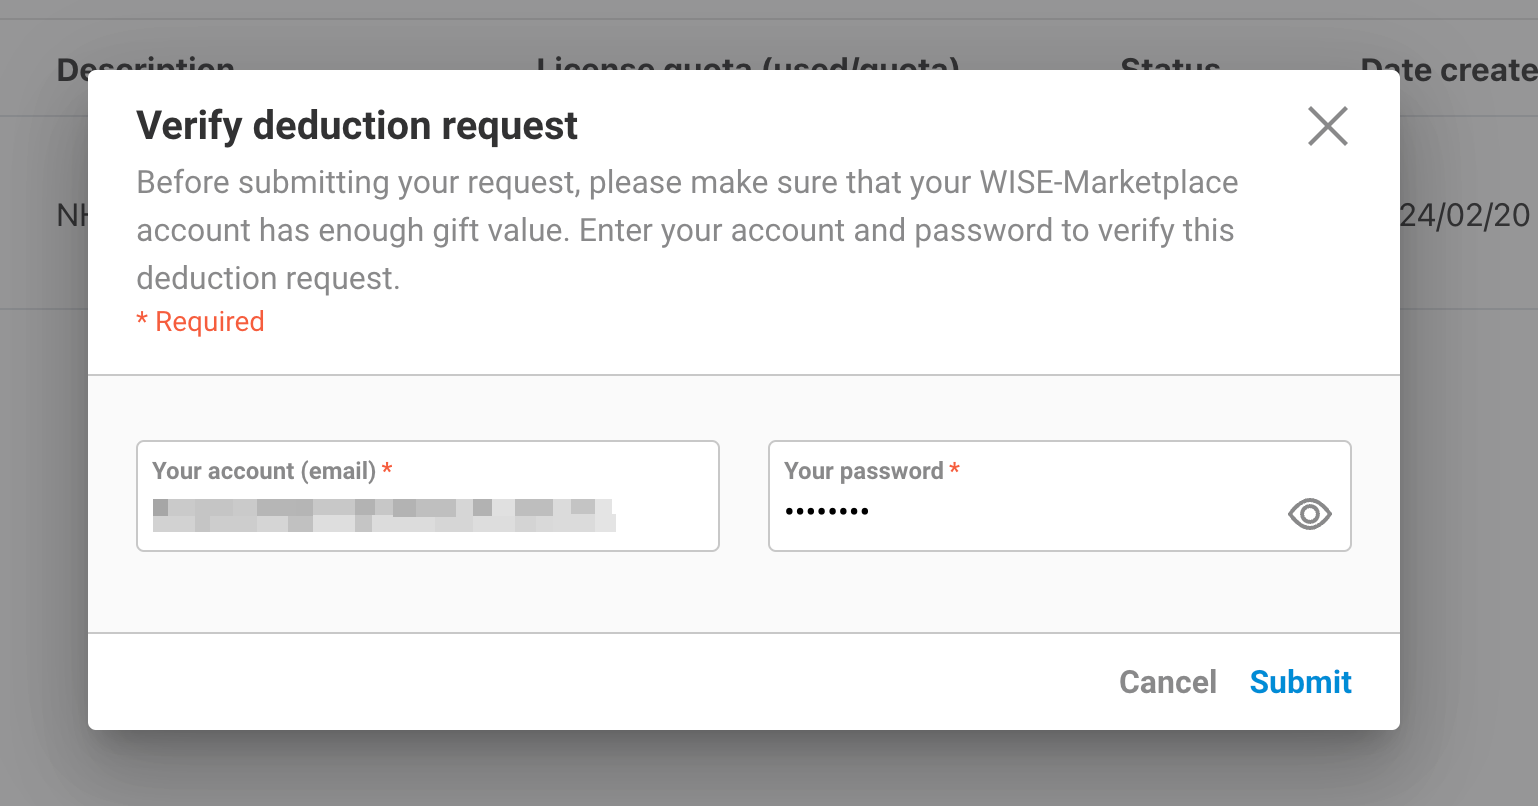
-
After verification, click
Confirm, and the EdgeHub backend will retry the deduction.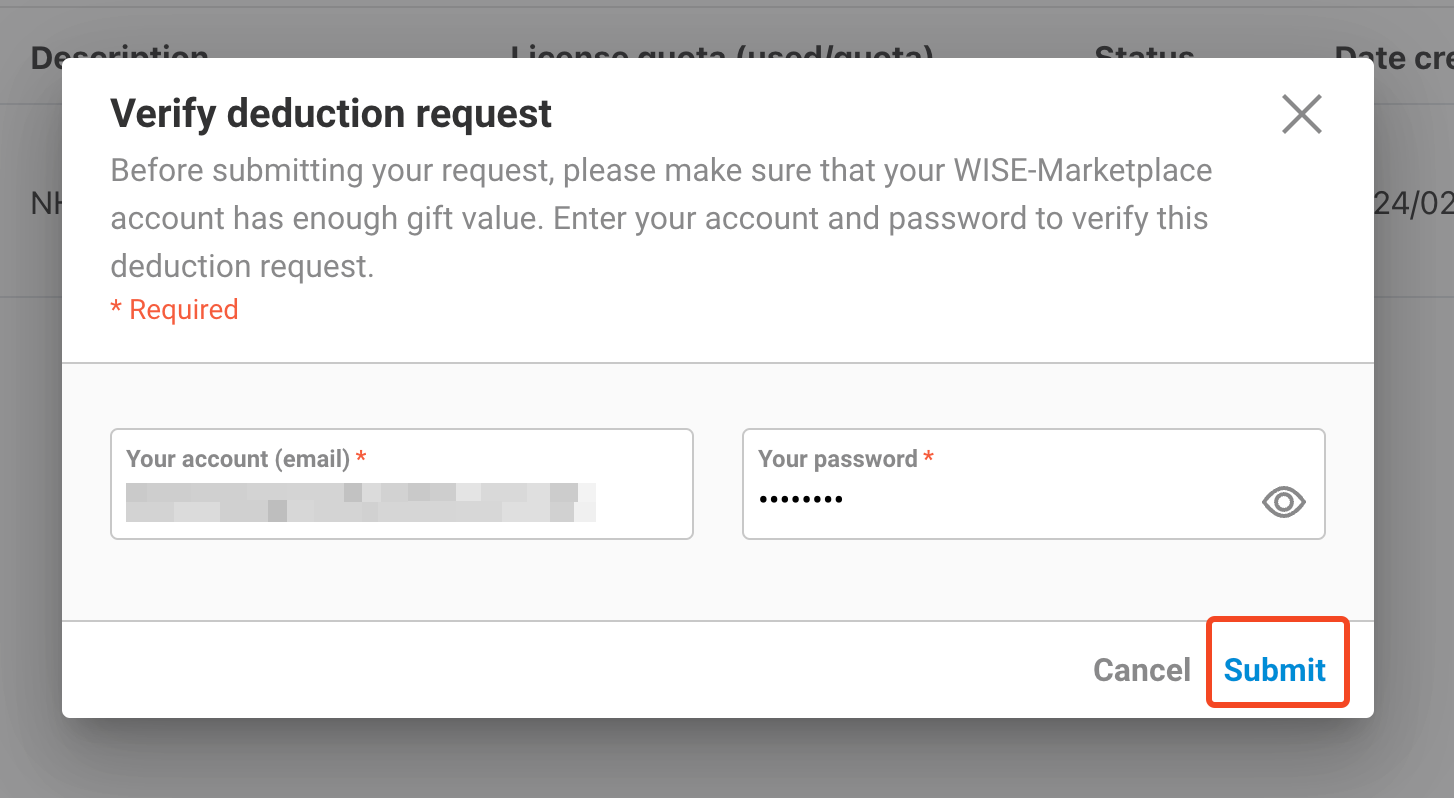
-
If the entered account is not the tenant owner, you will receive an error message, and retrying the deduction will not be allowed.
-
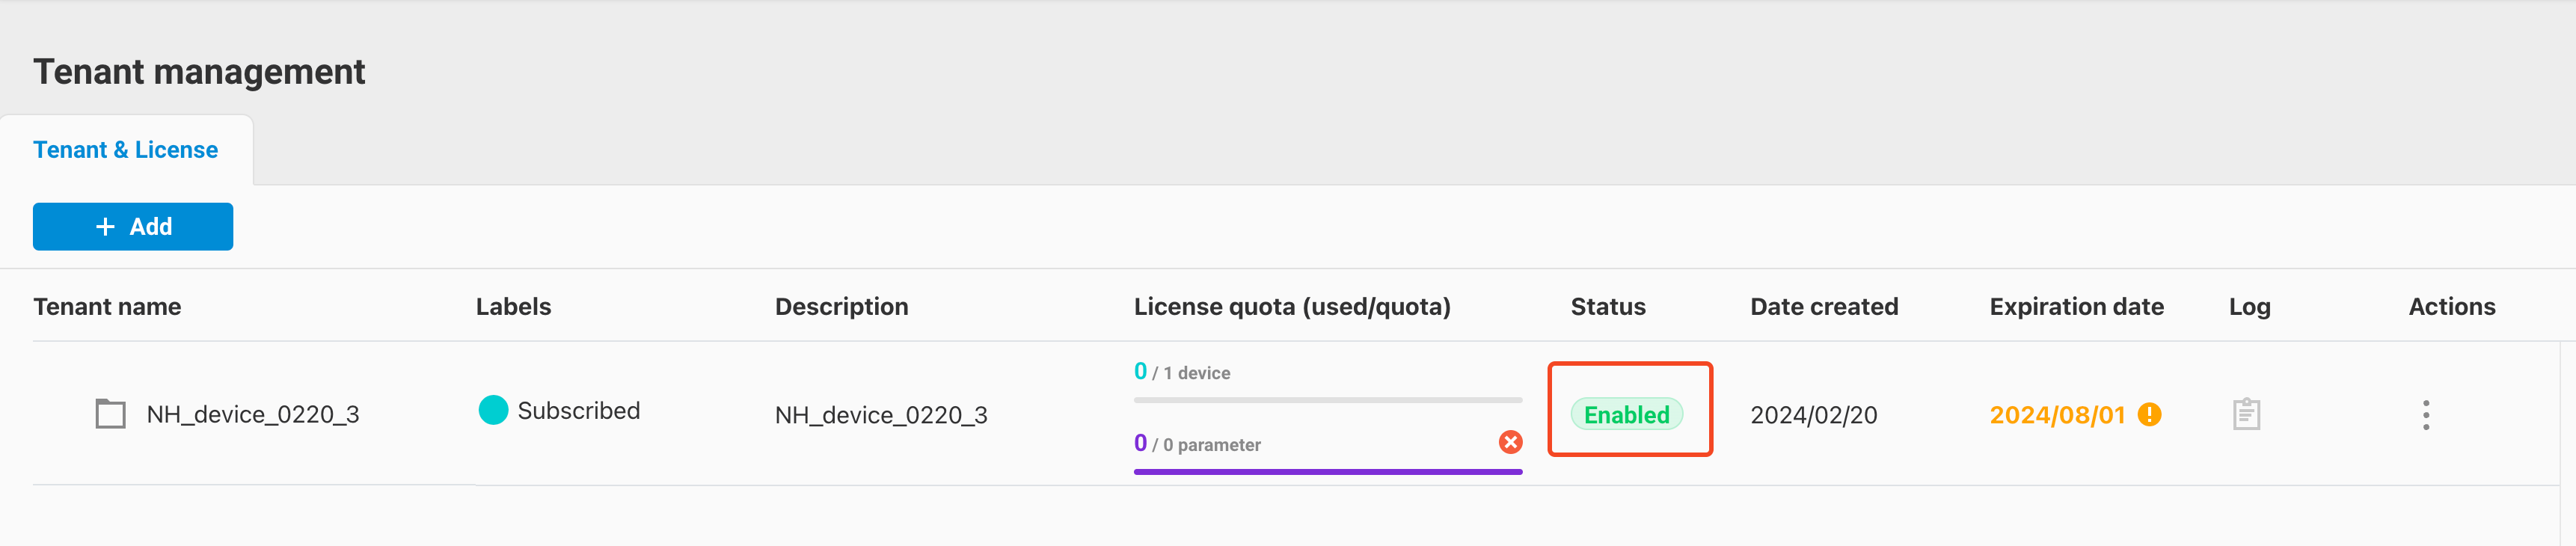
If the deduction is successful, the tenant’s status will revert to Enabled, restoring its original state.
9. Search / Filter
Starting from EdgeHub version 2.3, the Tenant List feature supports Search and Filter functionalities.
9.1 Search
The tenant list supports a search function, currently available for the following field:
- Tenant Name
Users can enter keywords in the search input field to perform a fuzzy search on tenant names. The detailed steps are as follows:
-
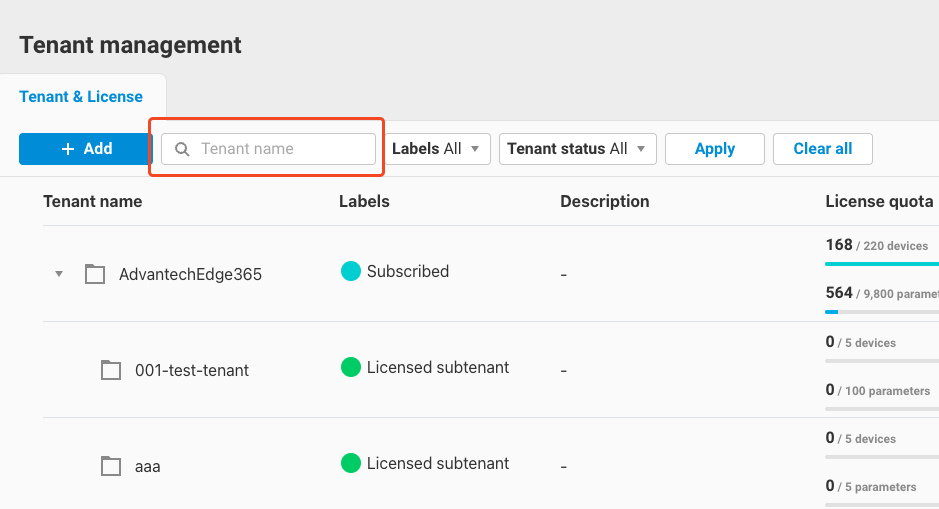
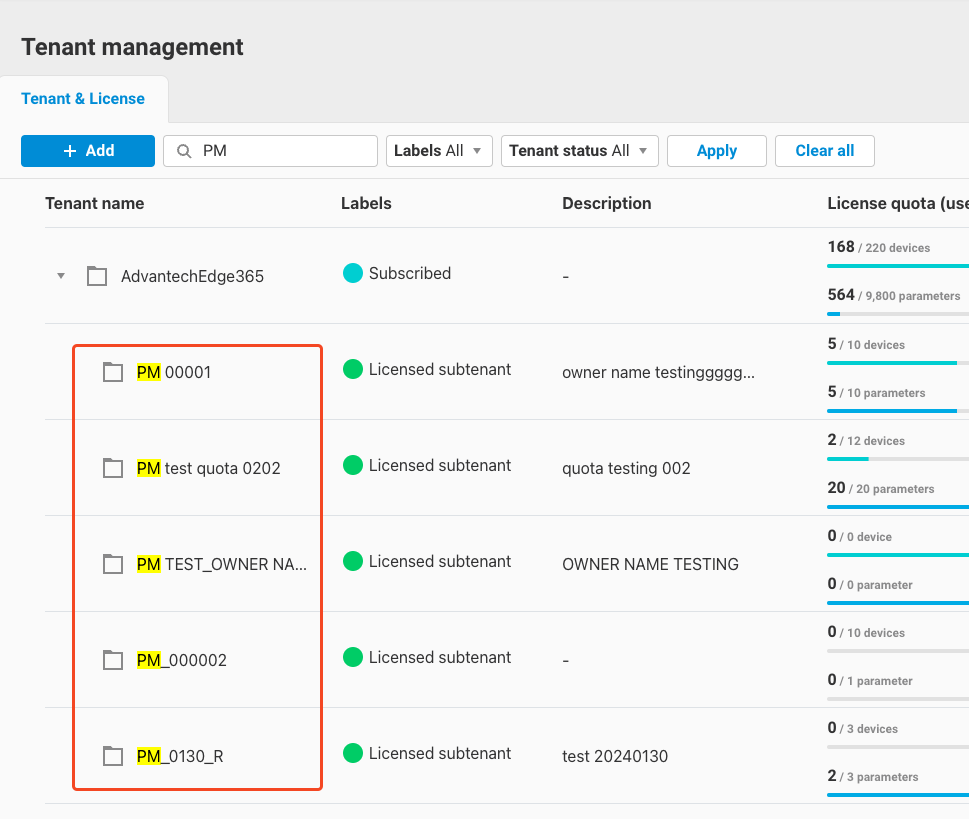
In the tenant list interface, click the search input field and enter the keyword you want to search for.
-
Click the
Applybutton to execute the search.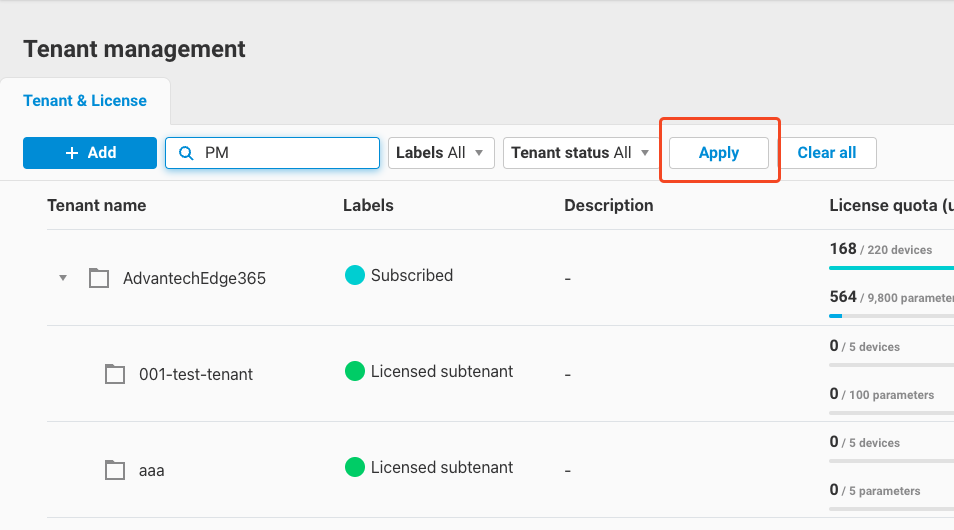
-
The tenant list will display tenants whose names contain the keyword, highlighting the keyword in yellow.
9.2 Filter
The tenant list supports filtering by the following fields:
- Tenant Labels
- Tenant Status
For details on these fields, please refer to Section 2.1. The usage instructions are as follows:
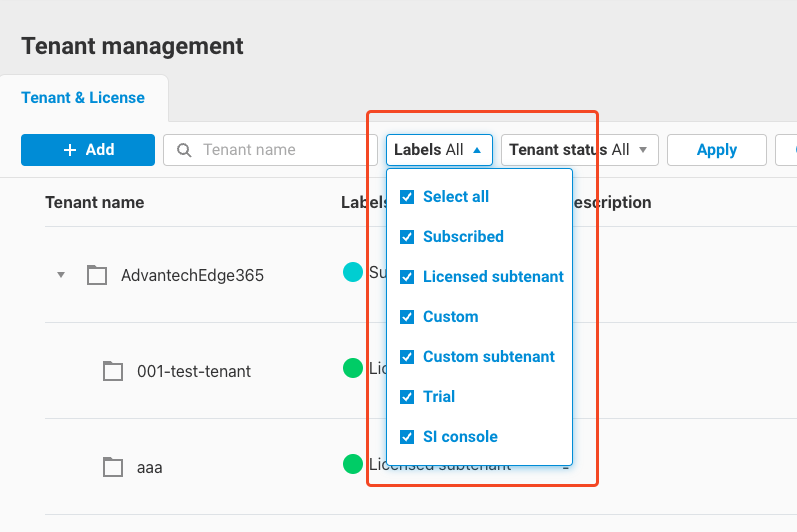
-
In the tenant list interface, click the label filter box to display a dropdown list of all available labels.
-
Select the labels you want to display, then click
Apply.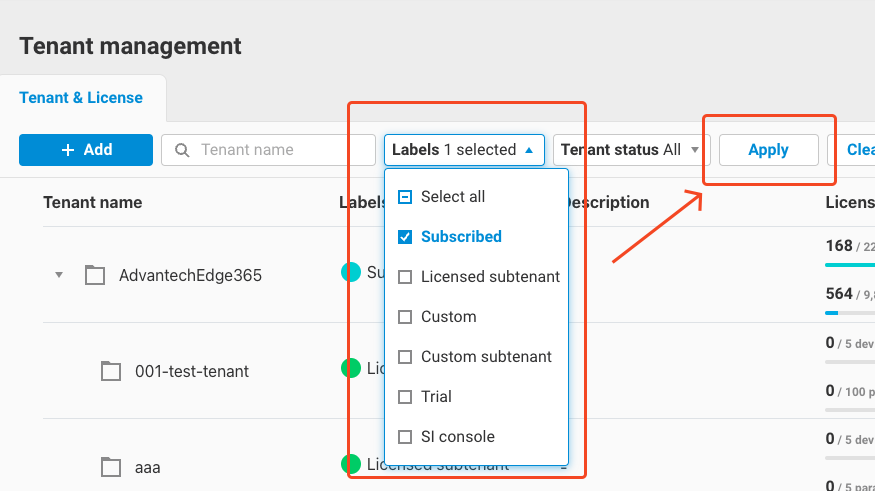
-
The tenant list will display tenants matching the selected labels.

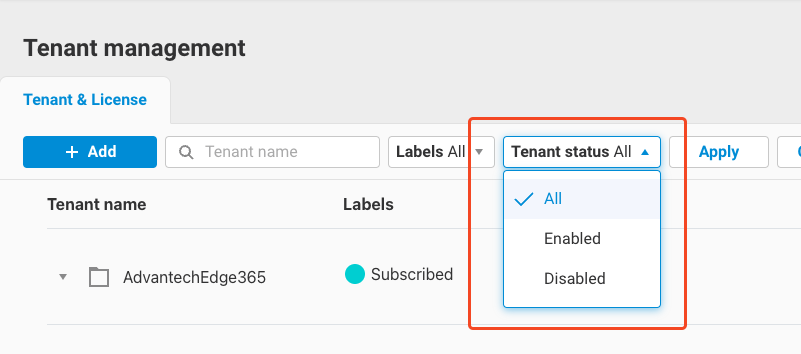
-
The tenant status filter works the same way. Click the status filter box to display a dropdown list of all available statuses.
-
Select the status you want to display and click
Apply.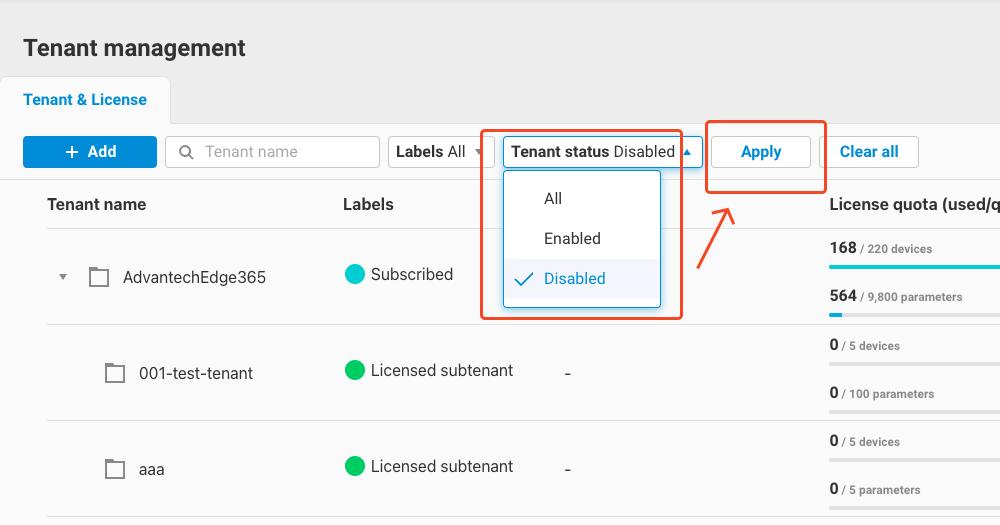
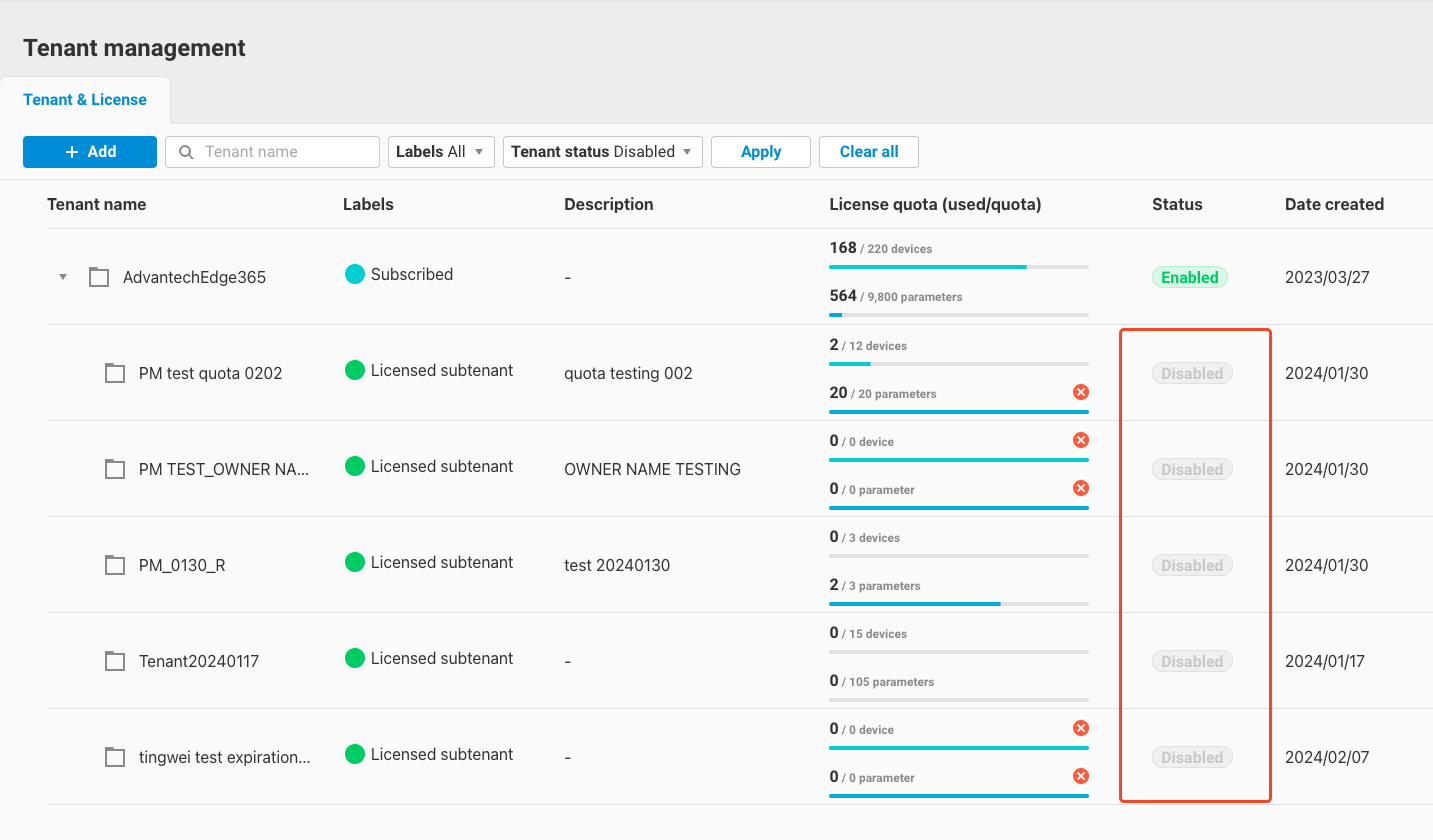
-
The tenant list will display tenants matching the selected status.
-
Finally, if you want to clear the search/filter results, click the
Clear allbutton to reset the list to its original state.
10. Log
Starting from EdgeHub version 2.3, the tenant list feature includes a tenant log functionality. It records tenant-related operations such as actions, subscriptions, and quota changes. The detailed log action types are listed below:
Action Type Description Created The tenant was created Create tenant A subtenant was created under this tenant Edited The tenant was edited Edit tenant A subtenant was edited under this tenant Status changed The tenant's status was changed Change status A subtenant's status was changed Delete tenant A subtenant was deleted under this tenant Activate license The tenant activated a license Unsubscribe license The tenant unsubscribed from a license Dispatch quota The tenant allocated a quota to a subtenant Revoke quota The tenant revoked a subtenant's quota Quota increase The tenant's quota was increased Quota decrease The tenant's quota was decreased Billing The system successfully/unsuccessfully billed a subscribed tenant Request renewal The tenant requested a renewal payment Renew The tenant successfully/unsuccessfully renewed Expiration updated The tenant's expiration date was updated Update expiration A subtenant's expiration date was updated Whenever any of the above actions are performed, the system records a log. You can view the logs as follows:
-
Click the
Logicon next to a tenant in the tenant list.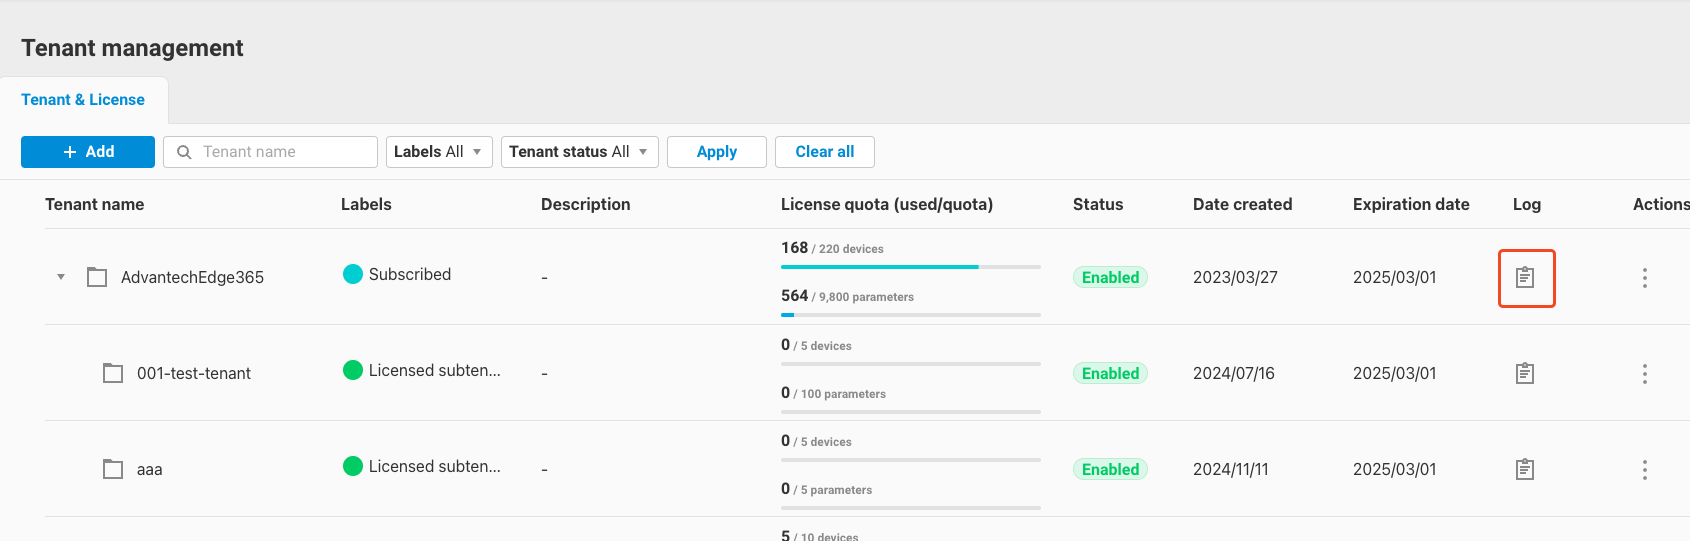
-
After clicking, you will enter the log page where you can view the log details.
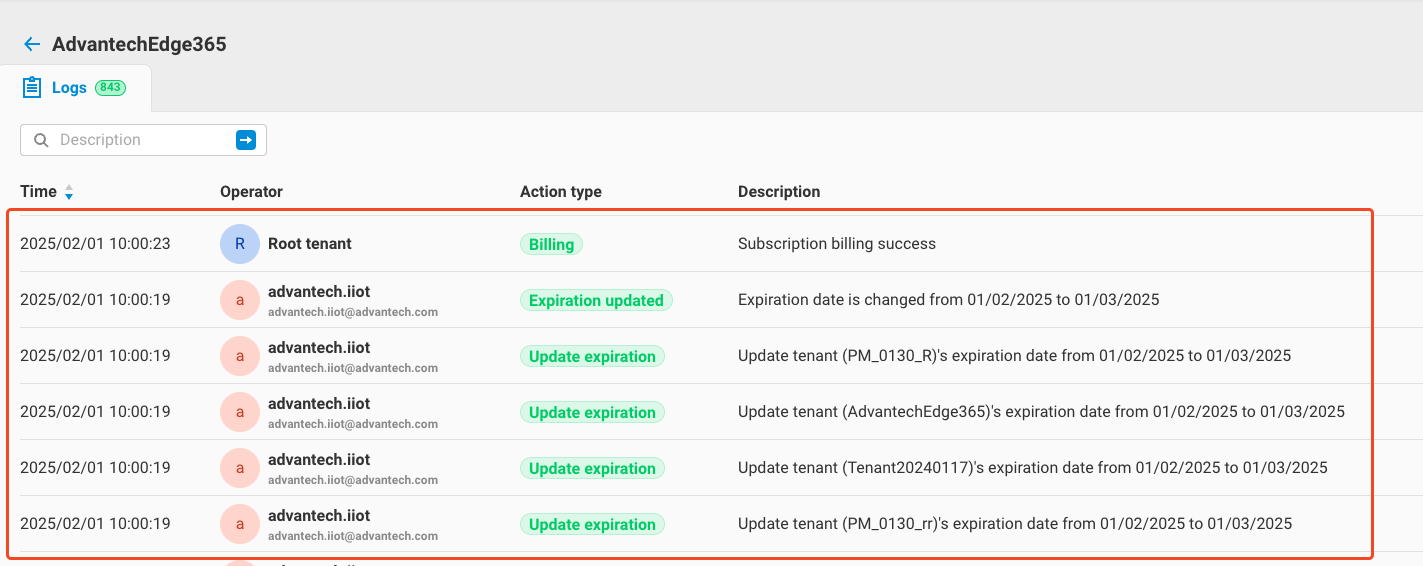
-
Users can also use the search function to perform a fuzzy search on the
Descriptionfield. Entering a keyword will return matching logs.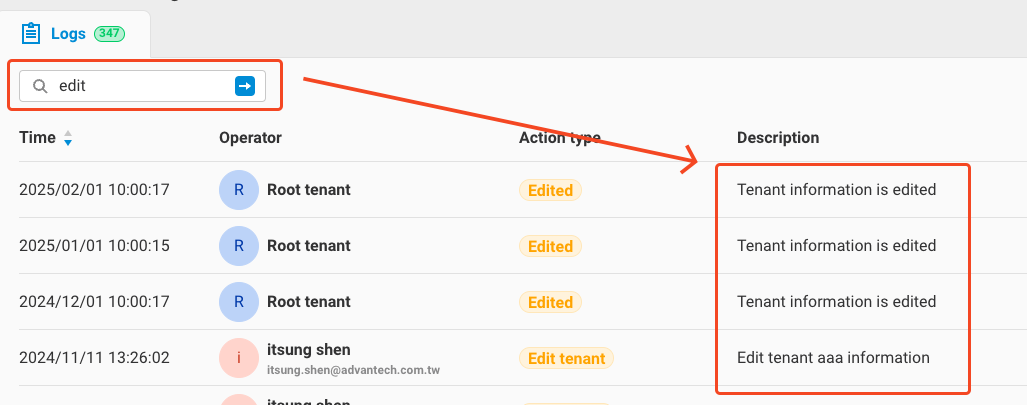
11. Delete Tenant
Starting from EdgeHub version 2.3, the following types of subtenants can be deleted:
- Subscribed
- Trial
- Custom
- Licensed Subtenant
- Custom Subtenant
Note that you cannot delete the currently active tenant. You can only delete subtenants under the current tenant.
Steps to delete a subtenant:
-
In the tenant list, click the
Actionicon next to the subtenant you want to delete. The dropdown menu will include theDelete tenantoption.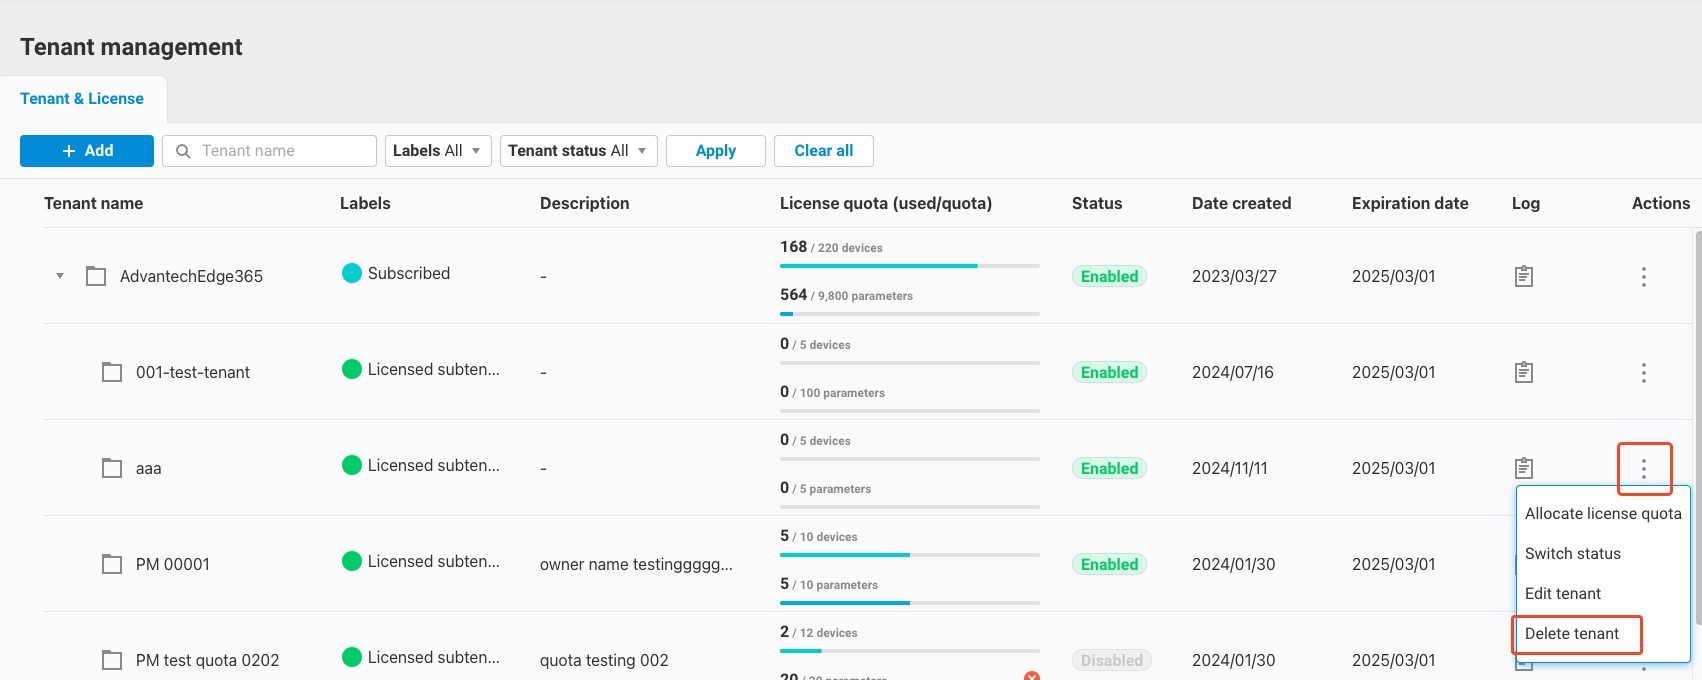
-
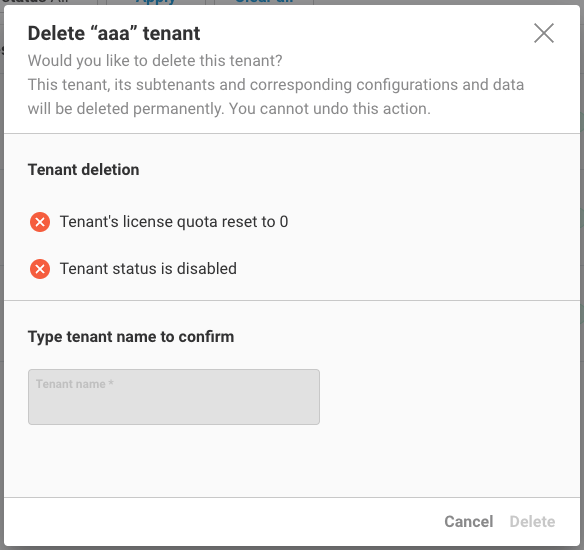
Selecting this option will open a dialog showing any prerequisites that must be met before deletion:
- The tenant's quota must be returned and reset to 0.
- The tenant status must be set to
Disabled.
-
Return to the tenant list -> Edit tenant -> Set the tenant's quota to 0.

-
Then go back to the tenant list -> Switch status -> Set the status to
Disable.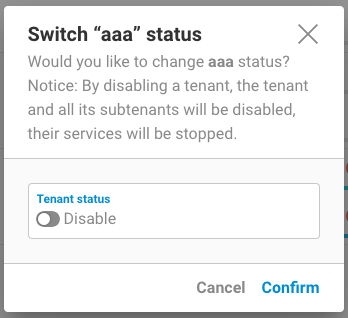
-
Return to the tenant list and confirm that the subtenant has a quota of 0 and is in a
Disabledstate.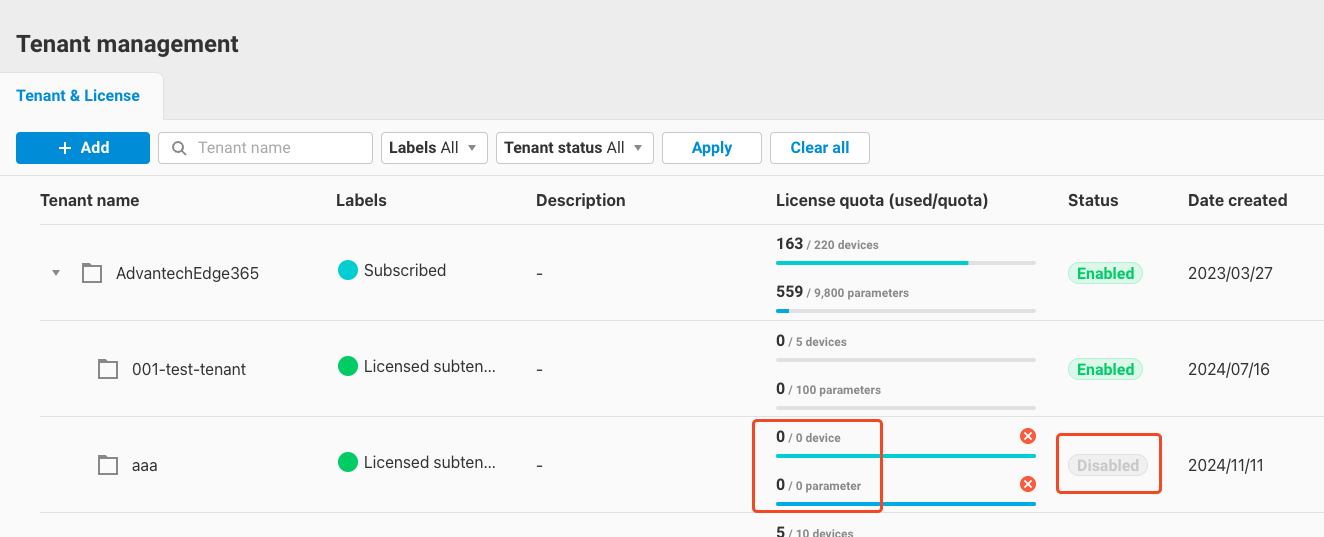
-
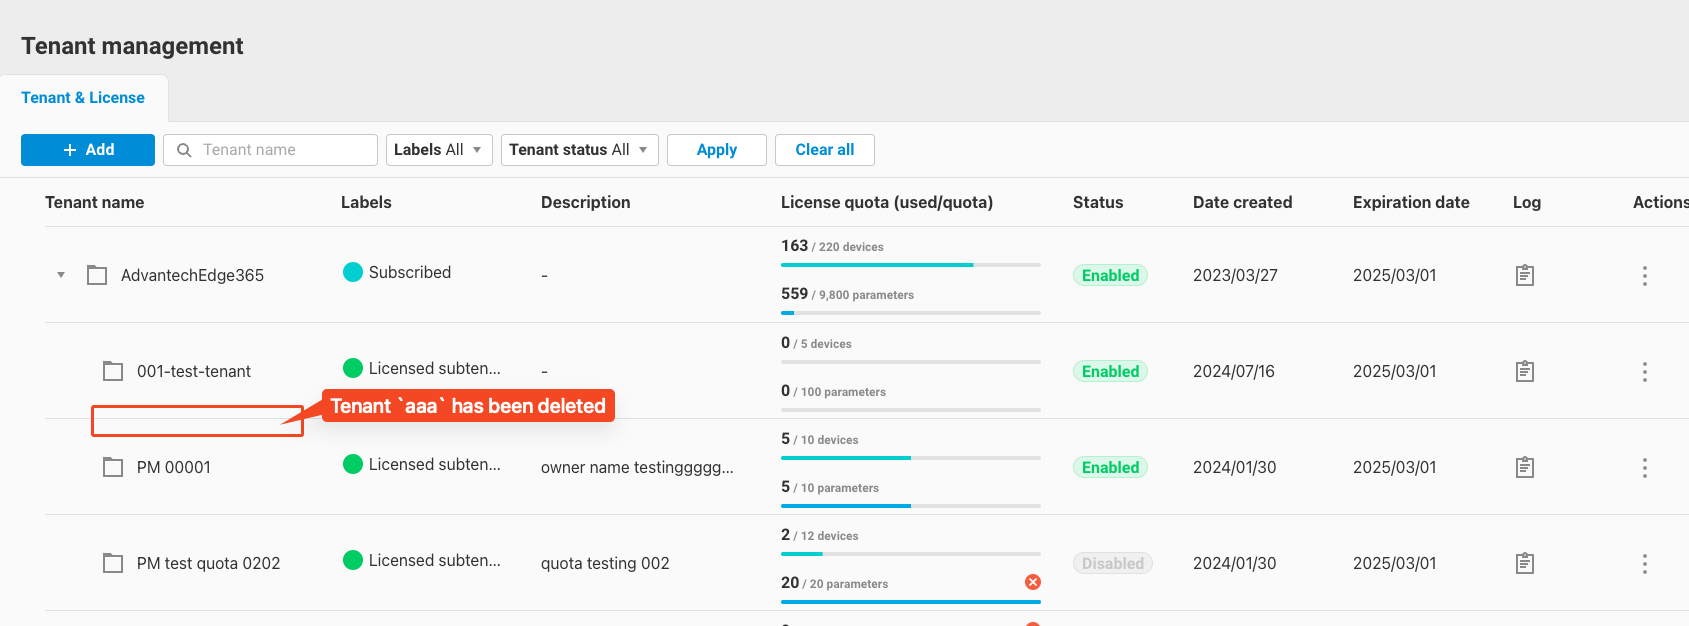
Select the
Delete tenantoption again. The confirmation dialog will now show that conditions are met. Enter the tenant name and clickDelete.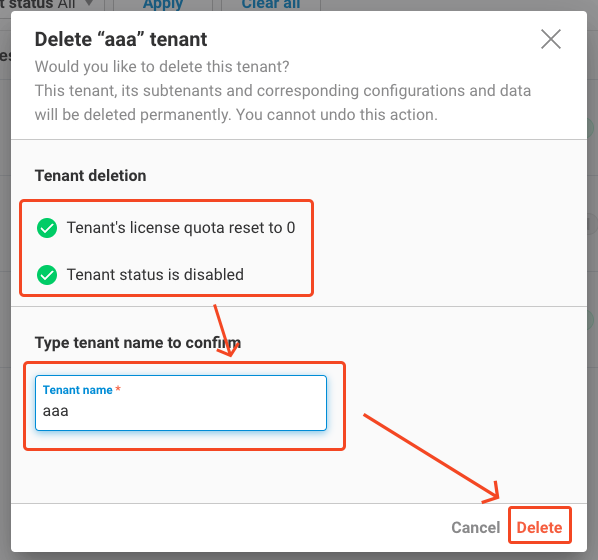
-
After clicking, you will return to the tenant list, and the deleted tenant will no longer appear.